Your computer’s hard disk drive (HDD) and solid state drive (SSD) hold a lot of sensitive data. Think about your account passwords, classified files, personal files, financial records, family photos, and Social Security Number – the list is endless.
Now, regardless of whether you want to simply delete a few old folders that contain sensitive data, or you want to sell your device, you want to be sure that the data is absolutely dead and completely erased.
It’s convenient to be able to save the data somewhere on your computer, but sometimes it’s necessary to delete all of your data so your privacy is maintained – and to do it securely. A tech-savvy person can restore a great deal of your personal data if you don’t securely erase it.
Only moving files to your “Trash” or “Recycle Bin” doesn’t do the trick, even if you remove or clean out the folder. The operating system doesn’t delete the file completely but rather removes the reference of the file.
The data of the file is still on the hard drive until another file is created over the old one. And still, sometimes the data might still be recoverable.
So, the question is: how can you securely erase your hard drive or solid state drive?
In this guide, I’ll explain to you the ins and outs of data deletion, and ultimately answer the question stated above.
Deleting Files on Your Device
Basically, every operating system and device has an option to delete files, such as photos, for example. Regardless of whether you have an Apple or Windows product, they both carry the same data deletion features.
Now, the question you might have: is using the data deletion feature on my device not enough to erase the data?
The short and simple answer is: no.
For most devices, if you tell the device to delete some data (be that images, videos, or folders), you’ll end up finding these files in a folder called “Recently deleted,” and it’s actually taking up space in that folder as well.
To no one’s surprise, operating systems are designed to do this on purpose. The purpose of moving “deleted” files from a certain location to another location is because many users accidentally delete files.
Both Apple and Windows have designated locations on their machines where files are moved to when they are deleted. For Apple users, this folder is called “Trash,” and for Windows users, the folder is called “Recycle Bin.”
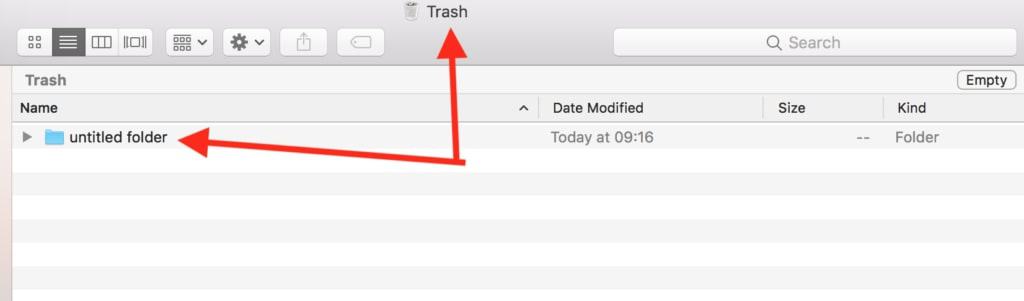
For example, if I want to delete an old folder on my MacBook’s dashboard, and I right-click the folder and select delete, I would merely move the folder from my dashboard to the trash folder. (I can also drag and drop the folder to the “Trash” icon in the Dock on the bottom of the Mac’s Desktop.)
The advantage of having such a “middle-man” folder before completely erasing files is that if I had any important files in the folder, I could restore the initial deletion and get my files back.
Imagine if I had some old-school photos in there or important datasheets for work. If I wasn’t able to restore it, I would lose it permanently.

In order to restore the folder, I simply right-click the folder and select “Put Back.” If I was sure that I wanted to delete the folder, I would simply click “Delete Immediately.”
So, now you’ve selected “Delete Immediately.” But is the folder actually deleted, as in, erased permanently from your machine? No, it’s still not erased.
Even emptying out the Trash folder is not “deleting” files permanently, as you might believe.
Data recovery software such as Stellar Phoenix Windows Data Recovery, Alsoft DiskWarrior (for Mac), or Kroll Ontrack EasyRecovery is designed to scan through the remainders of old hard drive sections, especially sections that were previously formatted. These software tools are able to puzzle an entire picture together using little pieces of data.
Although this software can be very handy to recover personal or business data that was accidentally deleted, it can also be used by criminals to get their hands on your data.
That means that emptying the Trash folder seems like a good solution (which it is), but it’s by no means an option to permanently delete your data.
Why Formatting Your Device Isn’t Enough
The format feature is one of the most commonly used methods in order to delete large quantities of data off of a hard disk drive.
On Windows machines, the format feature offers two options to erase data from your hard drive, but neither of these options provides the best end-all solution to erase your data completely.
The “Perform a quick format” option is technically not much different from emptying the Recycle Bin on your device. The data formatted with this option can be salvaged and restored easily with the previously-mentioned software.
The format feature on Windows computers has an option to run a full formatting process. This process is called a single “Write-Zero” pass.
“Write-Zero” is a data sanitization method that overwrites the existing information on a hard drive with zeros (obviously).
That means that after the first deletion pass, every character on the drive is a 0. However, after the first pass, the method might overwrite the existing information with a different character than zero. The method doesn’t follow a common way or pattern when doing overwrite passes.
Write-Zero passes are quite effective, but again, the data recovery tools mentioned earlier are designed to counter such methods and are able to put together small pieces of data to create one large file.
Secure Deletion Software Methods
In order to counter software used to restore data, there’s software available on the market that will assist you in permanently erasing data on a hard drive or SSD.
With a ton of different software providers that provide solutions for specific hardware, operating system, version, etc., it may be hard to find the right one.
There are various methods you can use to securely erase data on a hard drive or SSD. Here are the most notable ones:
- Secure Erase passes
- File Shredding
Every software tool has its own pros and cons. It comes down to how you want to delete your data, how reliable the deletion method is, and what type of driver(s) you’d like to erase.
For example, some software tools are only able to erase an entire drive as a whole, but if you’re looking to only delete a certain portion of a drive, you might need a different tool.
Secure Erase Passes
The Secure Erase pass method is different because it doesn’t require re-verification, as opposed to the Write-Zero method described earlier.
The command to delete the data also comes from within the drive itself, meaning the drive’s write fault detection can prevent missing any sections that need to be passed, which is an extra security feature in terms of secure data deletion.
The security feature is able to detect whether all sectors within the drive have been overwritten in the passes; otherwise, it might need to run another pass-cycle.
This means the drive’s write fault detection prevents any misses. This makes Secure Erase very fast compared to other data sanitization methods and arguably more effective.
The biggest disadvantage of the Secure Erase passes method is that it’s only helpful if you want to erase a drive entirely. The method doesn’t allow you to go through the drive to prevent certain files and folders from being erased permanently.
File Shredding
File Shredding, a digital shredder, is a software tool designed to render files and folders unreadable. It’s similar to a conventional physical shredder that you’re probably familiar with. The unique thing about file shredding is that you can choose to only shred certain data instead of wiping the whole drive as other methods require. We’ll discuss more about file shredding in the “Other Tools to Use to Wipe Your Windows Hard Drive” section.
How to Erase Your Hard Drive: Step-by-Step Guide
Below, I’ll explain how to erase the data on your HDD completely for both Apple and Windows operating system users.
Let’s start with macOS.
Operating System: macOS
While erasing the hard drive via formatting is an insecure method for Windows devices, it’s completely secure for Apple devices, so that’s the method I’ll be explaining how to use.
In order to erase all of your data completely from your iMac or Macbook, simply walk through the following steps.
- Shut down your device completely.

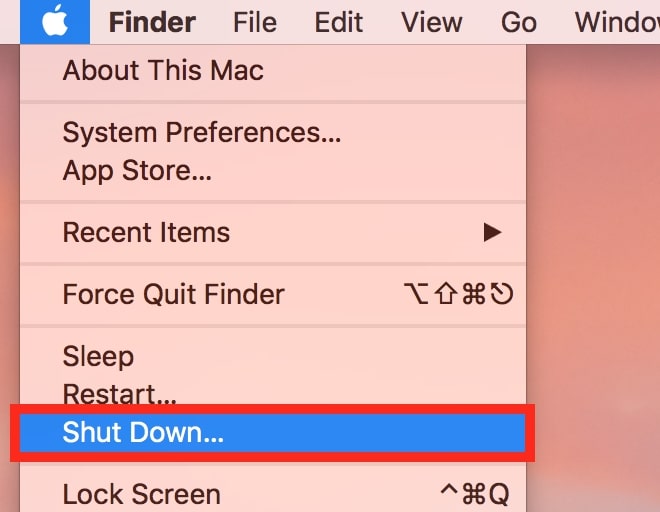
- Restart your device while holding both the CMD (command) and R buttons simultaneously immediately after hitting the power button.
Note: it’s important to hold the CMD + R keys before you hear Apple’s startup sound. Otherwise, you’ll need to start over.

In the selection menu that shows, click “Disk Utility.”
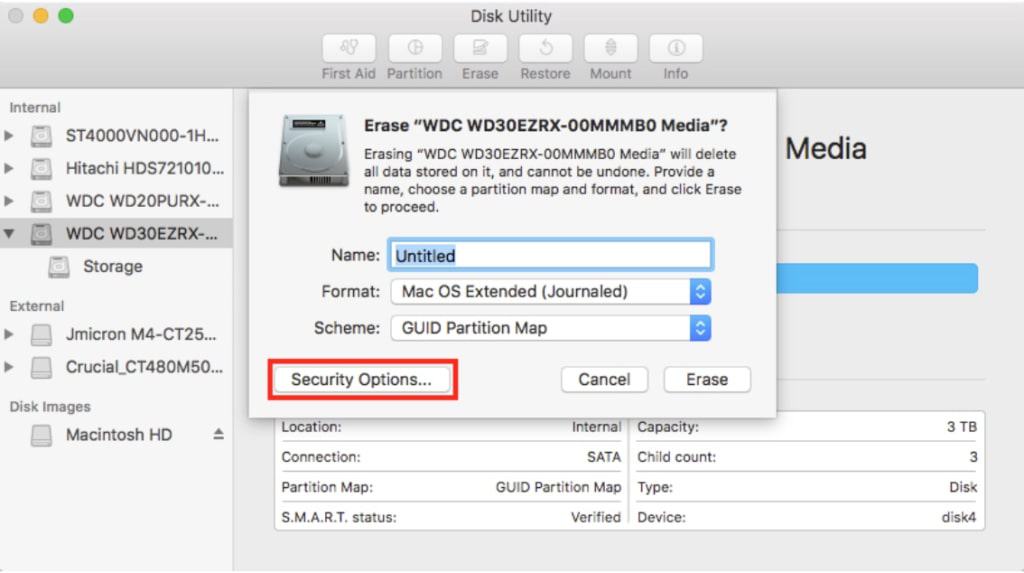
- Next, unfold the main (internal) disk drop-down and double-click the HDD you want to delete. In the example, it’s the “WDC WD30EZRX-00MMMB0 Media” disk.

- Once you’ve selected the HDD you want to delete, go to the top of the screen. Find and click the “Erase” button.
- In the next window, you have to choose a name, partition map, and format method. Click on “Security Options” to choose a formatting method.

- In the “Security Options” screen, drag the slider all the way to the right. This will ensure that the “Most Secure” formatting method will be used.

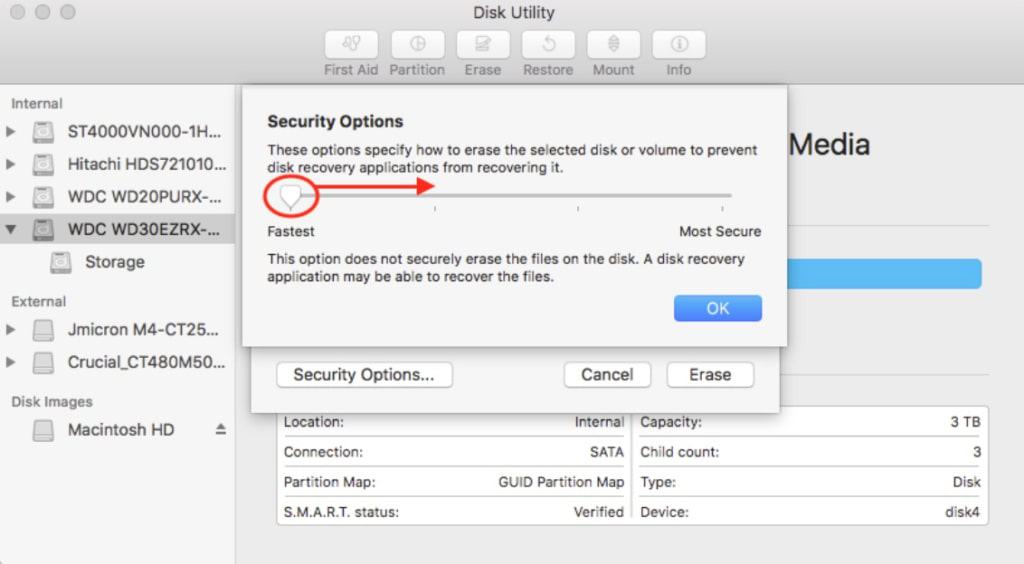
The “Most Secure” option meets the U.S. Department of Defense 5220-22 M standards, so you can be sure your HDDs and SSDs will be erased securely.
The option will run seven passes to overwrite the data on your hard drive, which makes it basically impossible to restore, even with special recovery software.
After you click “Erase” one final time, your files will be deleted. Remember, this deletion can’t be undone!
Operating System: Windows
Windows users have more options to erase data with third-party software, as the operating system itself doesn’t provide the same features and security levels as macOS.
Unfortunately, the formatting function on Windows devices isn’t the most secure option to erase data. You can delete a good chunk of data using that method, but it’s likely to be recoverable with the help of advanced data recovery software.
Darik’s Boot and Nuke, often referred to as DBAN, is a great application that allows you to completely erase all of your data.
DBAN has been around the block for quite a few years now, and it deserves to be at the top of this list. It’s free, incredibly easy to use, and it works perfectly.
The only disadvantage of DBAN is that the tool isn’t compatible to securely erase SSDs, but if you’re looking for an HDD data removal tool, this is for you.
So, my favorite software tool to erase data completely is DBAN. After the step-by-step explanation, I’ll list some alternatives.
Let’s get started:
- Download DBAN via the website’s download link.


- After you’ve saved the file to your computer, you can either burn DBAN to a CD or burn the ISO file to a USB drive.
Note: Rufus is a great tool to get the job done. It’ll assist you in transmitting the ISO file correctly from your download folder to the USB drive, so DBAN will work properly.

- Next, plug in the USB device or insert the CD.
- Now, restart your computer.
Just let your computer start up like it normally does. The CD or USB will launch DBAN automatically. If nothing happens, something went wrong in the previous step.
- Choose an option from the DBAN Main Menu.
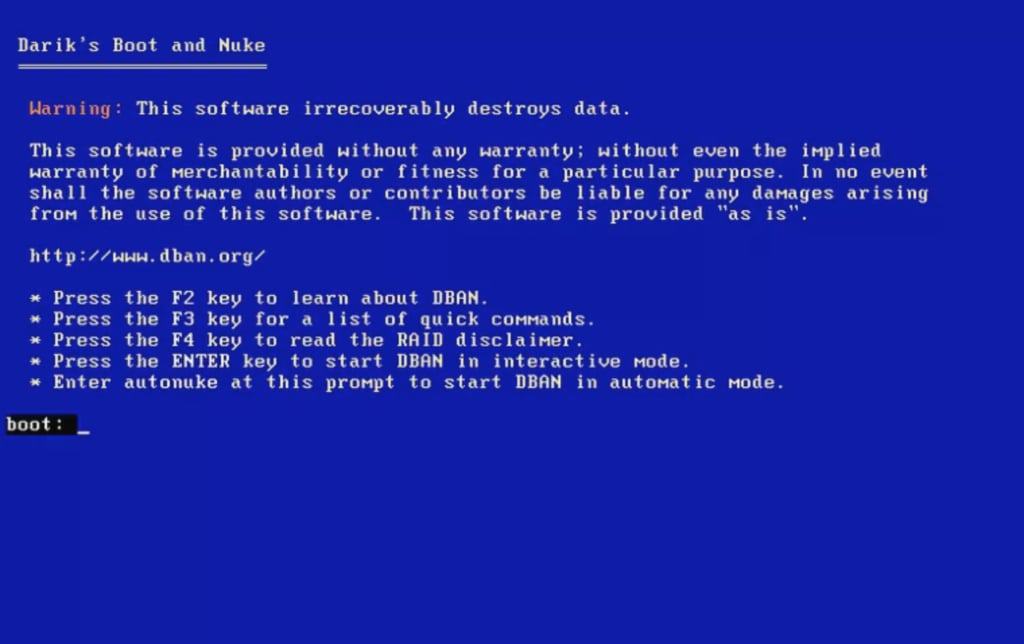
Important note: DBAN will irreversibly erase all of the files and data on the selected hard drive. So, make sure to triple-check if you selected the correct drive!
You can navigate through the interface using your keyboard, as the mouse function is disabled.
- Press F3 to enter DBAN’s list of quick commands.

- Next, select DBAN’s recommended “dodshort” command as the data deletion method.
- Press F1 to continue.
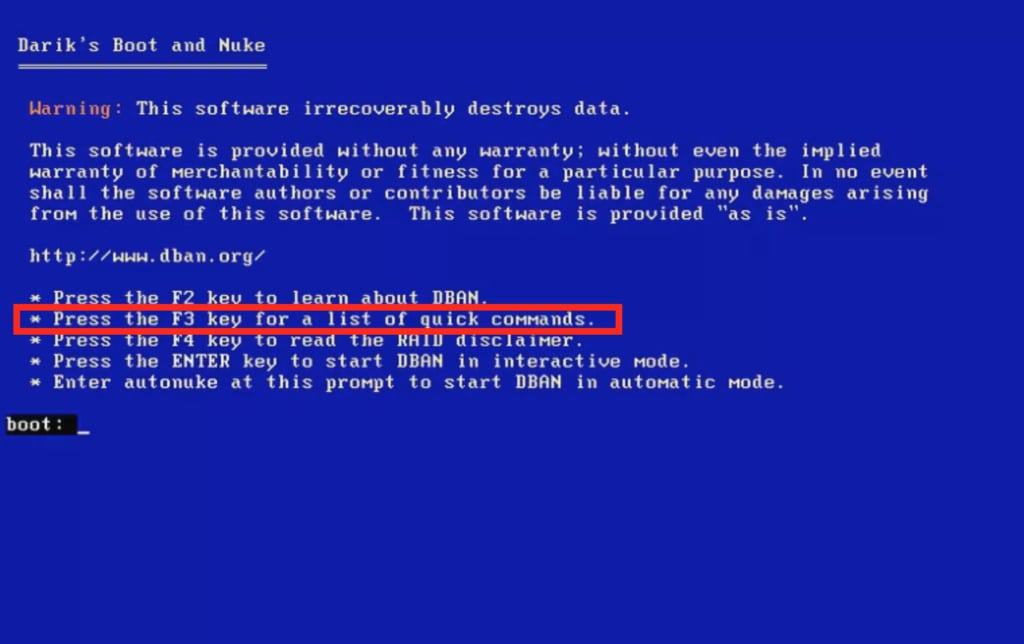

Autonuke, the method mentioned in the menu, is pretty much the same as dodshort. All of the other methods are optional. For example, “quick” stands for the “Write-Zero” method, and “gutmann” stands for the Gutmann method (this method runs a certain number of passes).
- Select the hard drive you want to erase in the “Disks and Partitions” section.
- Press F10 to start the data deletion process.

You’ll have to let the data deletion process run until it’s completed. During the process, you can’t stop, pause, or cancel the process.
- Then, you’ll see the “DBAN succeeded” message.

At this point, the data has been erased completely from your HDD. So, you can follow their instructions “Press any key to continue” and restart your computer. (Don’t forget to take out the CD or USB first).
You can also opt for other third-party software applications, which basically do the same thing. These software tools are also generally user-friendly and will make it quite easy for anyone to delete files permanently.
Other Tools to Use to Wipe Your Windows Hard Drive
Aside from DBAN, here are some of my other favorite (and free) tools to get the job done:
Eraser

Eraser is a free and open-source security tool to completely erase all of your sensitive data from your Windows hard drive.
Eraser is a great tool because it will overwrite your hard drive multiple times in various different selected patterns. This method will assure that everything is deleted and shredded from your hard drive.
The tool offers a few helpful advanced features (which aren’t that advanced). But you can, for example, select different files, locations, and erasure methods. Also, you can schedule erasure of your files, your device’s Recycle Bin, or other disk space.
You can download the latest release of Eraser (currently version 6.2.0.2993) on their download page.
Active@ KillDisk

As stated on Active@ KillDisk’s website:
“Powerful and compact software that allows you to destroy all data on Hard Disks, SSD & USB disks completely, excluding any possibility of future recovery of deleted files and folders.”
The incredibly large number of write-zero passes this software does on a hard drive launched KillDisk to the absolute top of the charts in the data deletion sector. The tool has quite different pass options for how you want to overwrite your hard drive.
It’s compatible with Windows XP/Vista/7/8/10 (32- and 64-bit) and Windows 2003/2008/2012/2016 servers.
Visit Active@ KillDisk’s website for more information.
FileShredder
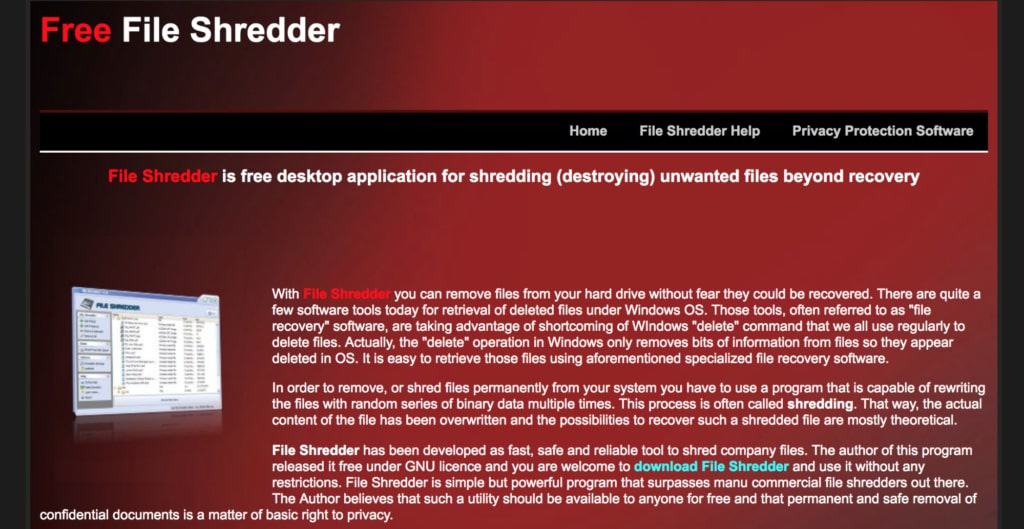
Don’t be fooled by the old-looking design and simple interface that has served as the face of FileShredder’s website since 2007.
Even though it’s one of the oldest software providers in this industry, it’s still one of the most powerful and thorough data deletion tools available (and it’s free!).
In order to erase all your data, the tool uses five algorithms to overwrite your disk. Due to its high quality of deliverables, reliability, and sheer efficiency, FileShredder is a highly-rated and well-known data deletion software tool.
And all of that comes in a software package of only 2.3 MB.
For more information, visit File Shredders website.
File Shredding Utilities for macOS
There are several utilities for macOS that allow you to easily “shred” your files. I would like to share my favorite “shredder.”
CleanMyMac X “Shredder”
My favorite file shredder is included in a suite of features offered in MacPaw’s CleanMyMac X app. The app’s “Shredder” feature allows you to pick and choose which files you’d like to permanently and securely delete from your hard drive.
CleanMyMac X also offers a number of other features to manage your Mac’s disk drives. The app also allows you to delete mail attachments, clean up system junk to regain disk space, scan for malware, optimize your system, and much, much more.
How to Erase an SSD
The process of erasing data on a solid state drive (SSD) works slightly differently in comparison to erasing data on a hard drive.
The biggest difference is in the structure of the solid state drive and how it’s designed. The fundamentals of the wear-leveling systems are very different on USB flash drives as opposed to hard drives.
Wear-leveling is a technique used to prolong the service life of erasable computer storage media. Flash memory is an example of that.
When you want to erase data on your solid state drive, you have two options.
Read and Follow the Manufacturer’s Guidelines on Erasing Data
For the first option, simply visit the website of the manufacturer of your solid state drive. Usually, the manufacturer has a section on the website dedicated to updating firmware and performing tasks like software deletion.
The section often includes some type of software, built by the manufacturer, to help you delete data permanently. It’s often dubbed “toolbox.”
For example:
Is your SSD not listed? Visit TweakTown’s website. TweakTown published a round-up for eight of the most popular solid state drives.

Download and Use Third-Party Data Deletion Software
In case you’re still not able to delete the data successfully from your solid state drive, and assuming your manufacturer doesn’t provide proper solutions, you can download third-party software to assist you.
Enter: PartedMagic

PartedMagic has many features as an all-around hard disk management solution. One of its strong suits is the “Disk Erasing” feature. It works with both HDD and SSD.
It’s very easy for anyone to use because the tool doesn’t require a whole lot of technical knowledge.
Also, you don’t need to install any software. The tool runs on a Linux-based piece of software that works on a USB drive or CD.
In order to download PartedMagic, visit their download page. If you’re not familiar with this type of data deletion software, simply walk through the easy-to-follow guide created by PartedMagic to run the software and successfully erase your data.
The only disadvantage of PartedMagic is that it’s not free. The subscription software is priced at $13 quarterly or $49 yearly. You can also do a one-time purchase of PartedMagic, but the $15 fee doesn’t include future updates.
The Last Resort: Physically Erase Your Data
The undeniably best method to erase all your data for good and to make sure it’s absolutely gone is to simply destroy the drive by brute force.
It goes without saying, but this method is only an option if you are okay with getting rid of the drive entirely in the process.
In case you were planning to take your drive to a recycling plant, this method is great since it’s better to destroy the drive completely before bringing it there.
Also, for this option, you have a few ways to go about it.
Magnets
Powerful magnets are super effective when it comes to data deletion. Simply wipe your drive with the magnets in order to scramble the data.
It’s effective because data on drives are magnetically written, so that means that if you mess with the magnetic fields on a drive, you’ll jumble up all the data.
Hammer Time
Do I need to explain? Kill two birds with one stone.
The primary benefit is that you can swing your 40 oz hammer on the drive to destroy all the glass platters in an instant.
The secondary benefit is that you get to take out your daily portion of frustration at something that was bothering you on the drive! I have to admit, it feels good sometimes.
Note: Be safe and wear safety goggles and gloves. If you record a video of the drive destruction, keep your camera or smartphone a safe distance to protect it against shrapnel.
Screwdriver
A less violent, yet highly effective method is to take the drive apart piece by piece with a screwdriver to make sure you’re completely destroying the drive.
It depends on the drive what special Torx screwdriver you’ll need to take it apart. I would say somewhere between T4-5 and T9 would do the job.
You can also drill out the screws with a bit more force, but again, make sure to use safety precautions if you’re removing them with force.
Just make sure to put the parts in separate bags if you take them to a recycling plant, bury the parts in different locations, or scatter them to the wind. (The recycling option would probably be the most eco-friendly one, though.)
Like I mentioned before, these last-resort methods are like killing two birds with one stone. You can be absolutely sure that the data is deleted permanently if you resort to one of the physical solutions.
On top of that, it’s a great way to relieve stress and some pent-up frustration.
Let’s Recap
Erasing all the data on your hard drive or solid state drive isn’t as simple as many people think. It requires quite a bit of effort to delete data, and more importantly, to make sure it’s not restorable by tech-savvy people or IT professionals.
At the end of the day, you won’t want other people to snoop on your old files and folders, do you?
For Windows users, formatting a hard drive is a helpful tool, but it doesn’t necessarily erase all of your data. Software tools like DBAN are way more effective, free, and super easy to use!
Apple users can run the “Erase” feature on any macOS device. If you prefer third-party software, PartedMagic is a suitable solution for you.
In order to securely erase data on your solid state drive, you’ll have two options. You could simply visit the manufacturer’s website and follow their instructions to delete the data, or you could use PartedMagic, which is an incredibly effective tool to erase the data on your SSD entirely.
If you want to be 100% sure your data is not recoverable and release some stress in the process: smash it!
Just make sure to be safe when destroying an HDD/SSD – use safety goggles and gloves!
Know of any other tools or methods? Have any questions about the methods listed in this guide, or are you unsure about what software to use for your device? Let me know in the comments below.