
At a Glance
Apple’s iOS 17 and iPadOS 17 mobile operating systems bring several new features to your iPhone and iPad, respectively, including several important new privacy and security features.
I’ll be covering the new security and privacy features that are included in the operating systems. In most cases, both iOS 17 and iPadOS 17 received the new features, so for convenience I’ll simply refer to both operating systems as “iOS 17.” I’ll be sure to mention if a feature is not available on both operating systems.
It should be noted that some of these new security and privacy features were not originally included in the first release of iOS 17, but were in later updates. If a feature debuted in a later update I will mention that. At the time of this article, iOS 17.3 and iPadOS 17.3 are the latest public releases of the mobile operating system.
New iOS 17 Security and Privacy Features
Private Browsing Upgrades in Safari
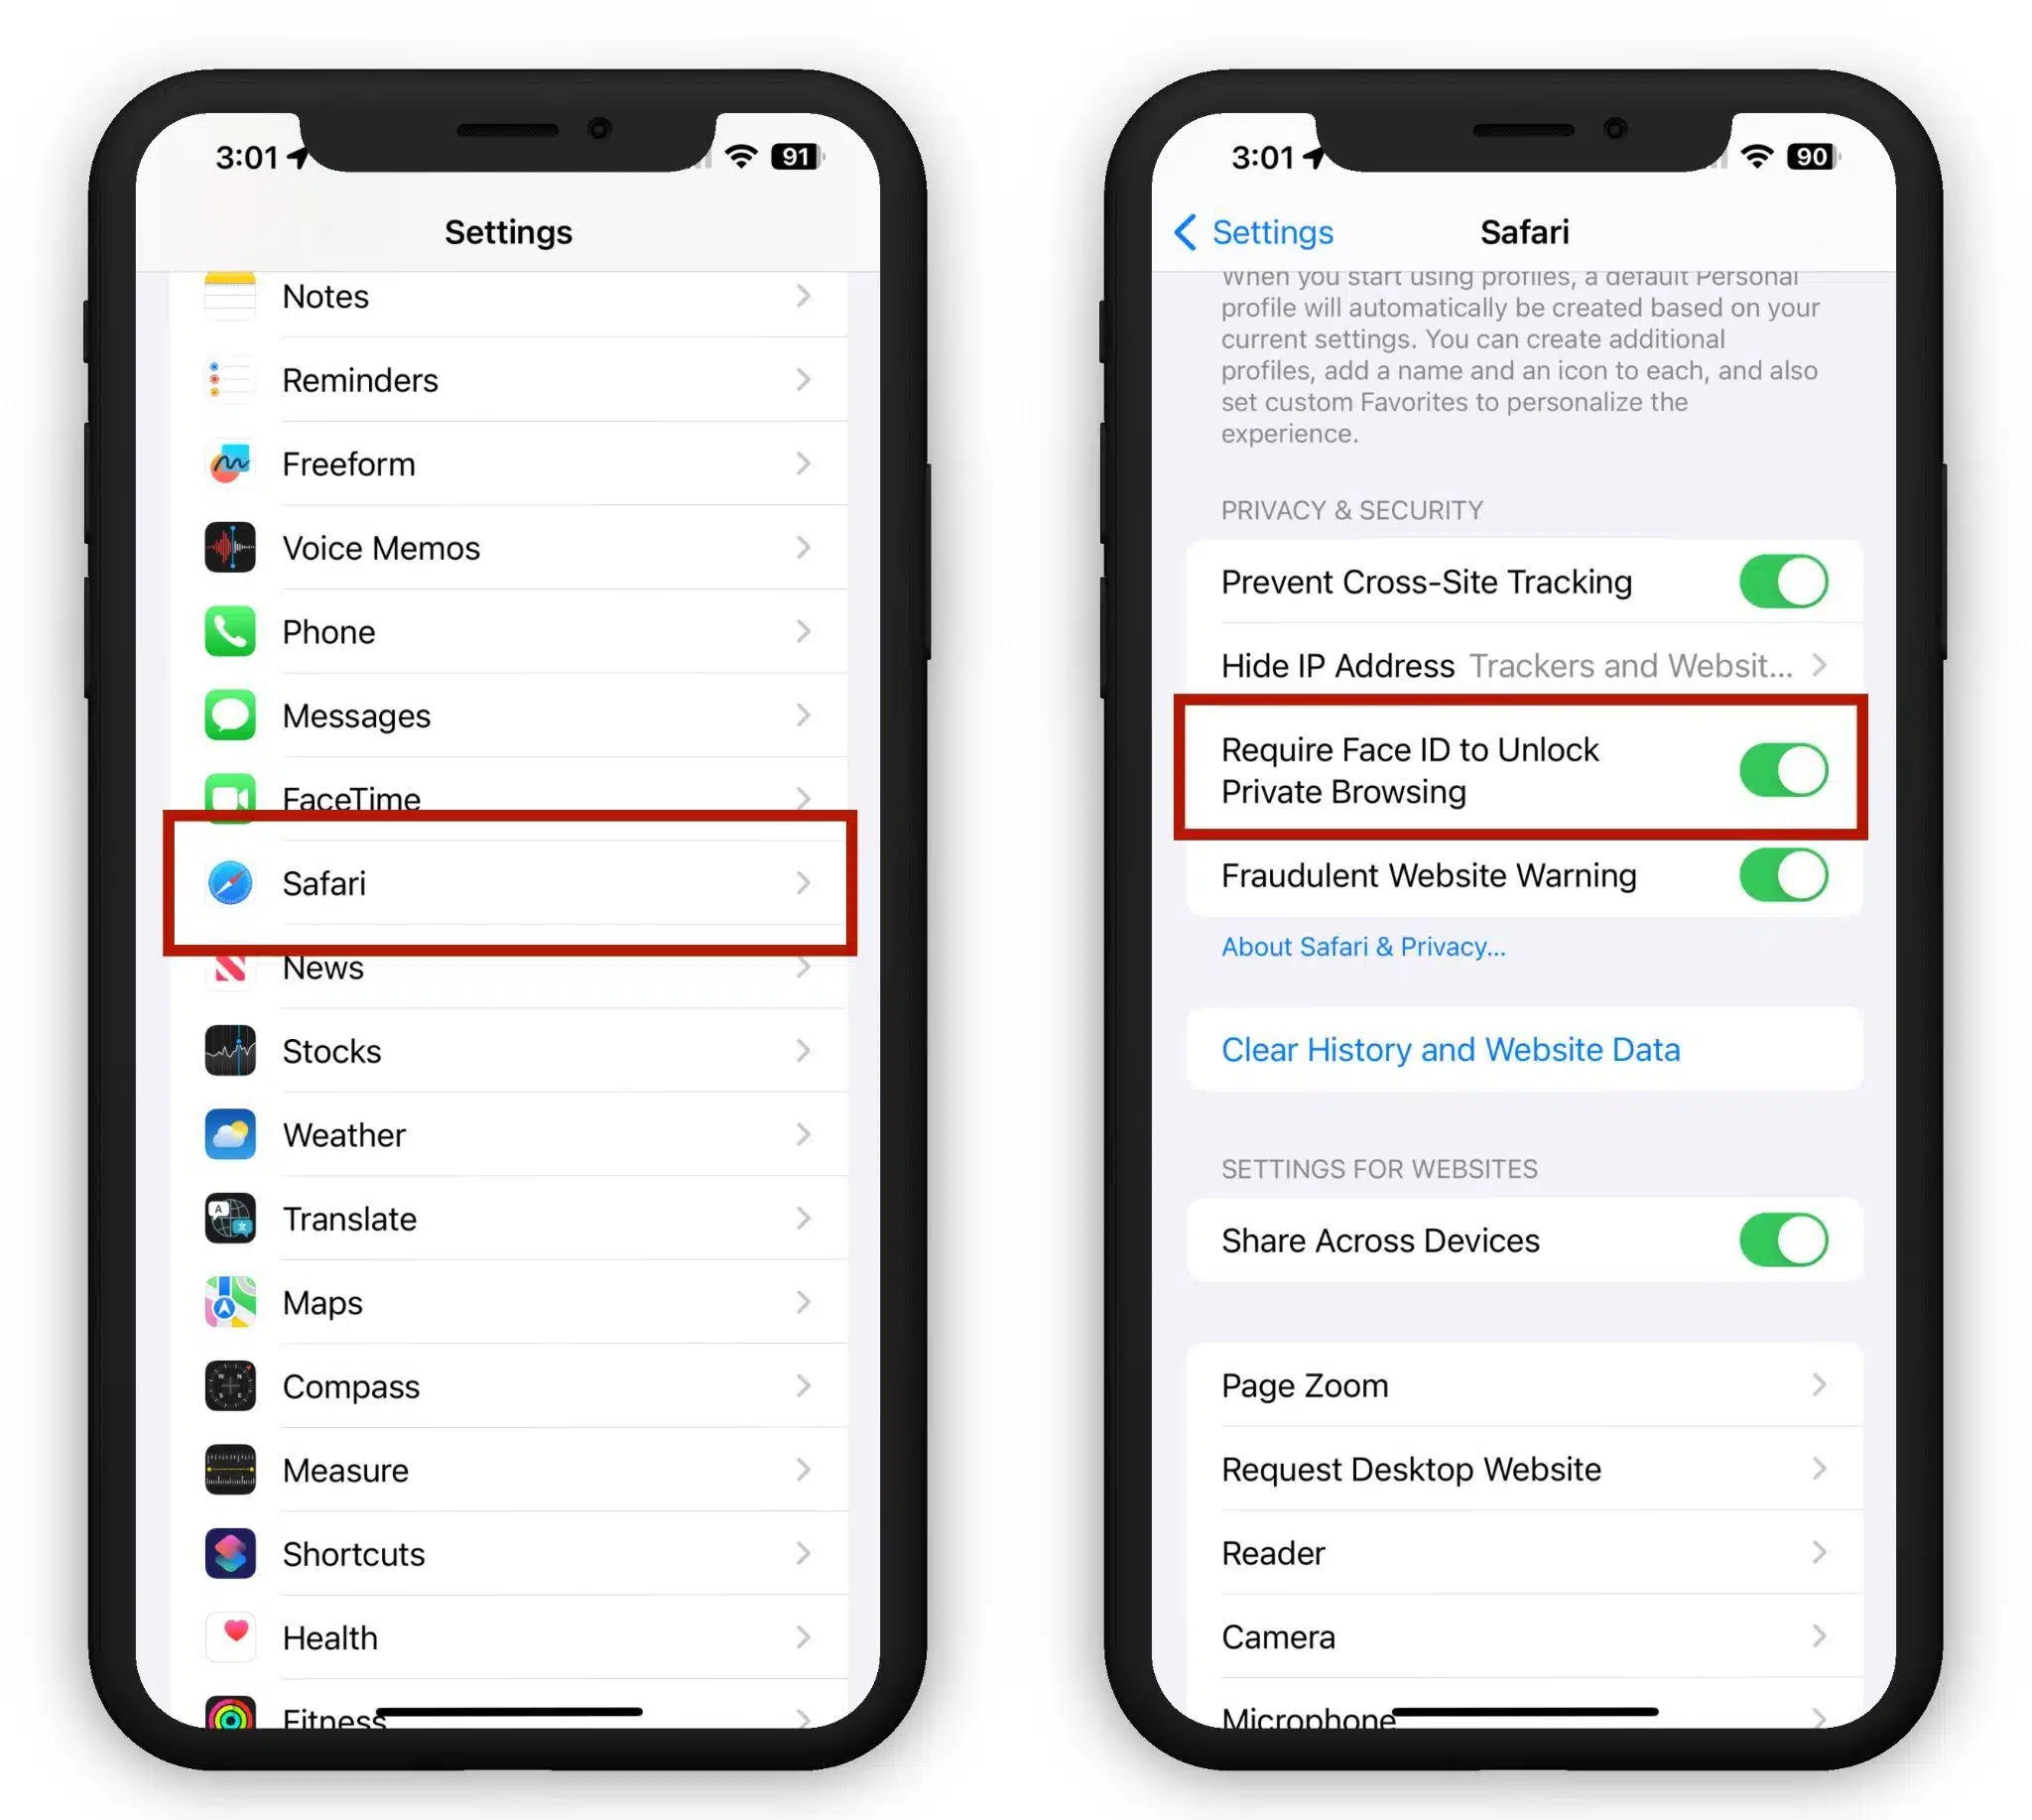
Safari Private Browsing Windows are now locked automatically, requiring secondary authentication to unlock and access the window. This means that if someone else is using your iPhone and attempts to open your Private Browsing tab, they will be unable to access it without your face or fingerprint or entering a passcode.
To require your face or fingerprint to unlock a Safari Private Browsing Window, do the following:
- Open the Settings app on your iPhone running iOS 17 or later.
- Scroll down to “Safari.”
- Toggle on the “Require Face ID to Unlock Private Browsing” switch to the on (green) position.
- While you’re there, make sure “Prevent Cross-Site Tracking” and “Fraudulent Website Warning” are both enabled, as seen in the screenshot below.
Tracking URL Removal in Safari
By default, opening a URL in a Safari Private Browsing Window automatically strips all tracking information that has been added to the URL. In addition, unknown trackers are completely blocked, preventing companies from tracking your browsing activity across multiple websites.
You can also configure Safari to strip URLs of tracking information in non-private browsing mode. Here’s how to remove URL-based tracking in all browser windows:
- Open up the Settings app.
- Tap “Safari.”
- Tap on “Advanced.”
- Tap on “Advanced Tracking and Fingerprinting Protection.”
- Toggle on the “All Browsing” switch.
![]()
This will ensure that all URLs opened in the Safari browser will automatically strip any additional tracking information that’s tacked on to the end of a URL.
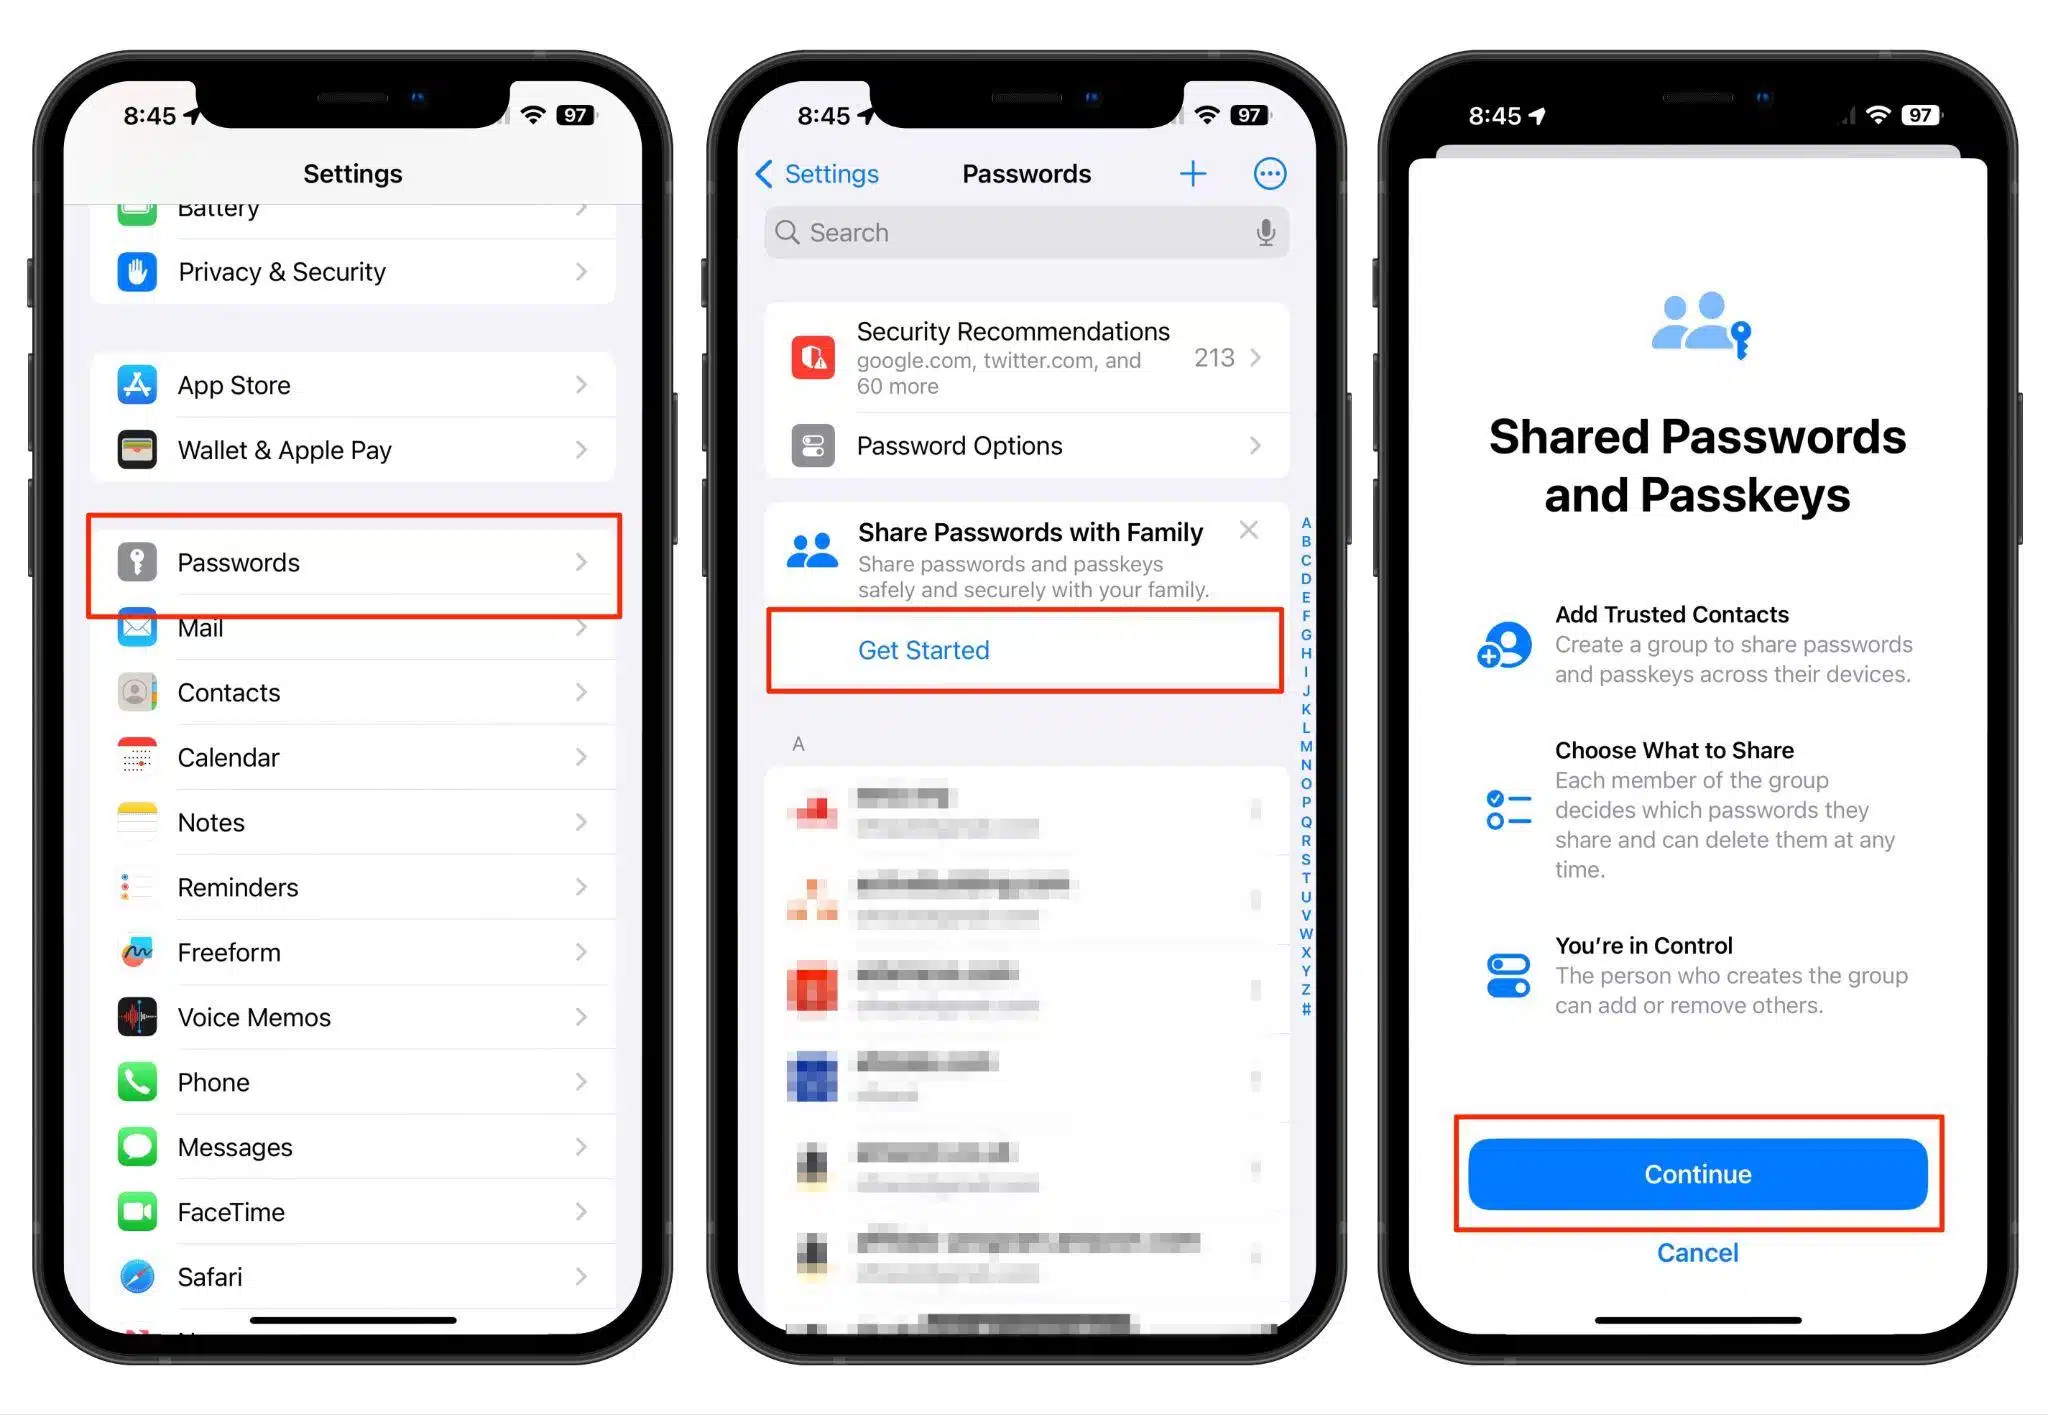
Shared Passwords
iOS 17, iPadOS 17, and macOS Sonoma now allow users to securely share passwords and passkeys with their family and friends via a new shared password function. This feature allows users to share passwords for shared media accounts, utilities, bills, and other sites and services with other people.
Each person can access, add to, and change shared passwords. Shared passwords can be set up by going to the Settings app and tapping “Passwords” and then tapping “Get Started” under the “Family Passwords” heading.
Passcode Resets
iOS 17 brings a welcome 72-hour grace period if you change the passcode on your iPhone and then forget the new passcode. You can now fix the problem without getting locked out of your device, as Apple allows you to still use your old passcode within 72 hours after creating a new one.
If you enter an incorrect passcode after changing it, you can simply tap on the “Forgot Passcode?” option at the bottom of the display to access the “Try Passcode Reset” option. By tapping that option, you can now enter your old passcode to create another new passcode.
If you think someone has learned your passcode, you can use the “Expire Previous Passcode Now” option to immediately shut that passcode down.
Photo Library Access
iOS 17 now allows you to share only specific photos with apps, while keeping the rest of your Photo Library private. Apps must explicitly request access to a user’s entire photo library. Users will also be shown information about the photos they are sharing, including the number of photos and videos, as well as metadata, such as captions and locations.
Apps can request the following access:
- Limited access: Apps are only allowed to access the images that you select. You can also review the images you’ve given access to both in the app or by going to “Settings” -> “Privacy & Security” -> ”Photos.”
- Full access: Apps can access all of the images and videos in your Photo Library. Your device will inform you as to exactly how many photos and videos you’re giving the app access to.
- None: The app is given no access to the Photo Library at all.
- Add photos only: The app is allowed to add images to your library, but not view them. This setting is not available for all apps.
You can view the Photos Library access enjoyed by the apps on your device by going to the Settings app, tapping “Privacy and Security”, and then tapping “Photos.” Here, you can make changes to the apps’ Photos access. You can also remove the photo information available to each app, while also having the ability to change the photo format.
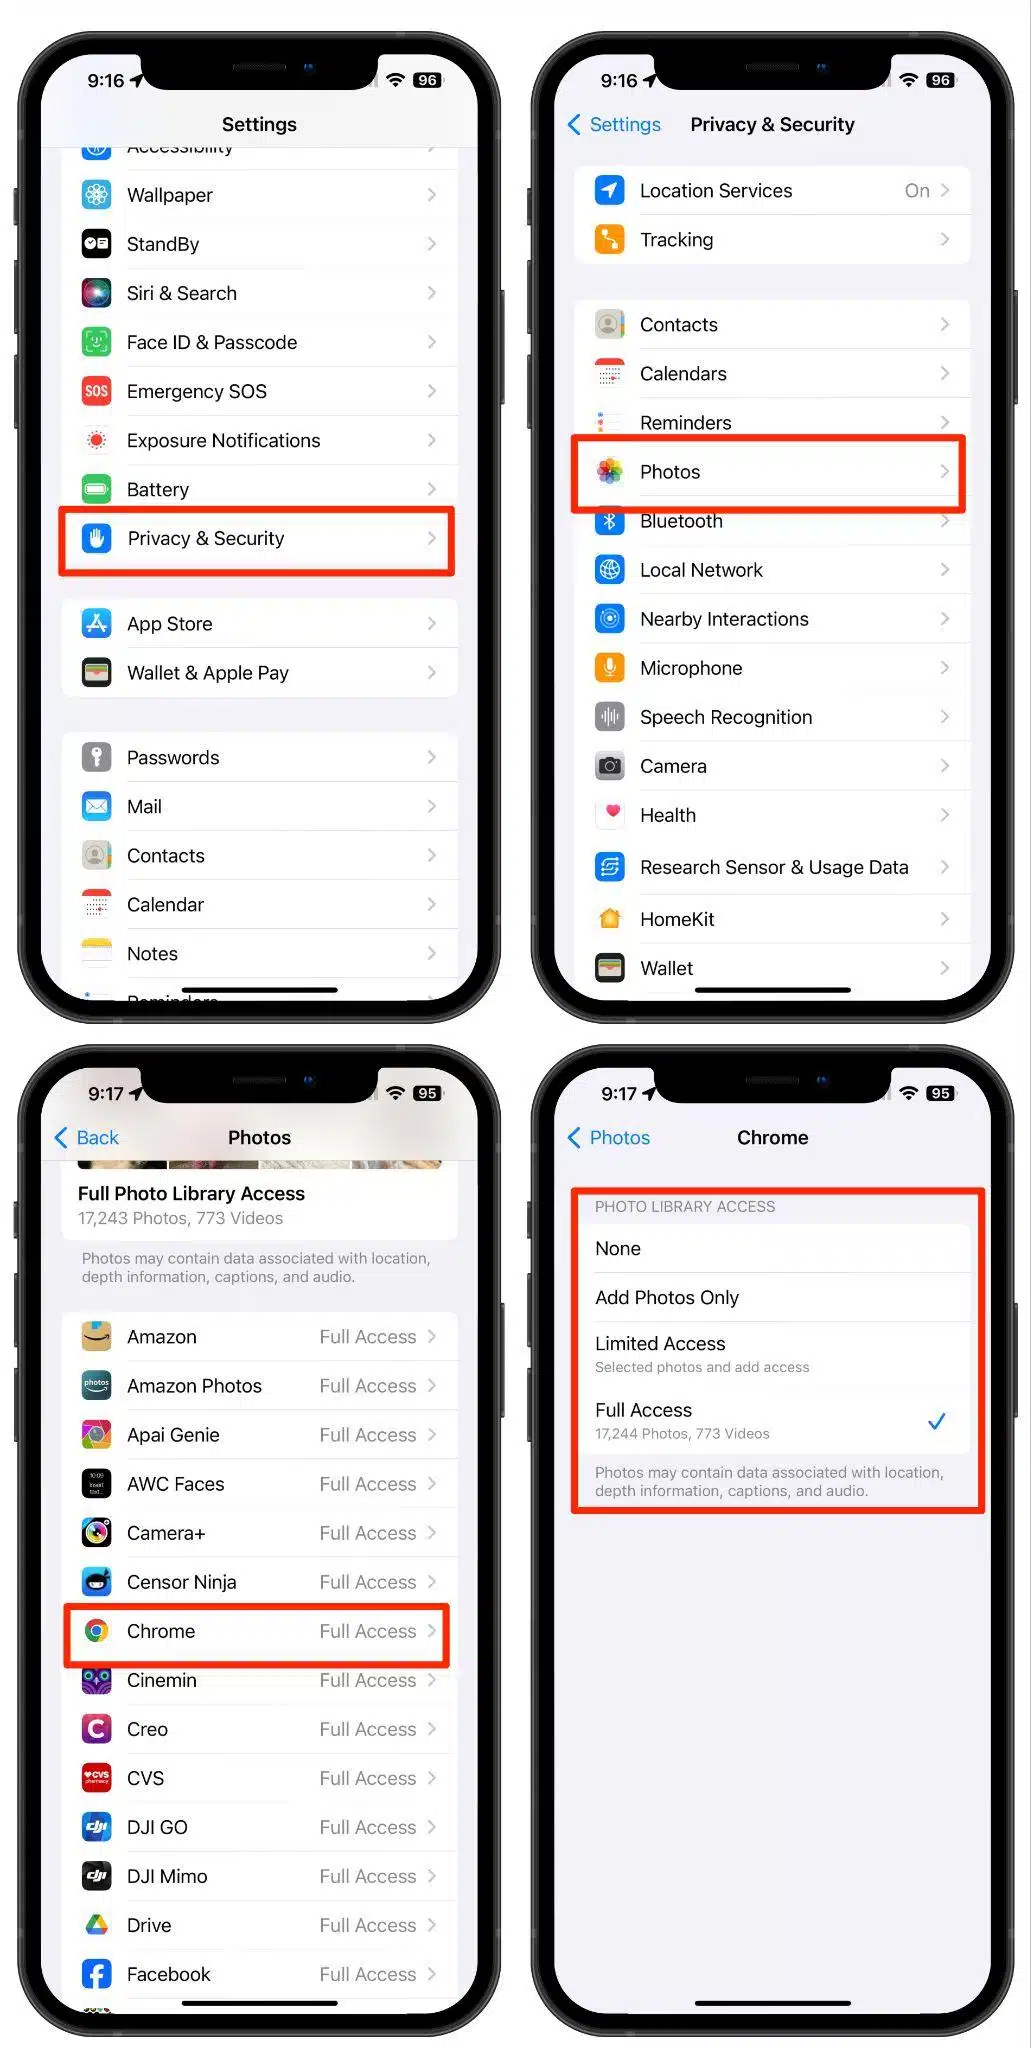
Any newly installed app that wants access to your Photo Library will bring up a request for limited or full access to your photos. In previous versions of iOS, apps simply asked for access to your entire Photo Library, so it was an all-or-nothing decision. You now have much more control over what apps have access to when it comes to your photos.
You’ll also see periodic reminders about the apps that have access to your entire Photo Library, allowing you to change the app’s access level if you so wish.
Calendar Access
Apps are only allowed to add an event to the Calendar app without having access to view your calendar through the “Add Events Only” option.
You can manage access to your Calendars by going to “Settings” -> “Privacy & Security” -> “Calendars.” You can allow apps to have Full Access, Add Events Only, or you can select the “None” option to revoke all access. Apps that you grant full Calendar access to can see location, invitees, attachments, and notes.
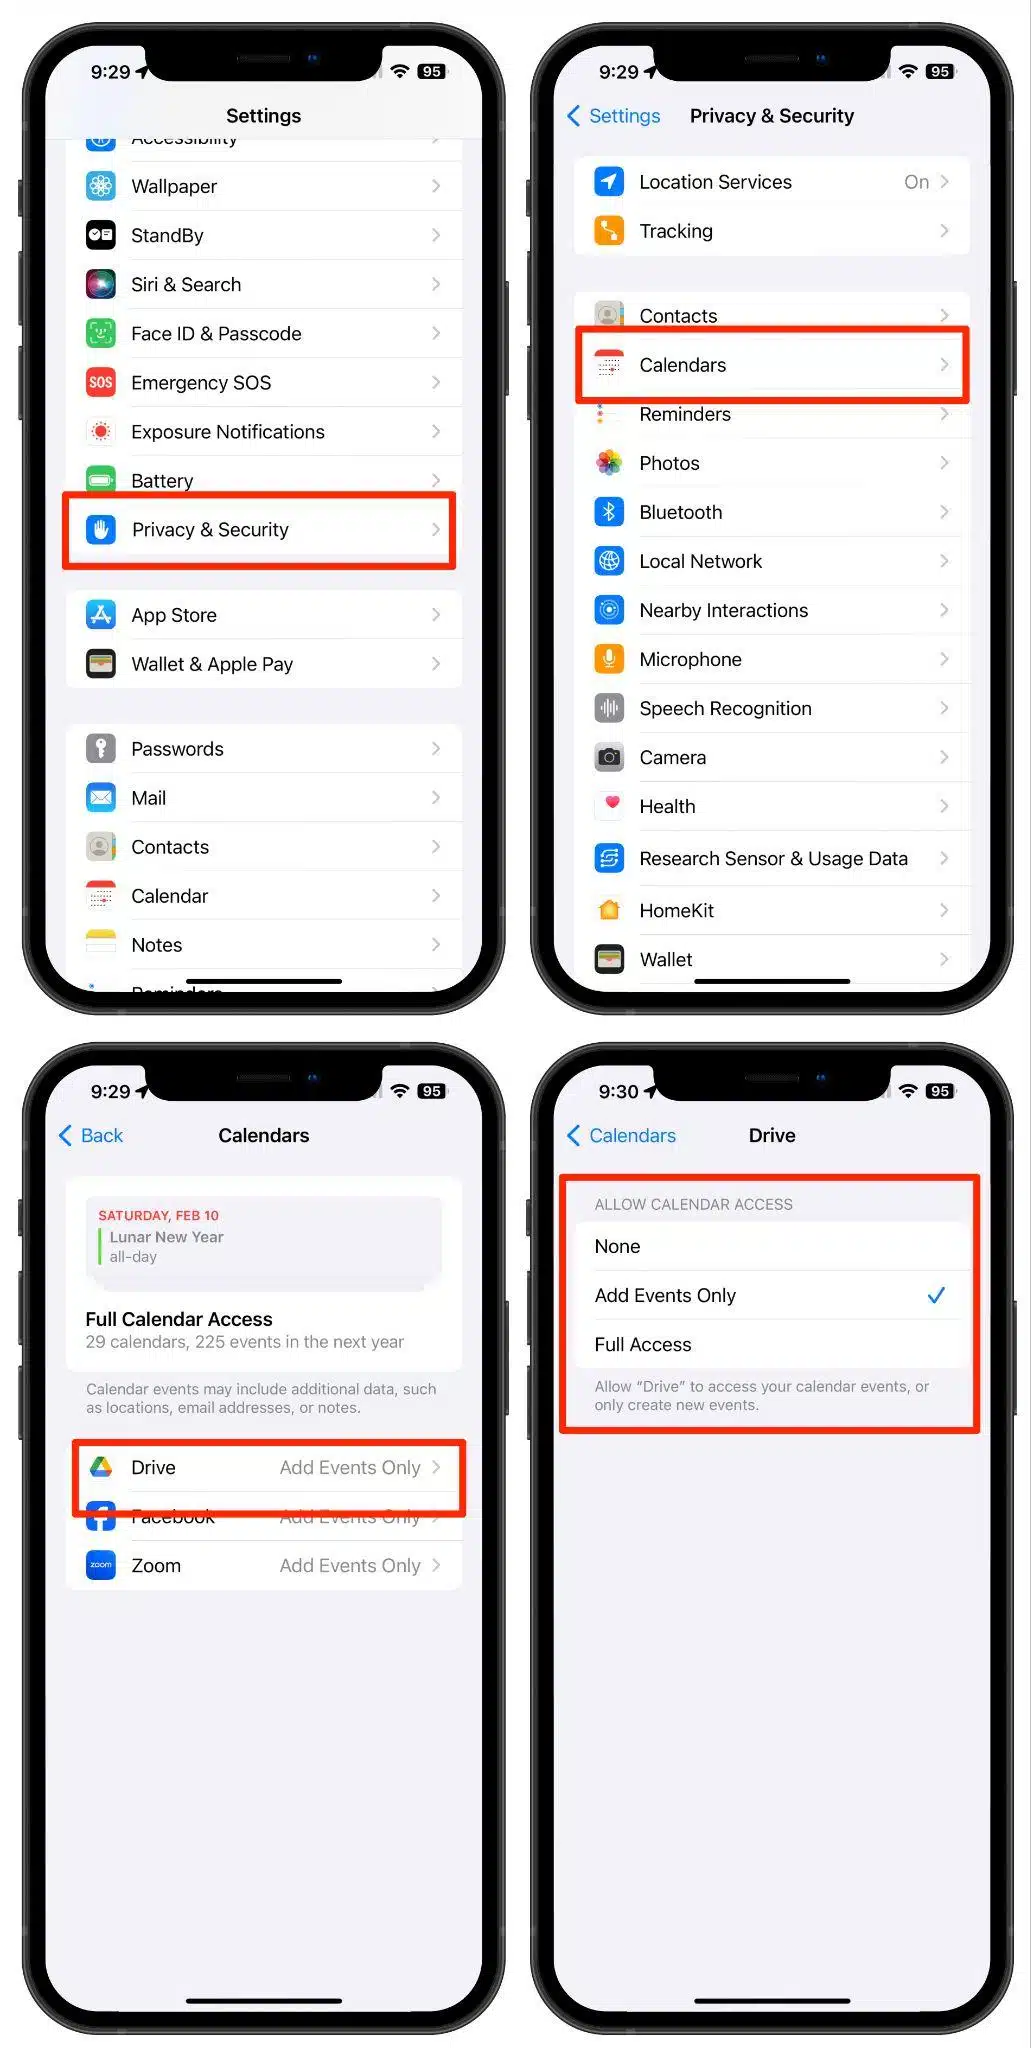
The Calendars section also displays the number of calendars you currently have and how many accounts you’re signed in to.
Passkeys
iOS 17 brings support for passkeys, automatically assigning a passkey to your Apple ID. Passkeys are a more secure alternative to passwords. A passkey allows you to sign in to your Apple ID by using Face ID or Touch ID instead of a password. The feature is available to login on icloud.com, appleid.apple.com, and other Apple websites.
Passkeys are more secure than the traditional user ID/password combo. This is because passkeys use a key pair, one public key that is registered to an app or website, and one private key that is stored solely on your device. This ensures that there is no way to intercept and access a passkey, making it nearly impossible for the passkey to be stolen.
When using iOS 17, iPadOS 17, and macOS Sonoma, you’ll use biometric authentication rather than your password to sign into an Apple website. Passkeys are also being slowly adopted by other sites, and they will eventually replace passwords.
Stolen Device Protection
In 2023, The Wall Street Journal reported about iPhone users being locked out of their Apple ID accounts by thieves who used Apple’s recovery key security option.
Thieves would sit in public places like bars and restaurants watching iPhone users enter their passcode in public, then stealing their device, using the passcode to gain access to the iPhone and its contents.
Once a thief knows a user’s iPhone passcode, they can quickly reset the victim’s Apple ID password in the Settings app. The thief would then turn off Find My iPhone on the device, preventing the owner from tracking the device’s location or from remotely erasing the device.
iOS 17.3 provides a solution to this problem: Stolen Device Protection for iPhone.
Stolen Device Protection provides improved security for your iPhone and your personal data by requiring Face ID or Touch ID with no passcode option to perform certain actions on your iPhone.
Security Delay requires Face ID or Touch ID, an hour-long waiting period, and then an additional successful biometric authentication before allowing users to perform operations, like changing the device passcode or your Apple ID password, can be performed
This feature provides an additional layer of security in situations where someone has stolen your iPhone and also got their hands on your passcode.
With Stolen Device Protection enabled, actions like using passwords or passkeys, erasing an iPhone, disabling Lost Mode, and other security-related actions on your iPhone will require biometric authentication – the passcode will not work when away from familiar locations, like your home or workplace.
Changing your Apple ID password, updating Apple ID security info, changing a passcode, changing Touch ID and Face ID settings, or disabling Find My or Stolen Device protection, a one-hour security delay will be required when away from familiar locations, requiring a second biometric authentication.
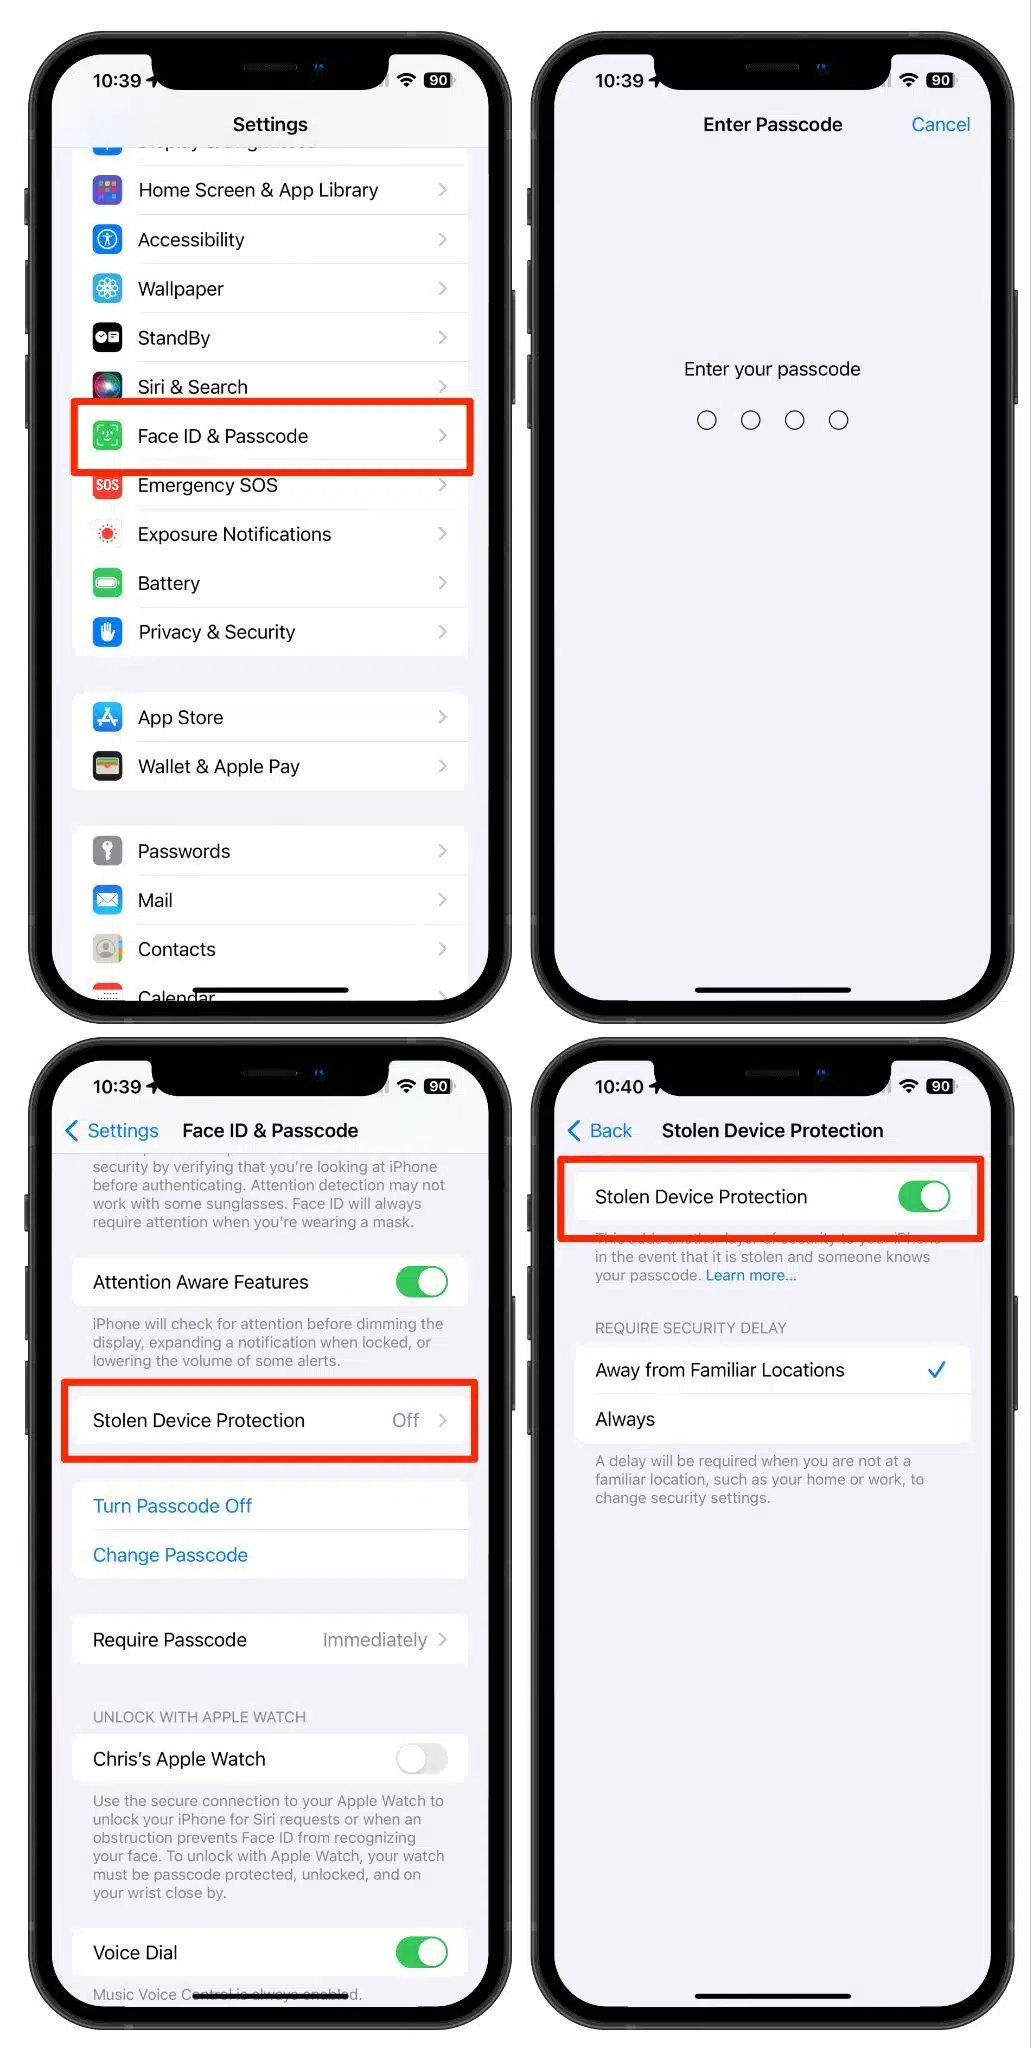
How to Enable Stolen Device Protection for iPhone
To use Stolen Device Protection, your iPhone must have iOS 17.3 installed.
- Open the Settings app.
- Swipe down a bit and find and tap “Face ID & Passcode” or “Touch ID & Passcode,” depending on your iPhone model.
- Enter your passcode.
- Tap the “Stolen Device Protection” menu option.
- Toggle “Stolen Device Protection” to the On (green) position.
Auto-Delete Verification Codes
If you’re like me, you probably use two-factor authentication with an SMS authentication code to log in to various websites and apps multiple times during the day. iOS 17 brings a new feature that auto-deletes SMS authentication codes in Messages and Mail after they are inserted using the AutoFill feature.
While you may look at this feature as more of a convenience than a security upgrade, it will definitely help protect you and your accounts if a site or app violates good protection measures and generates predictable verification codes. If nothing else, it makes it easier to find the correct code.
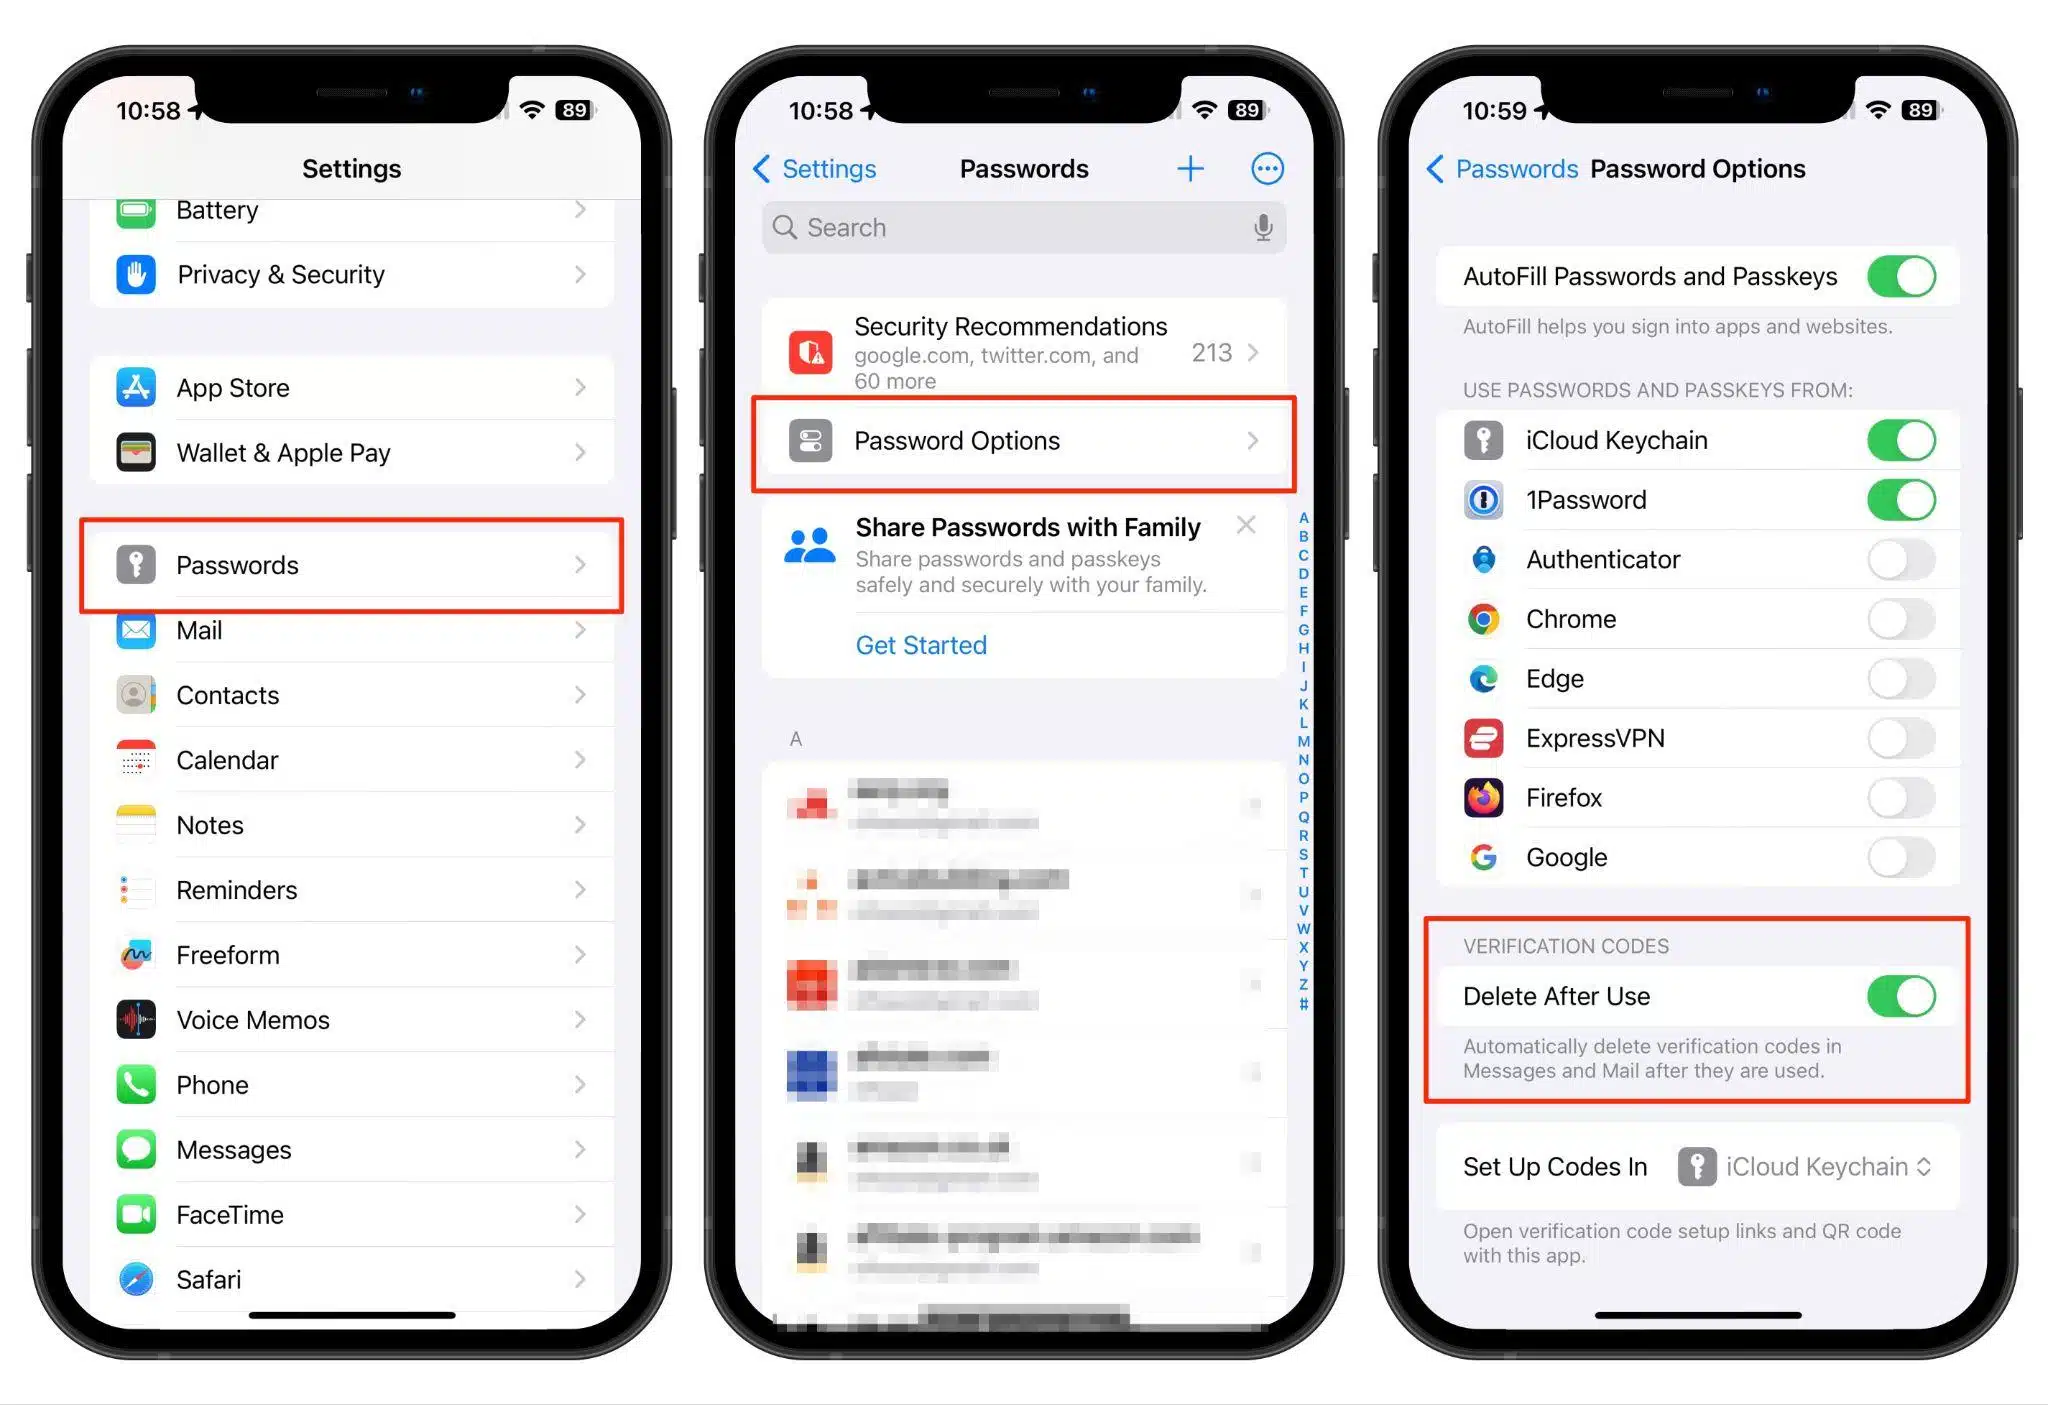
To enable auto-delete of verification codes, do the following:
- Open the Settings app.
- Tap “Passwords.”
- Tap “Password Options.”
- Find the “VERIFICATION CODES” section.
- Toggle on (green) “Delete After Use.”
Automatic Check In Texts in Messages
iOS 17 brings what Apple calls “Check In.” The feature automatically alerts friends or family via text when you’ve reached your desired destination. Check In will even alert your selected contacts if it recognizes that you are not making progress to your destination.
The feature can also share useful information, including your geographic location, your device’s battery level, its cell service status, and the last active time you used your iPhone.
Keep in mind that all users must be on iOS 17 or later for this feature to work.
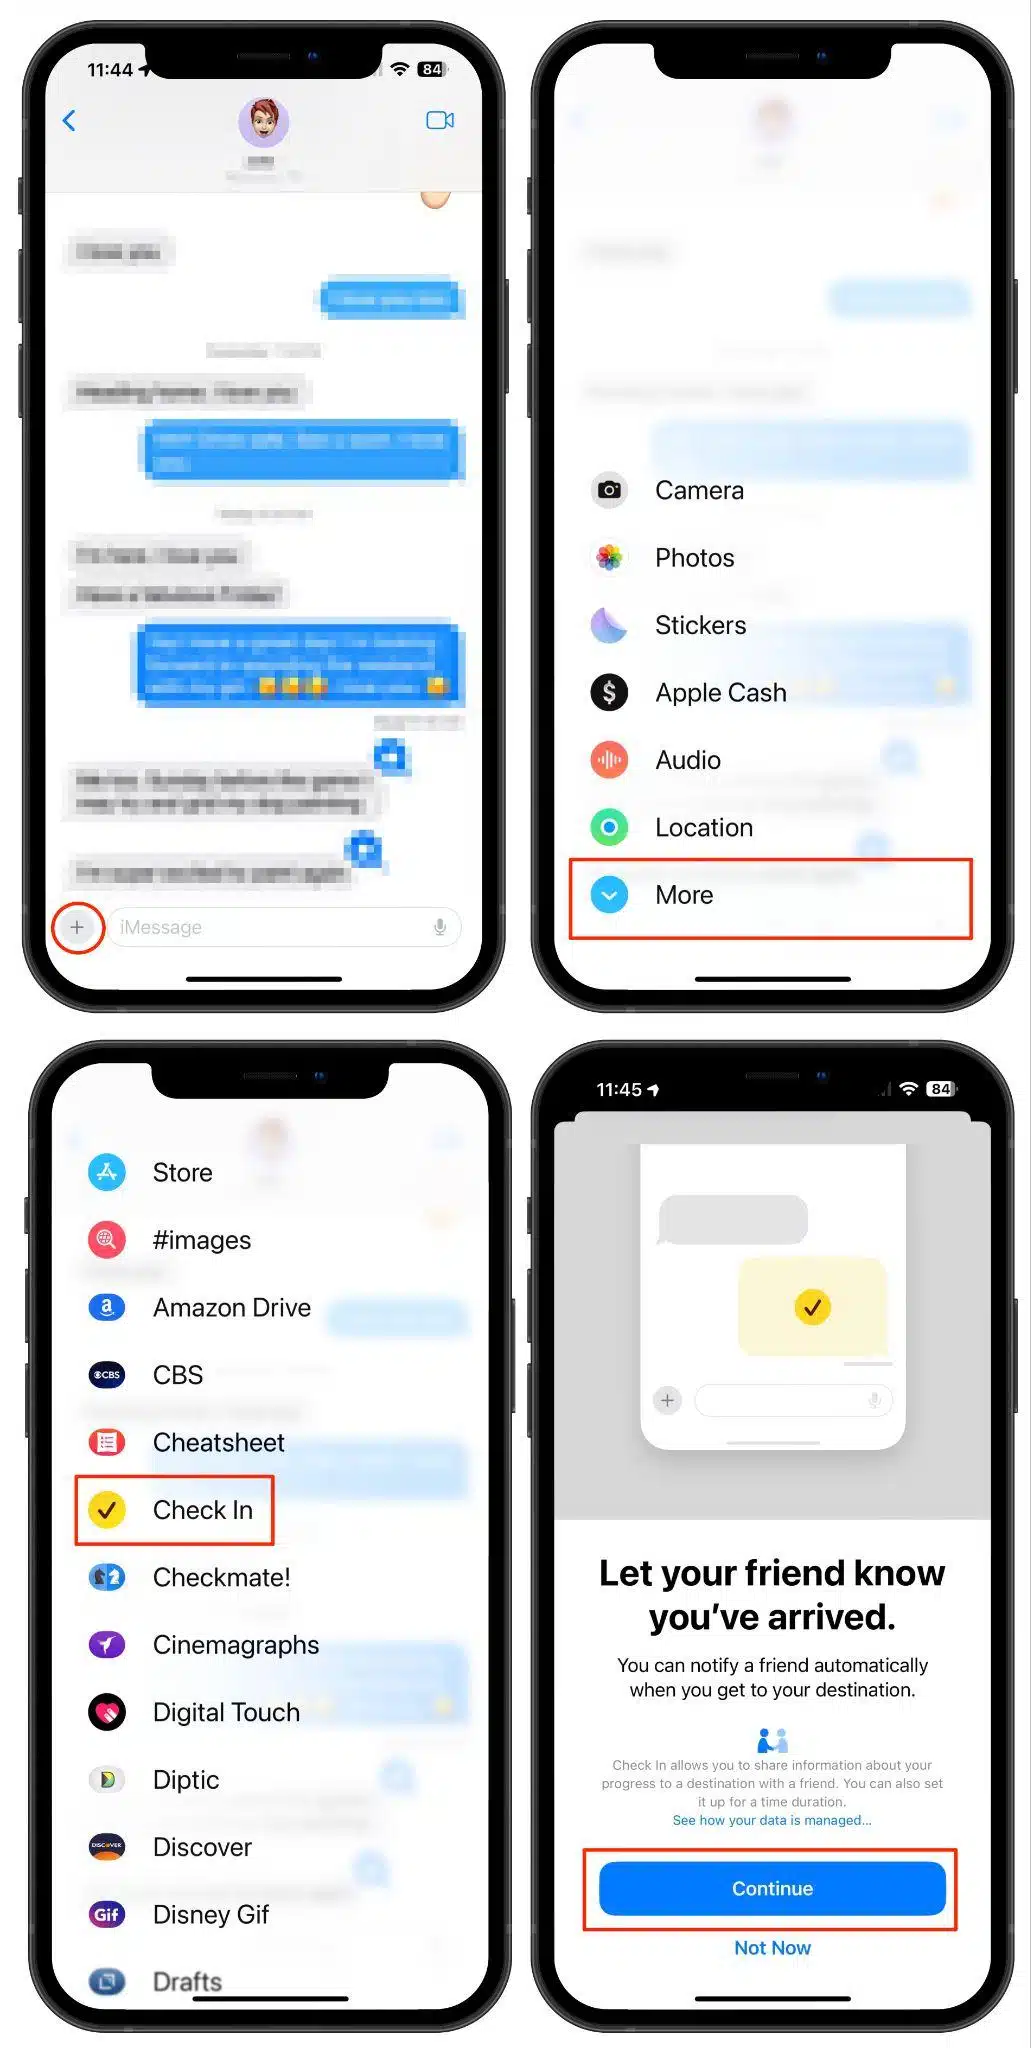
Here’s how you set up Check In Texts in Messages:
- Open the Messages app in iOS 17.
- Select the contact you’d like to send a Check In to.
- Tap the “+” icon located to the left of the message entry field.
- Tap “More” to reveal more options.
- Tap “Check In.”
- Follow the prompts in the setup pages. You’ll then see the Check In appear in the Messages chat. You can now edit your destination as well as whether you’re walking or driving, and other options.
Sensitive Content Warnings
iOS 17 and iPadOS 17 bring Sensitive Content Warnings, which are designed to prevent automatically seeing unsolicited pornographic photos and similar images when they are sent to your iPhone or iPad.
When you have Sensitive Content Warnings enabled in iOS 17, any incoming files, images, or videos are automatically scanned on-device and blocked if they contain any nudity. Blurring can be applied to images received in the Messages app, AirDrop, FaceTime Messages, and third-party apps.
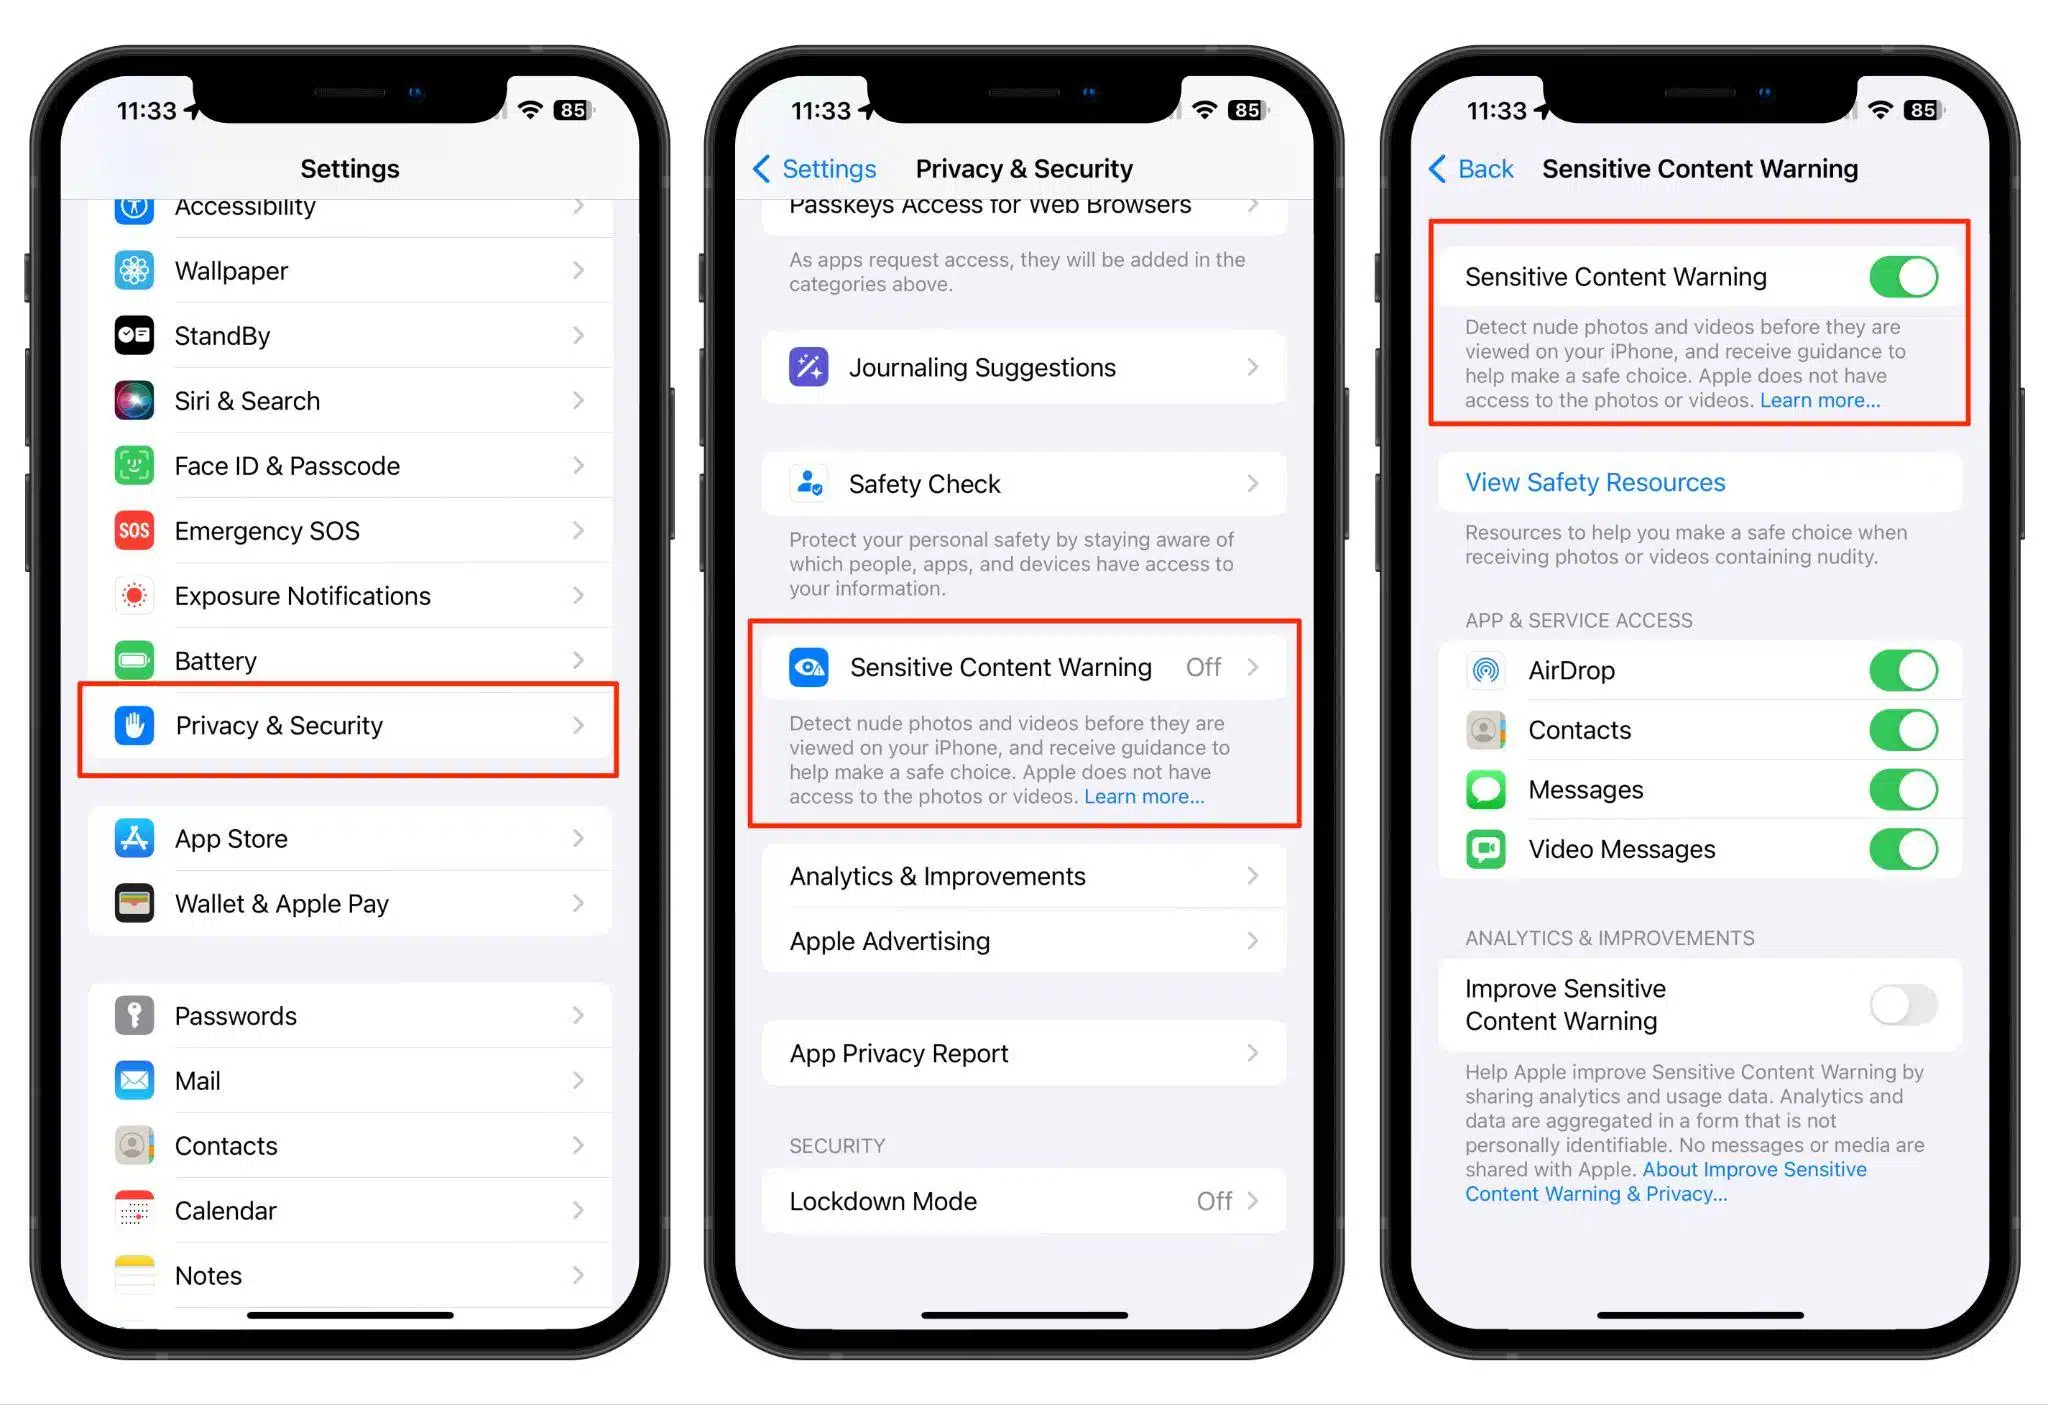
To enable Sensitive Content Warnings follow these steps:
- Open the Settings app.
- Tap “Privacy & Security.”
- Scroll down and tap “Sensitive Content Warning.”
- Tap the toggle switch next to “Sensitive Content Warning” to turn it on (green).
iOS 17 Security and Privacy FAQs
Why Should I Update My iPhone to iOS 17?
You should always keep your iPhone updated to the latest version of iOS and iOS 17 is no exception. By keeping your device updated to the latest version of its operating system you keep yourself protected against security and privacy flaws. In addition to useful new features, iOS updates also include fixes for security holes that have been discovered since the last update. This goes for iPadOS also.
Do I Have to Manually Update My iPhone to The Latest Version of iOS?
No, you can set your iPhone to automatically update iOS whenever a new version is available. You can enable automatic updates by opening the Settings app, tapping “General,” tapping “Software Updates,” tapping “Automatic Updates,” and then toggling “iOS Updates” to the on position (green). White you’re there, toggle the “Security Responses & System Files” switch to on. Now, when your iPhone is connected to WiFi, is on a charger, and is locked the updates will automatically download and install.
In Closing
If you have an iPhone or iPad, it is important to keep your device updated to the latest version of iOS or iPadOS, respectively. By updating to Apple’s latest and greatest version of iOS and iPad OS (iOS 17 and iPadOS 17), you’ll not only benefit from several great new features, but you’ll also keep your devices protected against security and privacy flaws that are fixed in each update.