At a Glance
NordVPN’s Meshnet is a completely free feature that allows users to connect their devices over local and remote networks. The feature provides a number of features, including:
- Sharing of files
- Playing LAN games
- Accessing other devices remotely
- Working on joint projects
All of this is performed securely, using NordVPN’s modern NordLynx protocol, which is based on one of the most secure and well-performing connection protocols today, WireGuard. While a NordVPN login is required to use Meshnet, you don’t need to have a paid subscription to NordVPN to use Meshnet. Although, I do strongly recommend subscribing to NordVPN. For more information, read my NordVPN review.
Here, I’ll explain what Meshnet is, how it works, the benefits of using it, and how to troubleshoot things if you have any issues.
What is NordVPN’s Meshnet?
Meshnet is a mesh network (makes sense, right?). A mesh network is a local area network (LAN) where each node (each device on the mesh network) can directly connect to and communicate with any other node on the network. This is different from traditional networks (called hub and spoke networks) where each device or computer on the network communicates through a centralized server. A mesh network allows each member of the network to communicate with any other node, without the need for a central server.
The Meshnet mesh network service is optimized for file-sharing, network routing, and remote access. It’s very easy to set up and use and you can start using it in just a few minutes.
WANT TO TRY NORDVPN VPN RISK-FREE?
If you’d like to give all of NordVPN’s services a try, the provider offers a fully-featured risk-free 30-day trial. You not only get access to Meshnet with no restrictions for a month, but you also get to try everything NordVPN has to offer.
There are no gotchas. If you decide NordVPN isn't right for you, simply contact support within 30 days and you'll get a full refund. Start your NordVPN 30-day trial here.
How to Configure Meshnet
Using NordVPN’s Meshnet requires at least two devices. You can connect up to 10 devices from your account and an additional 50 external devices can join your Meshnet network (no, I didn’t stutter, why do you ask?).
In this section, we’ll explore the setup and use of Meshnet for several different activities.
How to Initially Set Up Meshnet
In this section, I’ll cover setting up Meshnet on a Mac and an iPhone. Setting it up on Windows is similar to the Mac and setting it up on an Android device is similar to the process used for an iPhone.
Setting Up Device #1 (Mac)
- If you haven’t already, sign up for NordVPN and download the NordVPN app (Meshnet is a feature in the NordVPN app). You don’t have to subscribe to NordVPN to create an account, although they certainly won’t discourage you from subscribing if you really want to.
- Install the app, launch it, and log in with your user credentials. The screenshots here show the macOS app, although the Windows version is similar.
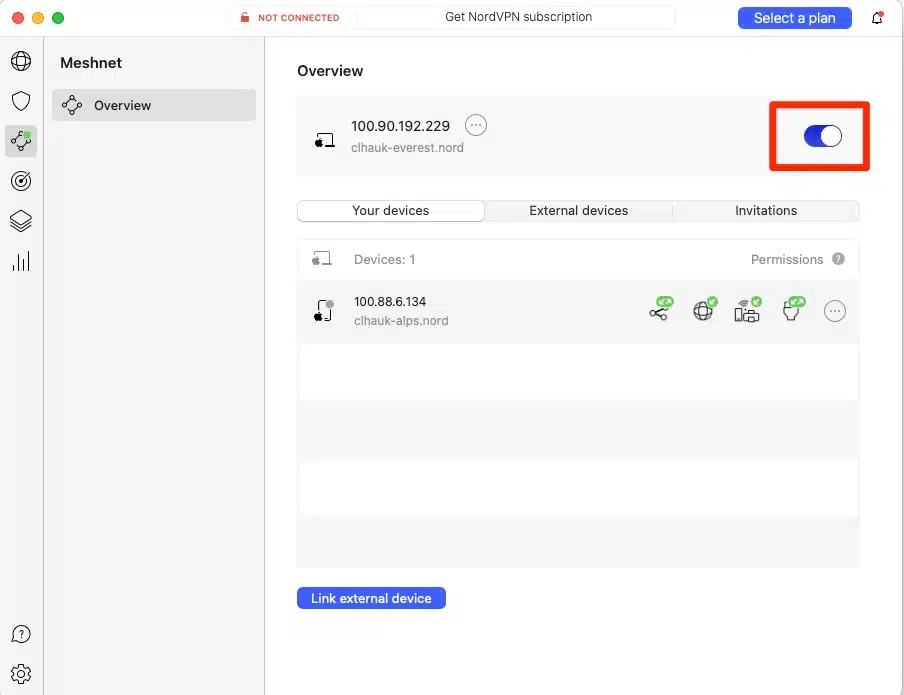
- Click the Meshnet icon, which can be found on the left pane of the app. The Meshnet screen will load.
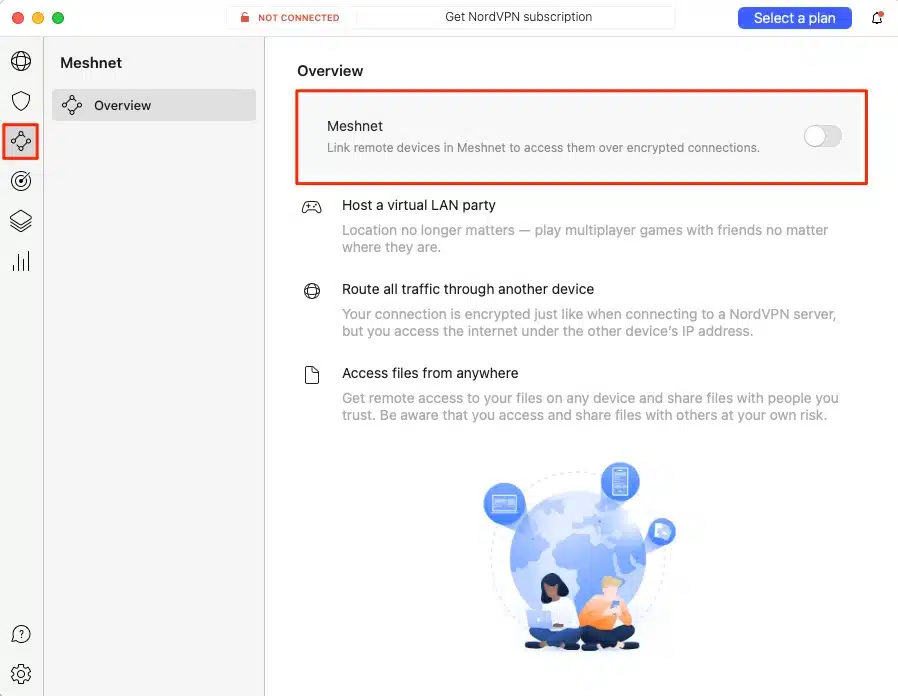
- Toggle the Meshnet switch to “On.”
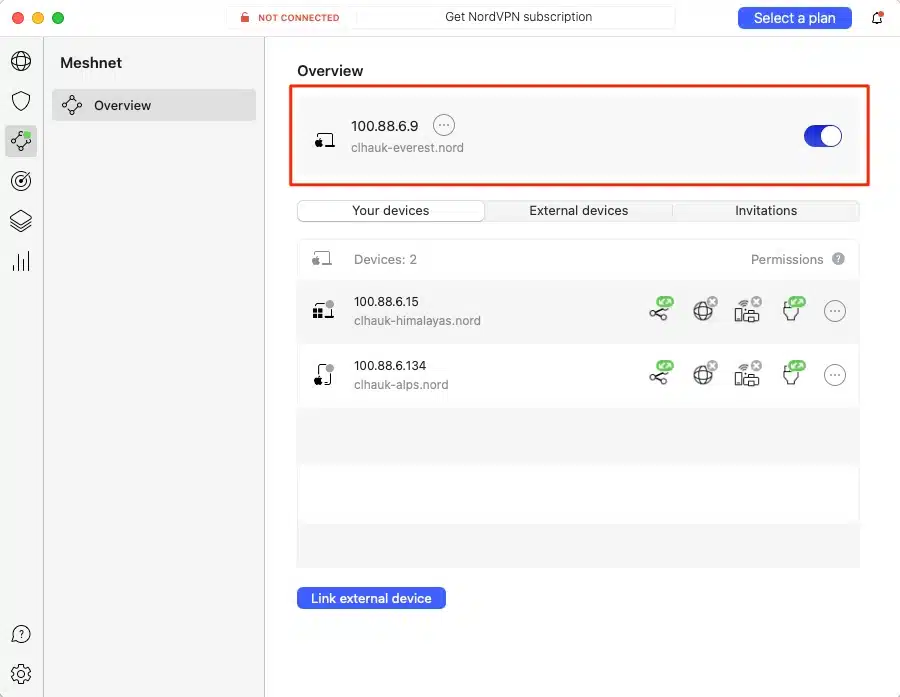
- Now that Meshnet is enabled, you’ll see that the app displays your Meshnet IP address and device name. Other users can communicate with your device using either one over Meshnet.
Setting Up Device #2 (iPhone)
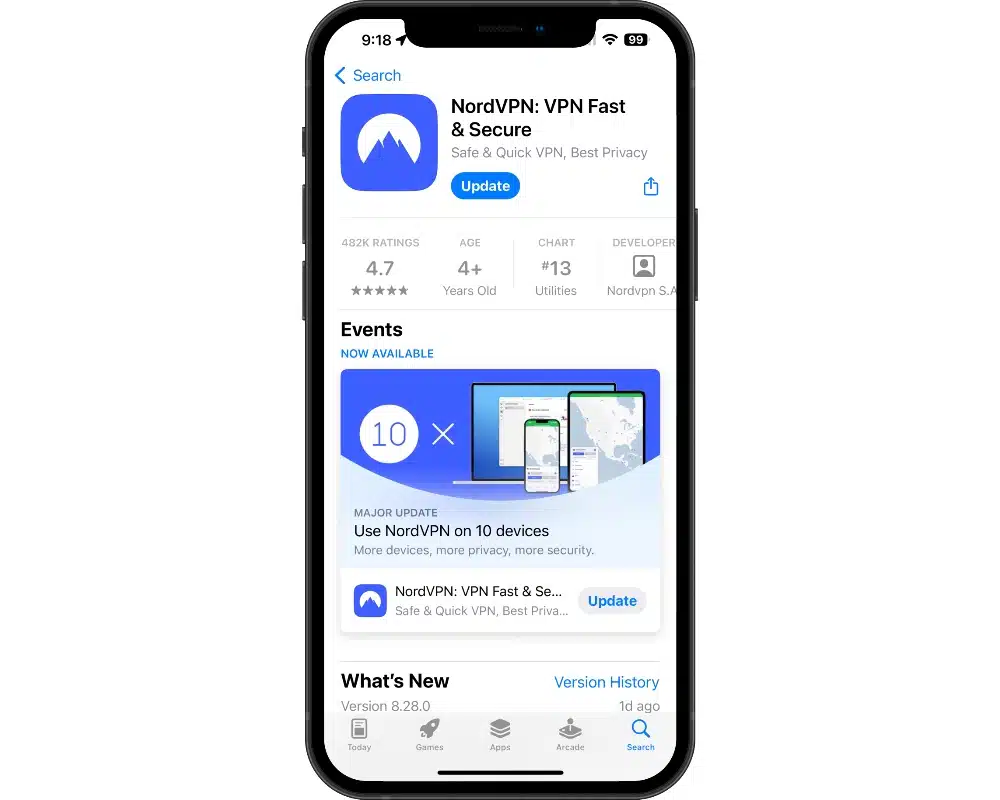
- On your iPhone, visit the App Store and install the NordVPN app.
- Launch the app and sign in.
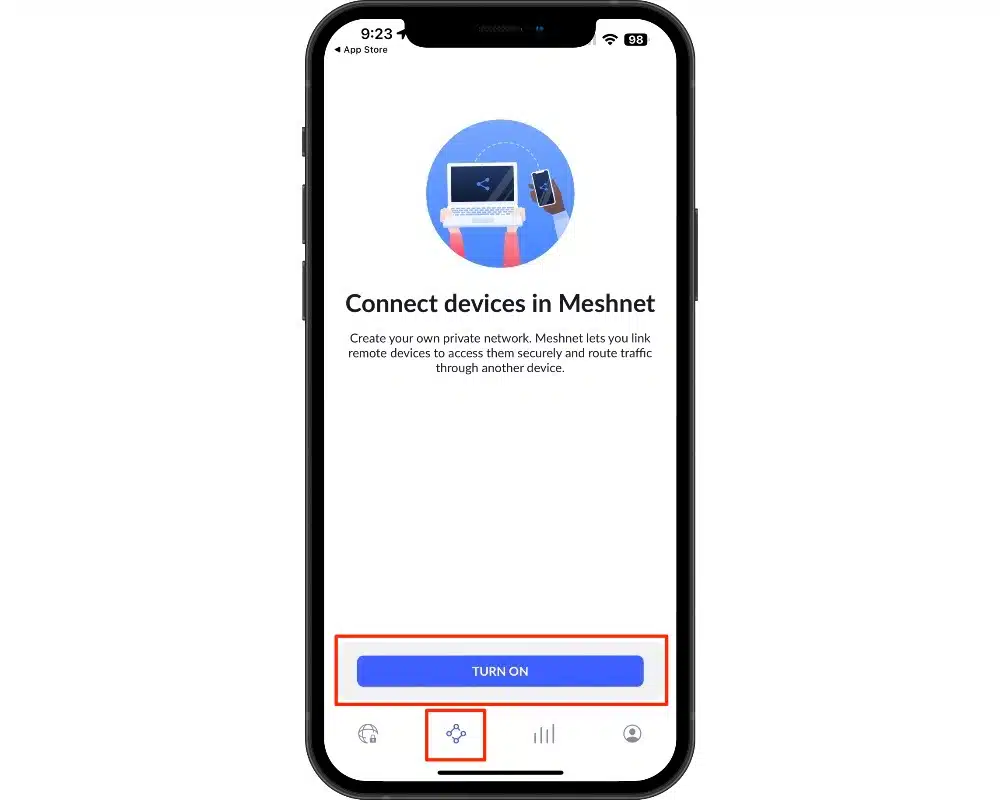
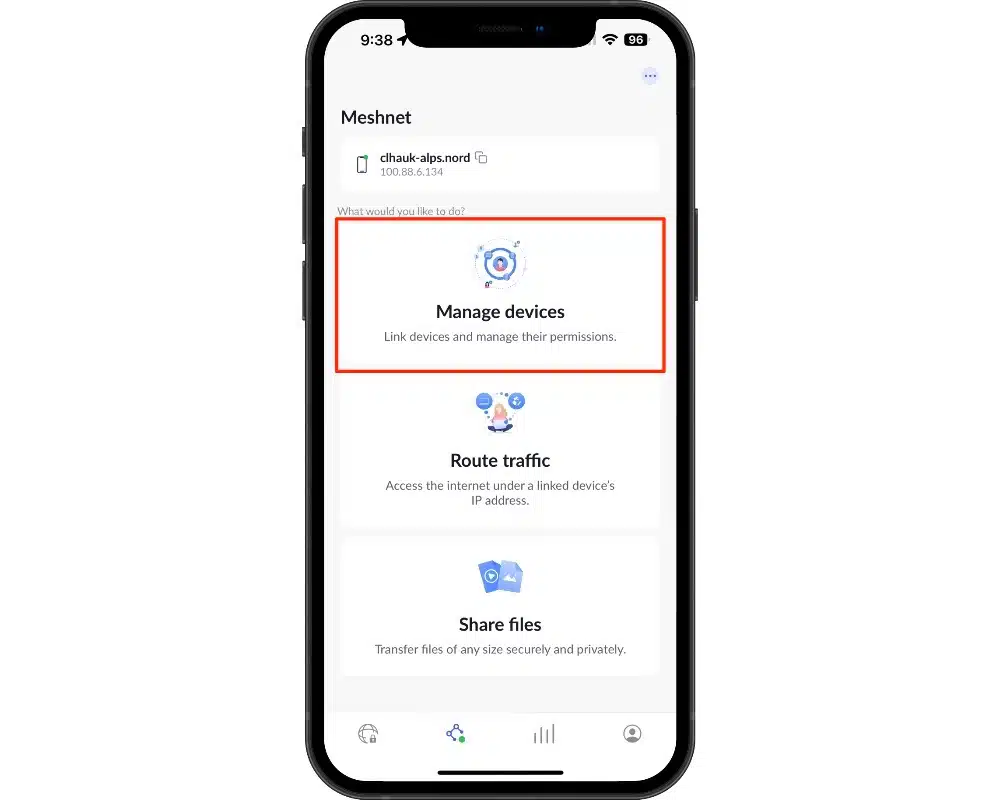
- Tap the Meshnet icon at the bottom of the app screen.
- The Meshnet page will be displayed. Tap the “TURN ON” button at the bottom of the screen. Meshnet will activate, displaying your device’s Meshnet IP address and device name.
- Click “Manage devices” to view the other devices that are members of your Meshnet network.
- You should now see your Mac computer’s name, IP, and Meshnet settings. Click the arrow on the right of that information to view additional details and to make any needed changes to the permissions.
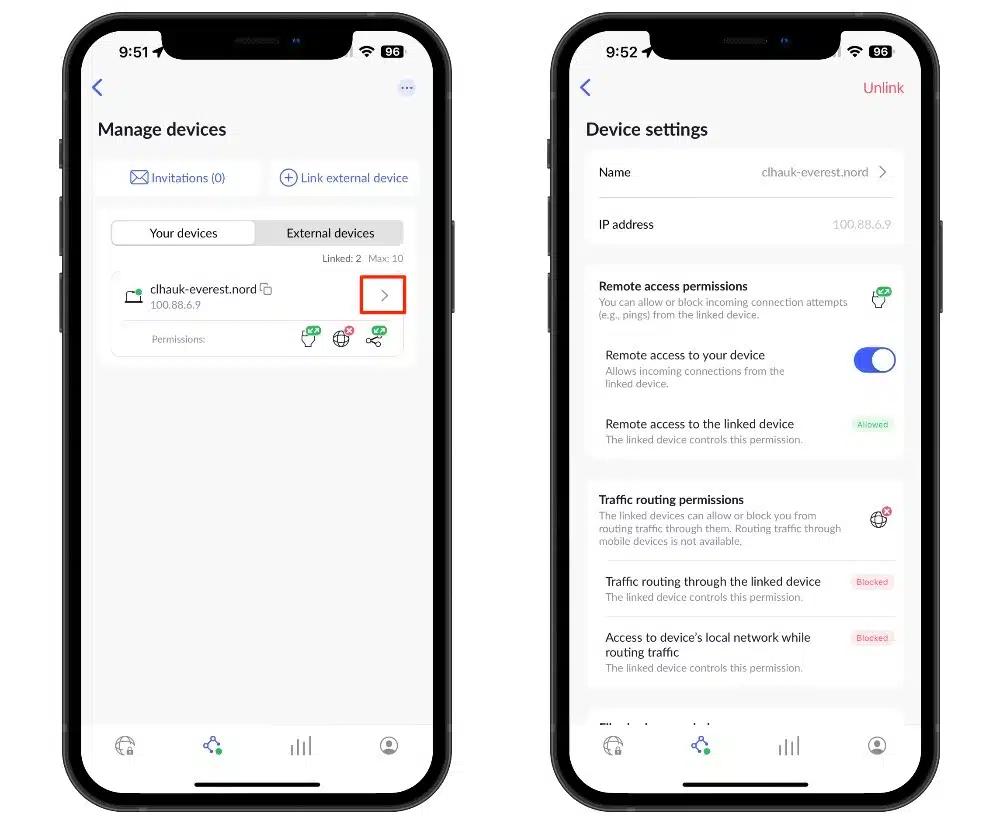
On this screen, we can see that remote access and file sharing with the macOS computer is allowed, but traffic routing is currently not allowed. We’ll need to enable that on the Mac, as traffic routing cannot be enabled through an iOS or Android device, it can only be done on a Mac or Windows computer. You’ll also discover that iOS and Android devices cannot allow remote access to their file system or LAN and local resources, it can only be done on a computer.
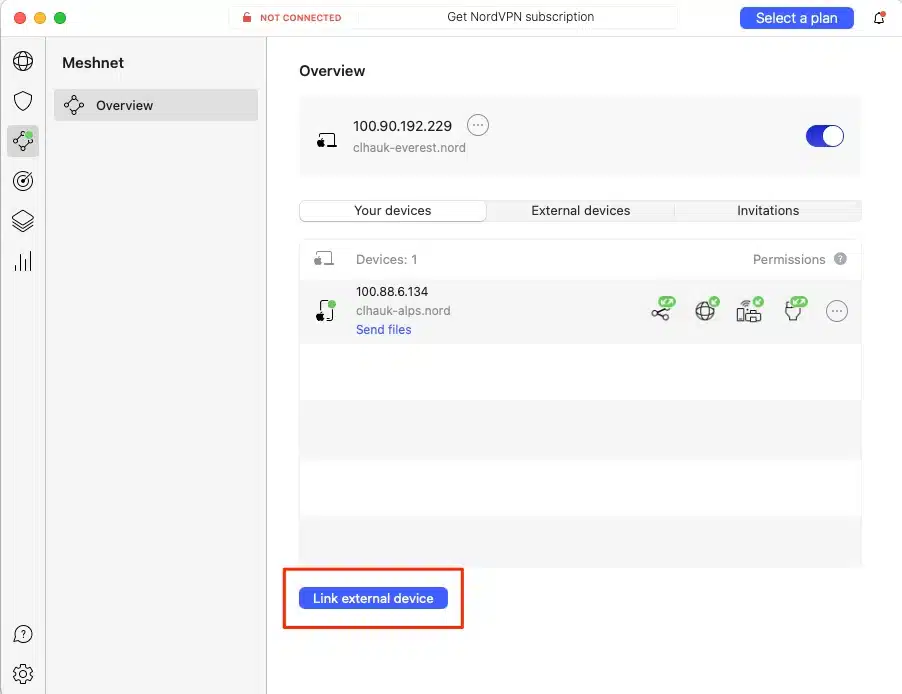
- Now, let’s go back to the Mac. On the Mac, we can see the iPhone showing in the list of our mesh network members.
- Click on the three dots to the right to allow the iPhone to route its traffic through the Mac device.
- Now we’ll follow the same steps as in #2, to allow local network access.
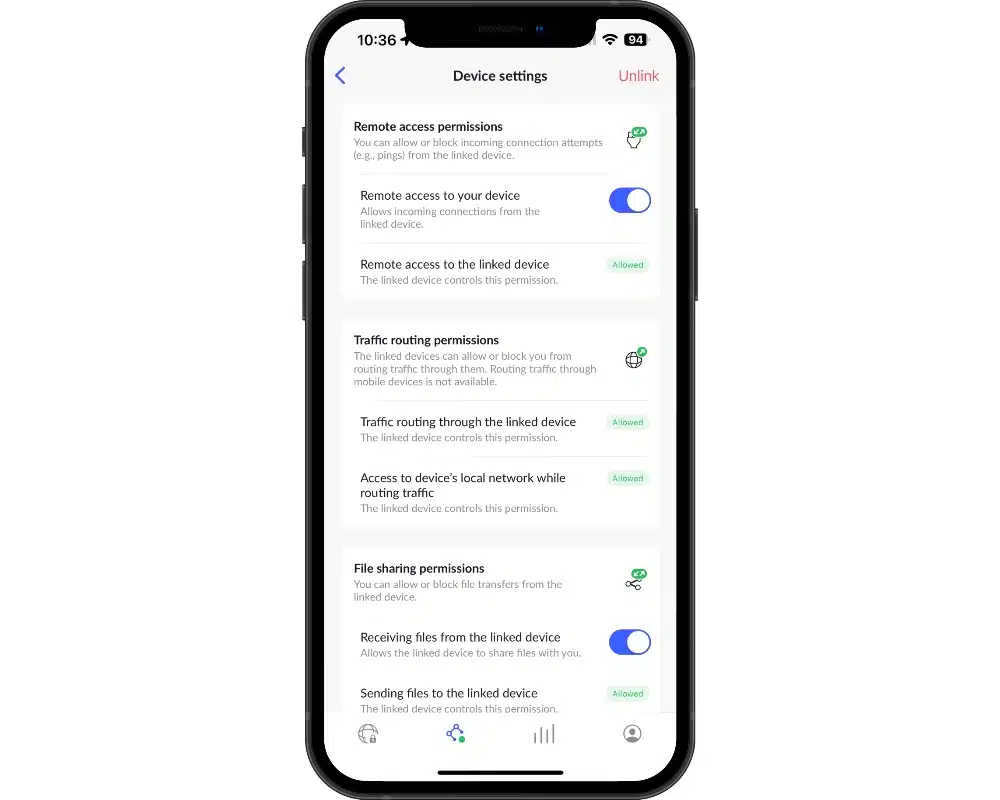
- We’ve granted full permission for the iPhone to access our Mac via the mesh network.
- On the iPhone, you’ll be able to see that the app reflects those changes.
Okay, everything is all set up, so let’s take a look at some use cases for Meshnet.
Sending Invitations
It’s easy to send invitations to other NordVPN users to join your personal Meshnet network. Please note that those users must have Meshnet enabled on their device for you to be able to send invites to them.
- While on the Meshnet screen of the NordVPN app, click on the “External Devices” tab, then click the “Link external device” button.
- You’ll be taken to the “Link external device” screen. Enter the email address of the user you wish to invite, select the permissions you wish to grant to that user, and then click the “Send invitation” button.

- The invitee will see the invitation displayed in the Meshnet invitations tab.
Once the invitee has accepted your invitation, they will join your Meshnet network as soon as they enable Meshnet. Unanswered invitations are automatically deleted after 72 hours.
File Sharing
Now, let’s share some files between the iPhone and the Mac.
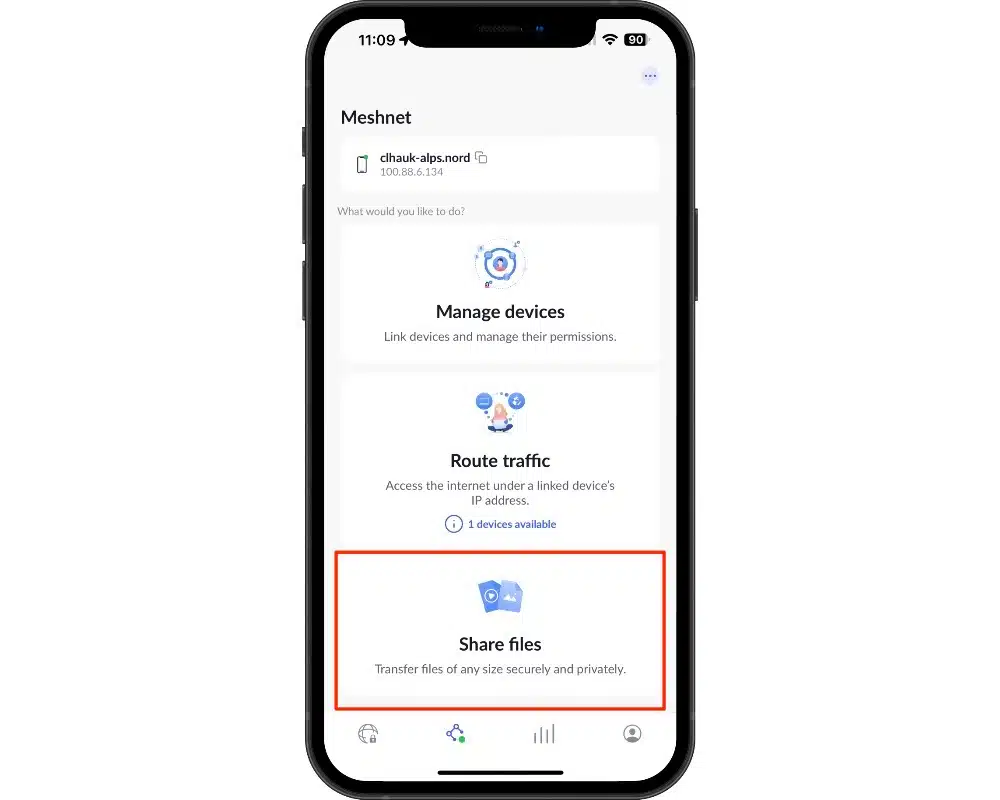
- Go to the Meshnet screen in the iPhone app and tap on “Share files.”
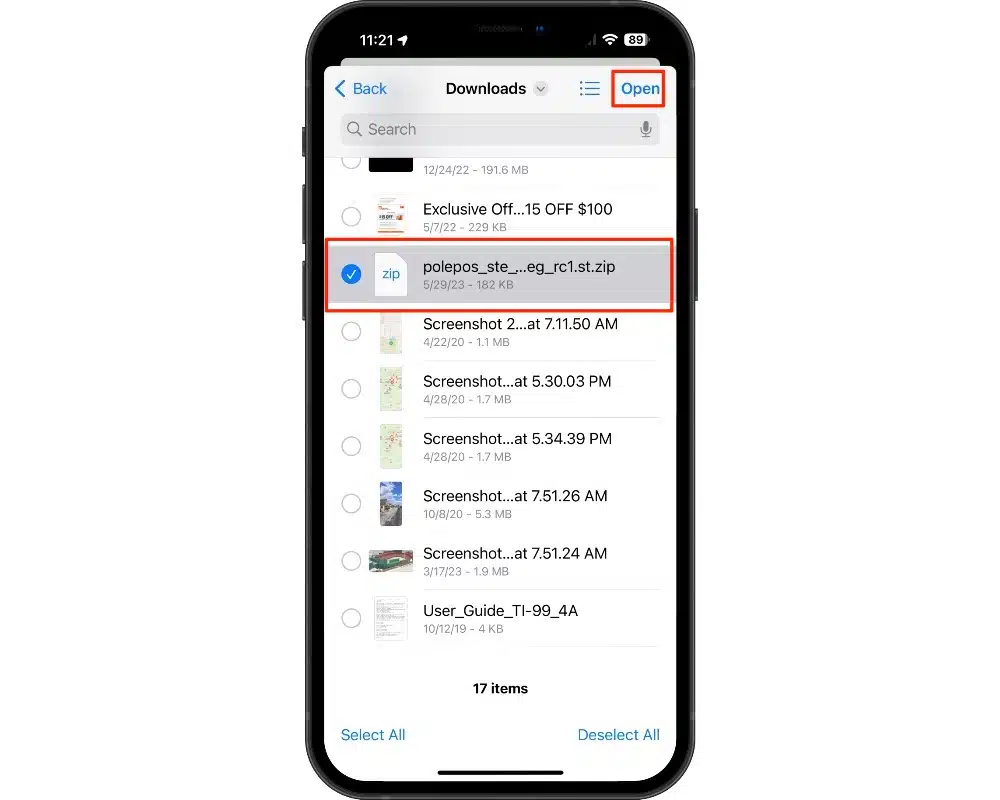
- You’ll be prompted to share photos or files. In this case, let’s select “Files.” The file picker will be displayed.

- Tap the file you want to share and then tap the “Open” button.
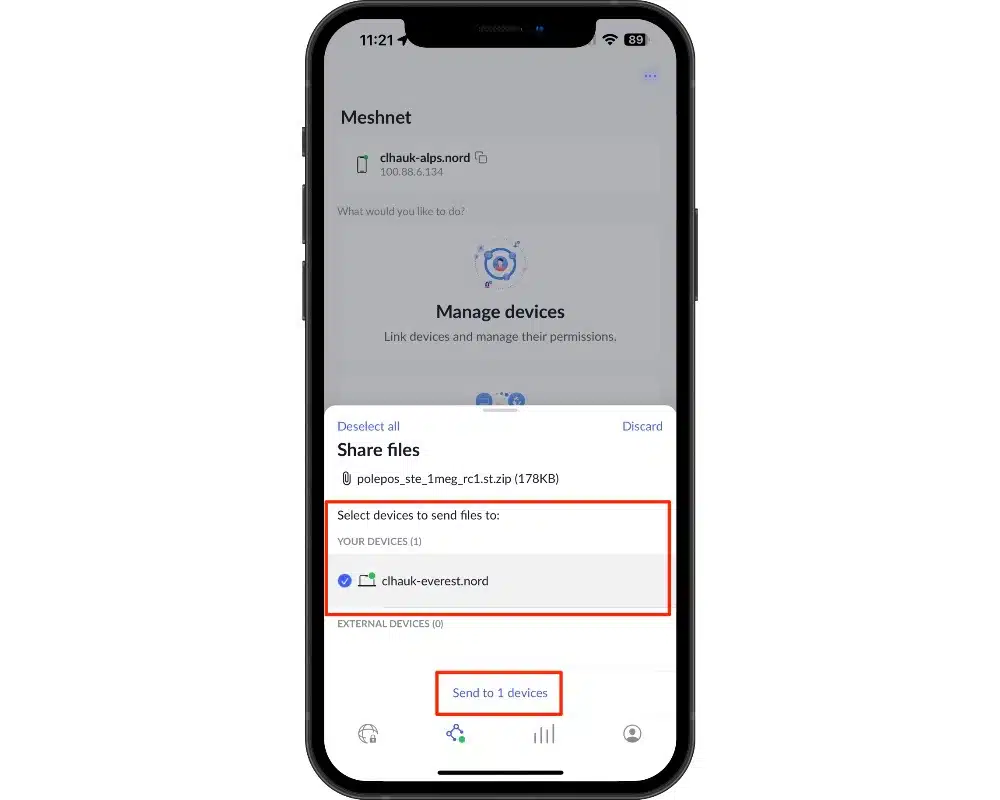
- You’ll then be prompted to select the device you’d like to send the file to. While we only see one device here (since we’ve only setup two devices total), you’ll normally see all of the available members of your mesh network.
- Tap the device, and a blue checkmark will appear to its left.
- Tap “Send this to 1 devices.”
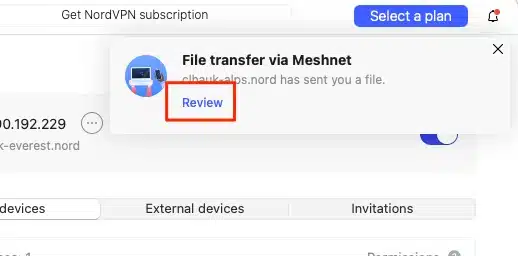
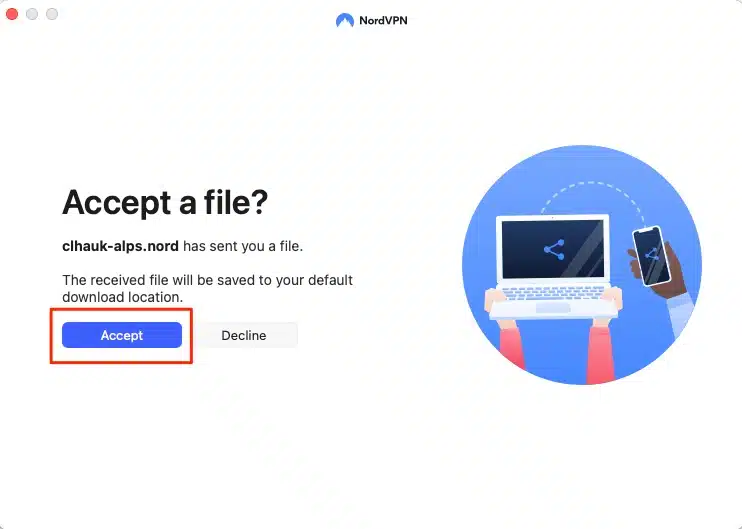
- A notification will appear in the macOS app, notifying you of the file transfer request. Click “Review.”
- You’ll now be prompted to “Accept” or “Decline” the file transfer.
- Click “Accept.”
- The file will be downloaded and you’ll see a notification when the transfer is complete.
- The file will be saved to your Downloads folder. You can click “Show in Finder” and Finder will open up the directory where the file is saved.
Routing Traffic Through Another Device
NordVPN’s Meshnet traffic routing feature allows devices on the mesh network to browse the internet via another network device’s internet connection. This basically turns one of the networked devices into a VPN server of sorts. This feature is limited to computers in the mesh network, outside devices do not have this privilege.
In my example case, I’ll allow my iPhone to access the internet via my Mac computer through Meshnet. The process will be similar for Android and Windows devices.
- On the iPhone, I’ll go to the Meshnet page in the NordVPN app.
- I will then tap “Route traffic.”
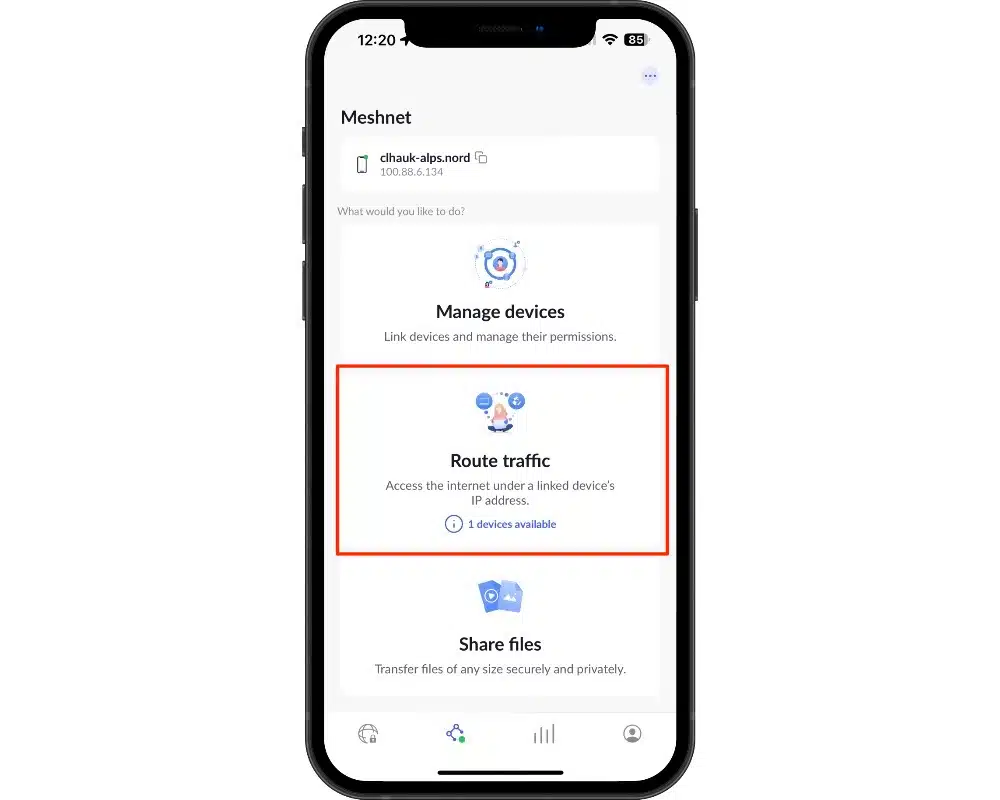
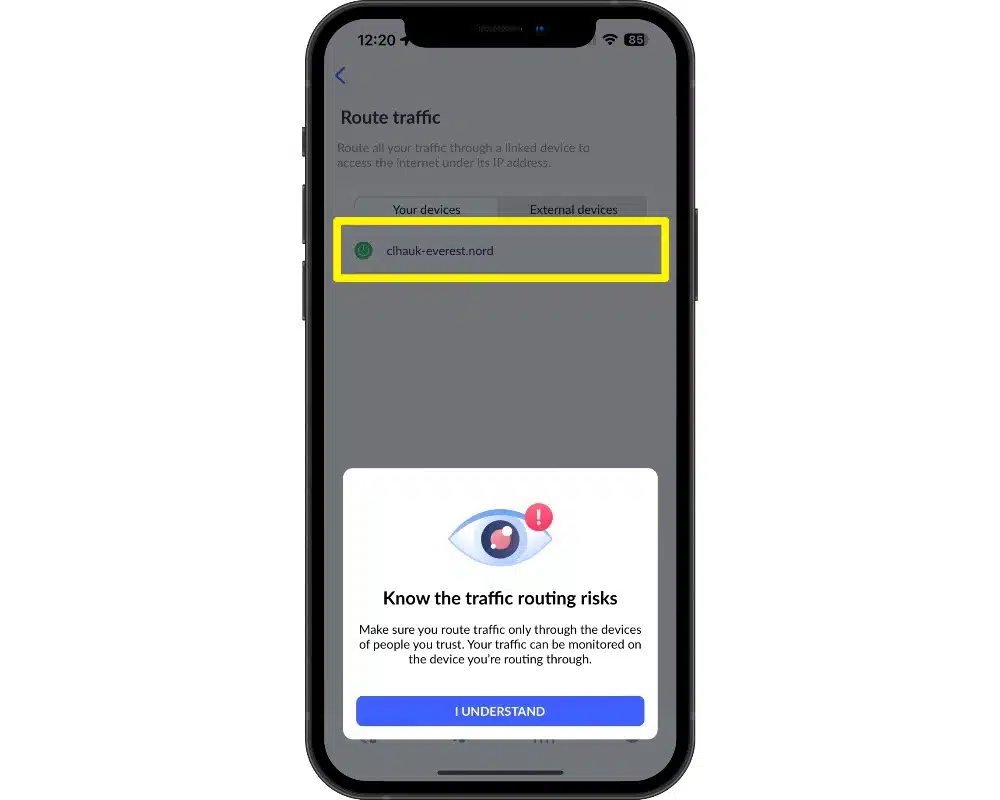
- I am prompted to select the device I wish to route my internet traffic through. I only have two devices on my Meshnet network, so I only see one device, my Mac.
- I tap the Mac, and a green check mark appears to its left.
- That’s all it takes, my iPhone’s internet connection is now being routed through my Mac.
Let’s test the connection to make sure things are working as they should.
- In a browser on your Mac, visit an IP Address Checking website, like this one from Comparitech. This will show you the Mac’s public-facing IP address.

- Open a browser on your iPhone and visit an IP Address Checking website, like this one from Comparitech.
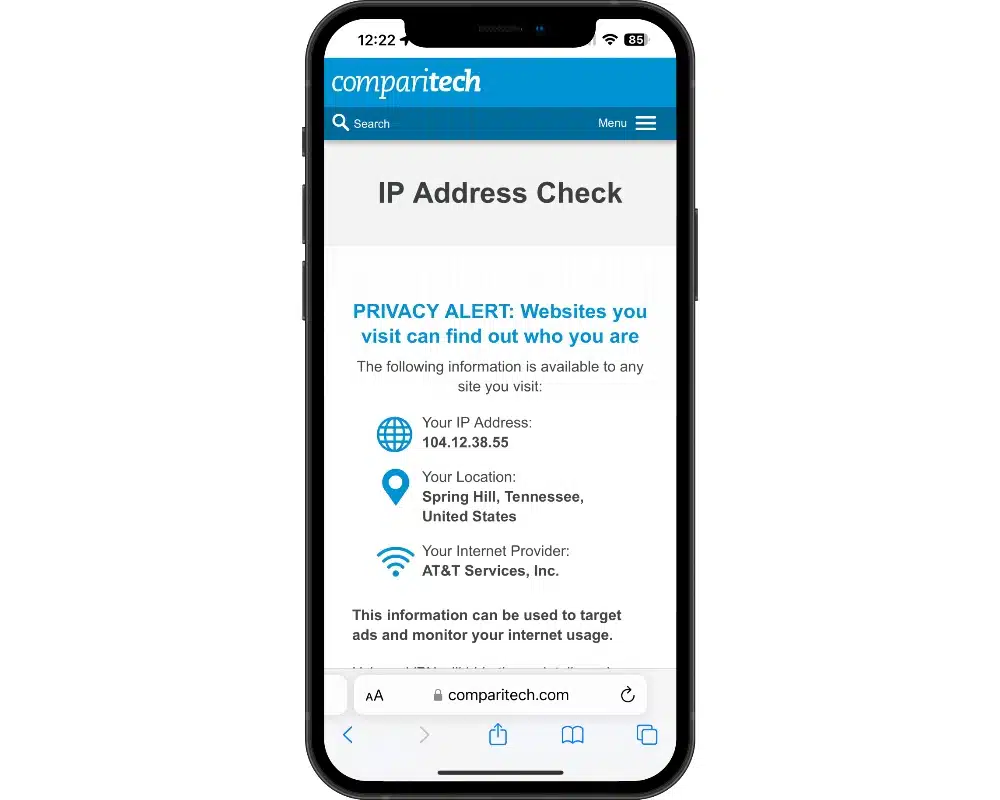
- The iPhone’s IP address should match the address seen in the Mac’s browser.
- They match! This means the iPhone is connecting to the internet through the Mac’s internet connection.
Provide Remote Access to LAN Resources
Meshnet also allows devices to access a host device’s LAN resources, including file servers or even the router. In this example, I’ll be configuring my iPhone to access the LAN router over 5G.
- On the iPhone, I’ll go to the Meshnet page in the NordVPN app.
- I will then tap “Mobile” -> “Select Route Traffic.”
- I will then select the device I’ll route my traffic through.
- I am prompted to select the device I wish to route my internet traffic through. I only have two devices on my Meshnet network, so I only see one device, my Mac.
- I tap the Mac, and a green check mark appears to its left.
- The iPhone’s traffic should now be routing through my Mac and the iPhone should now have access to the Mac’s LAN resources.
We’ll now test to make sure everything is set up correctly by accessing the LAN router’s Web UI. Our Mac’s router is accessible from 10.0.0.1.
On the iPhone, let’s launch a web browser and enter 10.0.0.1. We should be able to get to the router’s login page if everything is set up correctly. (Your LAN’s subnet may differ, so replace the IP address in this example with yours (ex. 192.168.1.1, 192.168.2.1, etc.)).
We have access – it works.
Meshnet Troubleshooting
We’ve covered how to use Meshnet to share files, route traffic, and provide access to LAN resources. But, what if you run into problems? In this section, I’ll walk you through a few troubleshooting tips that may help you if things don’t go according to plan.
Restart the NordVPN App
If you run into an issue with Meshnet not working properly, try shutting down the app and then firing it up again. Sure, it sounds like a response the IT Crowd would offer, but it is the first thing you should try when troubleshooting.
Disable and Re-Enable Meshnet
If restarting the NordVPN app doesn’t fix things, try disabling and re-enabling Meshnet.
- In the NordVPN app, go to the Meshnet page. Our screenshots here are on the macOS version.
- Toggle the Meshnet switch off and then back on.
- Meshnet should now be working properly.
Disable the VPN
Some users will find that having both the NordVPN VPN protection and Meshnet enabled at the same time will cause Meshnet to not work properly.
Try disabling the app’s VPN protection, enabling Meshnet, and then turning the VPN back on again.
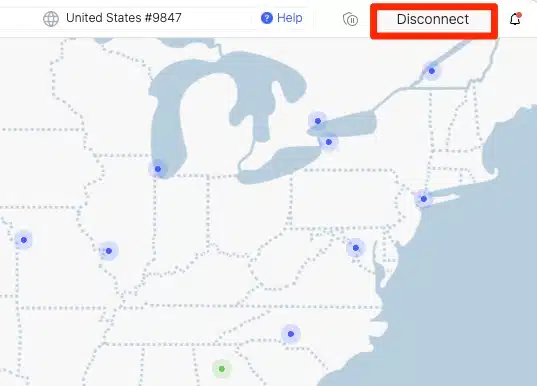
- In the NordVPN app, go to the Meshnet page. Our screenshots here are on the macOS version.
- Disable VPN protection by clicking the “Disconnect” button, found in the top-right corner of the app.
- Toggle Meshnet to the “ON” position.
- Switch the VPN protection back on by clicking the “Quick Connect” button, found in the top-right corner of the app.
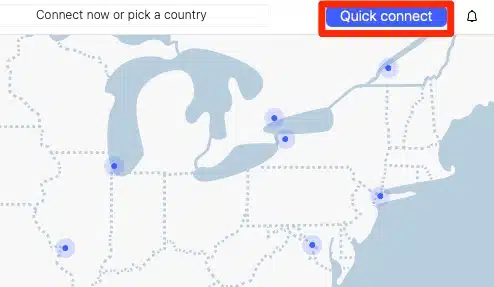
- Meshnet and the VPN connection should now both be enabled.
Still having issues connecting? Check to make sure that MeshNet and NordVPN aren’t blocked by your firewall. Also, make sure all users on Meshnet have the most up-to-date version of NordVPN installed.
If all else fails, contact NordVPN’s 24/7 live chat support.
In Conclusion
NordVPN’s free Meshnet feature offers an excellent and secure way to communicate between your devices and those of other trusted users and devices. During the time I have used Meshnet, it has provided reliable service and I urge readers to give it a try. It’s free (it requires a NordVPN account, but you don’t have to subscribe to NordVPN’s VPN services), and there is no risk in trying it.
For information about Meshnet, visit the NordVPN website.
NordVPN Meshnet FAQs
Is Meshnet Really Free?
Absolutely! Meshnet is completely free, although it does require a NordVPN account (but you don’t have to subscribe to NordVPN, although you really should). Simply download the app and start using Meshnet. Meshnet is included in the NordVPN apps for every major platform.
What Are the Most Popular Uses for Meshnet?
The most popular uses for Meshnet include:
- Remote device access
- Remote LAN gaming parties
- Sharing files
- Working on joint projects
- Security
How Many Devices Can Be Connected in a Single Meshnet Network?
Meshnet supports up to 60 devices on a single network. Up to 10 devices from a single Meshnet account, as well as up to 50 external devices can be connected.