
In May 2014, a group of Russian hackers launched a malware attack against iOS device users, which locked their devices. The group demanded a $100 ransom from each victim to unlock the afflicted devices.
While the attack affected a large number of users, it appeared to mostly affect users who had not used a passcode to secure their devices.

Later that year, a September report told of celebrities who had their iCloud accounts hacked, leading to the release of revealing photos of those same celebrities. The photos were first posted on a 4chan message board.
Of course, the internet being the internet, the images quickly spread to the rest of the web.
These are just two of numerous instances where bad guys gained access and control of an iOS user’s device. Such stories can cause a chill to run through the average user’s body.
However, in both cases, the access was gained due to users not protecting themselves properly. They had neglected to either lock down their device with a passcode, or – in the celebrity photos hacks – they used weak passwords and committed the cardinal sin of password reuse.
In this article, I’ll guide you through what you can do to protect your device and all of that valuable personal and business data that you have stored on it. I’ll show you how to protect your device from prying eyes and keep it updated to the latest version of iOS.
I’ll also take a look at how to back up your iOS device, set it up to unlock with just the touch of a finger, and even how to make sure all of your personal data is removed before you sell or donate an old device.
In addition, I’ll take a look at how to password-protect notes in the iOS 11 Notes app and keep track of all of the other passwords you use. Before I’m through, you’ll also know what jailbreaking is, and the pros and cons of doing it to your device.
#1 – Enable Auto-Lock and Set the Timeout
One of the first things you should do for any iOS device is turn on Auto-Lock and set a reasonable amount of time to pass before it Auto-Locks. Auto-Lock can be configured to engage for time periods of “30 seconds” to “Never.”
Auto-Lock sets the amount of time that will pass before your unattended iOS device will shut off and require a passcode or fingerprint on a Touch ID to unlock the device.
To enable Auto-Lock and set a timeout period for it to engage, do the following:
- Open the Settings app on your device.
- Tap the “Display & Brightness” menu option on the main Settings menu.
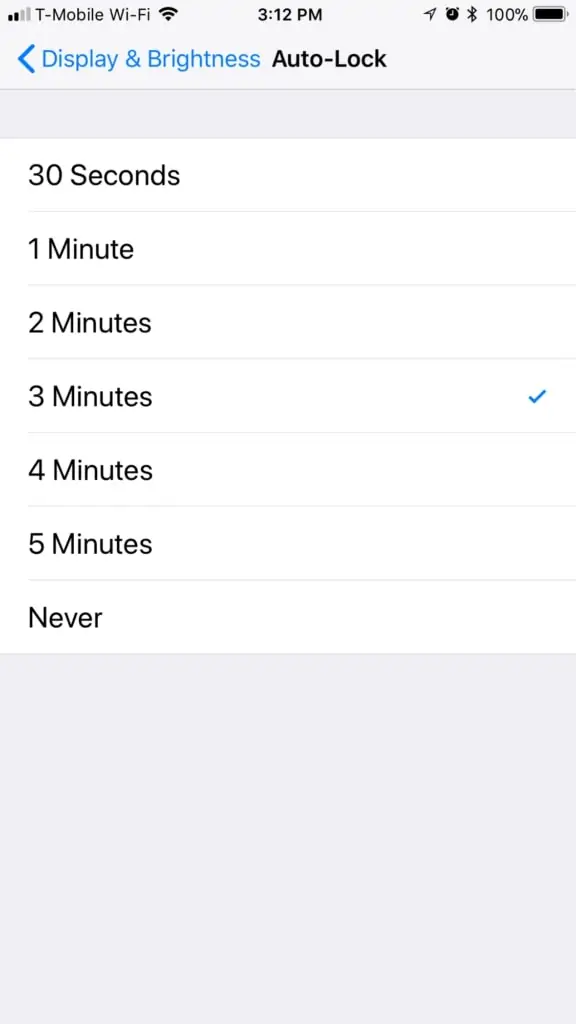
- Tap the “Auto-Lock” menu option in the “Display & Brightness” menu.
- In the “Auto-Lock” area, you can opt for any of the following timeout options: “30 Seconds,” “1 Minute,” “2 Minutes,” “3 Minutes,” “4 Minutes,” “5 Minutes” and “Never” (not recommended).


How you set the timeout period depends on how you use your device.
If you always have your iPhone in your hand and use it constantly, you might want to set auto-lock to a longer period of time. Those users that simply check mail every once in a while, or only use it a couple of times a day, might want to set it to a shorter period of time.
Fun fact 🙂 I once worked at an Apple Store located in the Southwest part of the United States. A fun pastime for mischievous employees at the store was to find an unlocked iPhone another employee had left unattended.
Soon, the unsuspecting employee was receiving text messages and Facebook comments wondering why he or she hadn’t told their loved ones about their Spider-Man bed sheets or their entire collection of My Little Pony DVDs before now.
#2 – Turn On Two-Factor Authentication
Two-factor authentication adds an extra layer of security for your iCloud login and associated devices. It ensures your account can only be accessed on devices and computers that you trust.
Any time you log in to a new device or computer for the first time, you’ll need to provide your password and a six-digit verification code that will automatically display on your already trusted devices.

By entering the code, you indicate that you trust the new device. This drastically improves the security of your account, as even if someone has your password, they won’t be able to supply the six-digit verification code.
Turn On Two-Factor Authentication in Settings
If you’re using iOS 10.3 or later:
- Go to “Settings” -> “[your name]” -> “Password & Security.”
- Tap “Turn on Two-Factor Authentication.”
- Tap “Continue.”
If you’re using iOS 10.2 or earlier:
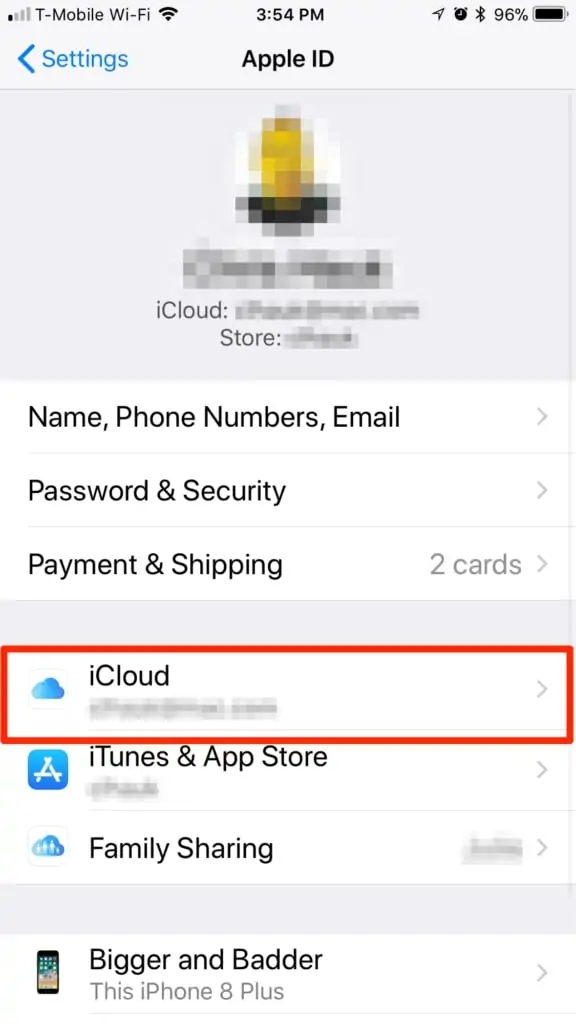
- Go to “Settings” -> “iCloud.”
- Tap your Apple ID -> “Password & Security.”
- Tap “Turn on Two-Factor Authentication.”
- Tap “Continue.”


After completing the steps above, you’ll be asked for the phone number where you want to receive verification codes. The codes can be sent via text or a phone call, so any type of phone number can be entered. When you tap “Next,” Apple will send you a verification code. Enter the number to verify the phone number and turn on two-factor authentication.
For more information about two-factor authentication, and to learn how to set it up on your other Apple devices, visit the Apple Support website.
#3 – Use “Find My iPhone”
You love your new iOS device. You take it everywhere you go.
Uh-oh! You’ve lost it. Now what?
No worries – you enabled “Find My iPhone” on the device, right?
Find My iPhone allows owners of an iPhone, iPad, iPod touch, Apple Watch, Mac, or AirPods to find the lost device, accessory, or computer by displaying the item’s last known location on a map viewable on another iOS device or computer.

This can help if you weren’t sure exactly where you lost the device. The service also allows you to get the device to play a sound, which is handy if you think it may have slid under a seat cushion or fallen into a drawer. (Hey, it happens!)
You can also remotely lock and send a message to your device, informing the finder of the device as to how they can contact you.
As a last resort when all else fails, you can send a command to the device to wipe itself clean of all personal information. The device remains linked to your iCloud account, preventing anyone else from resetting the device and using or selling it.
Enabling Find My iPhone
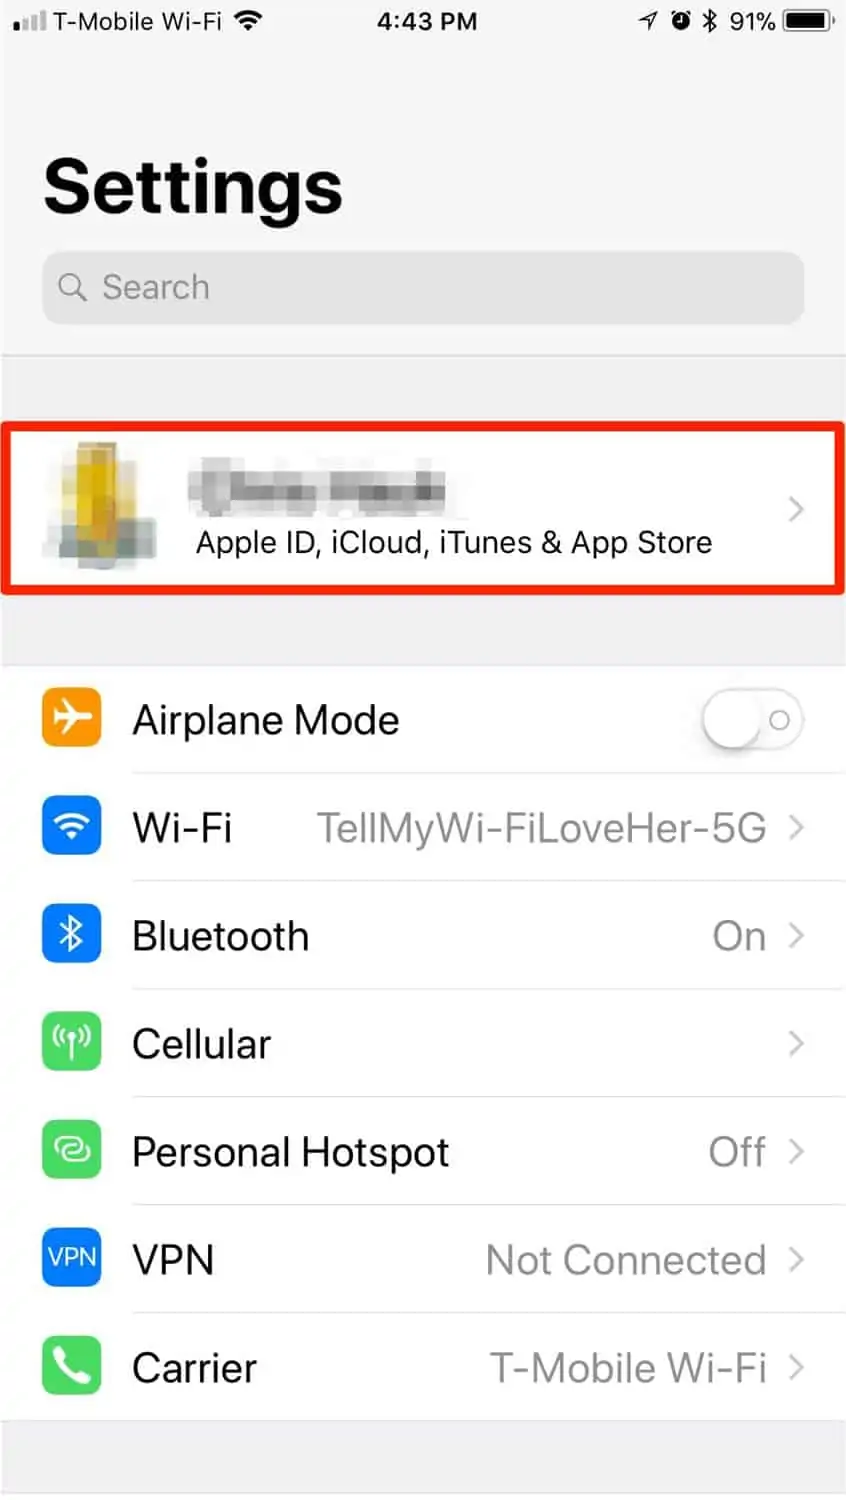
- Open the Settings app and tap “User Name.”
- On the “Apple ID” screen, tap the name of your device. Mine is “Bigger and Badder.” It is also labeled as “This iPhone 8 Plus,” as seen in the screenshots below.


-
-
- On the “Device Info” screen, tap the “Find My iPhone” menu option.
- On the “Find My iPhone” screen, make sure the “Find My iPhone” toggle switch is set to “on.” (The background of the button will be green when it’s turned on.) Also, make sure the “Send Last Location” toggle switch is set to “on.”
-


Now, if you lose your iOS device, you can view its location on a map, message anyone who may have found the device, or lock or erase it if need be. Also, since the “Send Last Location” option was turned on, your device will automatically attempt to send its location to Apple if the device’s battery reaches a critically low level.
Using Find My iPhone to Find a Lost Device
If you lose your iPhone or iPad, visit the iCloud.com website on your computer or another mobile device to view its location. There, you’ll be able to see the device’s location, tell it to make a noise to alert you to its nearby whereabouts, or lock or erase the device.
Visit iCloud.com and log in with your iCloud credentials.

From the main iCloud.com menu, click the “Find iPhone” icon.

A map will display, showing all of the devices, computers and accessories you have enabled “Find My iPhone” on. To narrow the view down to the device you are searching for, click the pull-down at the top of the map labeled “All Devices.”
Click the name of the device you are searching for. Only that device will display on the map.

From this view, you can:
- Tell the device to play a sound to alert you or anyone nearby to its location
- Put the device into Lost Mode, which will lock the device and display a phone number where you can be reached, as well as a message of your choosing on its screen
- Erase the device
You can also use the “Find My iPhone” app on an iOS device to find another iOS device, an Apple Watch, a Mac, or AirPods. The app allows you to:
- Locate an iPhone, iPad, iPod touch or Mac on a map
- Play a sound for two minutes at full volume (even if the device is set to silent)
- Remotely lock a device with a passcode
- hashtagDisplay a custom message on the Lock Screen
- hashtagView recent location history of the device while in Lost Mode (iOS devices)
- hashtagGet driving directions to the device’s location
- hashtagRemotely erase all content and settings on the device
- hashtagView the device’s remaining battery charge


#4 – Keep Your Device Updated to the Latest Version of iOS
To ensure you are protected from any security holes or other issues with your iPhone or iPad, you should always keep your iOS device updated to the most recent version of the iOS mobile operating system.
Apple releases a major update of their iOS operating system, alongside the debut of their new flagship iPhone handset, each fall. The new operating system always offers new features as well as fixes for any security holes that may have been discovered over the previous year.

The company also makes periodic “point releases” during the rest of the year, which are intended to fix any issues found in the operating system by researchers and users.
Apple and security researchers, from time to time, find security flaws in iOS. (All operating systems have security holes – it’s just a sad fact of modern computing.) Apple regularly updates iOS to plug those security holes.
Upgrading to the latest version of iOS is easy and can be performed either over-the-air or via iTunes. Before updating your iPhone or iPad, always make sure you have a recent backup of the device, just in case any issues arise. I’ll show you how to back up your device in the next section.
Updating an iOS Device Over-the-Air
Your iOS device can be updated “over-the-air,” which means it can be updated directly through its Wi-Fi connection. The update downloads to the device and is automatically installed.

To install an over-the-air update, do the following:
- Plug your device into a charger and make sure it’s connected to the internet via Wi-Fi.
- Open the Settings app and go to “General” -> “Software Update.”
- If an update is available, details about the update will be displayed here. Tap “Download and Install.”
Note: if your iOS device is running low on space, the update process may ask to temporarily remove some apps to gain more space for the update process. The apps will be reinstalled following the completion of the update.
- To update immediately, tap “Install.” If you’d like to install at a later time, tap “Install Tonight” or “Remind Me Later.” If you tap “Install Tonight,” your device will update while you sleep – just remember to plug it into a charger before slipping into dreamland.
- Your device will ask you for your passcode – enter it.
The update will now proceed. It can take anywhere from a few minutes to an hour, depending on the speed of your internet connection and the size of the update.
Updating an iOS Device via iTunes
If you don’t have a Wi-Fi signal handy, you can hook your iPhone or iPad up to your PC or Mac through a Lightning cable and update it via iTunes. (Your computer will need to be connected to the internet in some manner or other for this to work.)

- Make sure you have the latest version of iTunes installed on your PC or Mac.
- Connect your device to the computer with a Lightning cable.
- Open iTunes and select the iOS device you want to update.
- Click “Summary” and then click “Check for Update.”
- Click “Download and Update.”
- If requested, enter the passcode for the device.
- Wait for the update process to finish.
#5 – Back Up Your Device Regularly
For any computer or mobile device, the best advice I can give anyone is to keep it backed up. There is no better feeling if and when your iOS device dies (or if you just want to buy a new model) than knowing you have a recent backup you can restore from.
Backups save hours, perhaps even days of trying to remember what was on your iPhone. (And you WILL forget something important. There is no doubt about that!)
As mentioned in the previous section, you always want to have a backup handy, just in case something goes wrong with an iOS update. As an example, Apple’s iOS 10.3 update made a huge change, especially for a “point” update.
Version 10.3 converted the file format for storage on iOS devices from the 30-year-old HFS+ file system to the new Apple File System (AFS). While not many issues were reported with the conversion, you can be sure the folks who did have issues were glad to have had a backup handy!
Set Your iOS Device to Back Up Automatically
The easiest way to keep a recent backup of your iPhone or iPad is to set it to back up to iCloud every night automatically. iCloud Backup will store a copy of the information on your device, allowing it to be quickly restored if needed.
Here’s how to set up iCloud Backup:
- Open the Settings app and go to: “Settings” -> “User Name” -> “iCloud” -> “iCloud Backup.” Make sure iCloud Backup is turned on.
- Each evening, connect your iOS device to a power source.
- Make sure the device is connected to a Wi-Fi network.
- Make sure the device’s screen is locked.


If you find your device isn’t backing up automatically, it may be due to a lack of space in your iCloud storage account.
When you first set up iCloud, you automatically receive 5GB of free cloud storage. While 5GB is usually enough to back up an iOS device, that storage can also be used for other purposes, such as storing photos and videos, documents, and other data from various iCloud-enabled apps.
Check your iCloud storage space by opening the Settings app on your device and going to “Settings” -> “[User Name]” -> “iCloud.” There, at the top of the screen, you’ll see how much iCloud storage space you have remaining. A handy gauge shows you what exactly is taking up space in your iCloud Drive.


If needed, you can purchase more iCloud storage space by tapping the Storage Gauge and then tapping “Change Storage Plan.” On the next screen, you can buy more iCloud storage space.
Backing Up Your iOS Device to Your Computer Via iTunes
You can also keep a backup of your iOS device on your PC or Mac by using iTunes. I always back my iPhone up to both iCloud and iTunes to double-down on the chance of having a good backup to restore my device if needed.

To back up your iOS device to iTunes, do the following:
- Open iTunes on your PC or Mac and connect your iOS device to the computer via its Lightning sync/charging cable.
- Your device may ask you to enter your device passcode or to “Trust This Computer.” If it does, follow the onscreen prompts.
- Click on your iPhone or iPad when it appears in iTunes.
- If you have Health and Activity data from either your iPhone or your Apple Watch, you’ll need to encrypt your backup. Click the “Encrypt” box and enter a password you will remember.
Note: make sure you can remember your password, or write it down and store it someplace safe. If you can’t remember this password, you won’t be able to restore from your encrypted backup.
If you don’t need to save your Health and Activity data, you can proceed to the next step.
- Click “Back Up Now.”
- After the backup process ends, you’ll be able to see on your computer’s screen if the backup was successful. The name of the device, along with the date and time of your backup, will be listed.
#6 – Set Up Your Device’s Passcode & Touch ID or Face ID
No matter where you use your iPhone or iPad, it’s never a good idea to leave it unprotected by a device passcode or fingerprint lock via Touch ID.
At the very least, you should lock your device with a passcode, and if your device was manufactured in the last few years, you should also lock it with a fingerprint through Touch ID – or in the case of the iPhone X, Face ID.
Setting or Changing the Passcode on your iOS Device
First, we’ll take a look at creating or changing a passcode that can be used to lock your iOS device. It only takes a few moments to set one up, and it offers an excellent layer of protection from nosy parties who may want to get a look at what you have stored on your iPhone or iPad.


To set a passcode, do the following:
- On your iOS device, tap the “Settings” icon to open the Settings app.
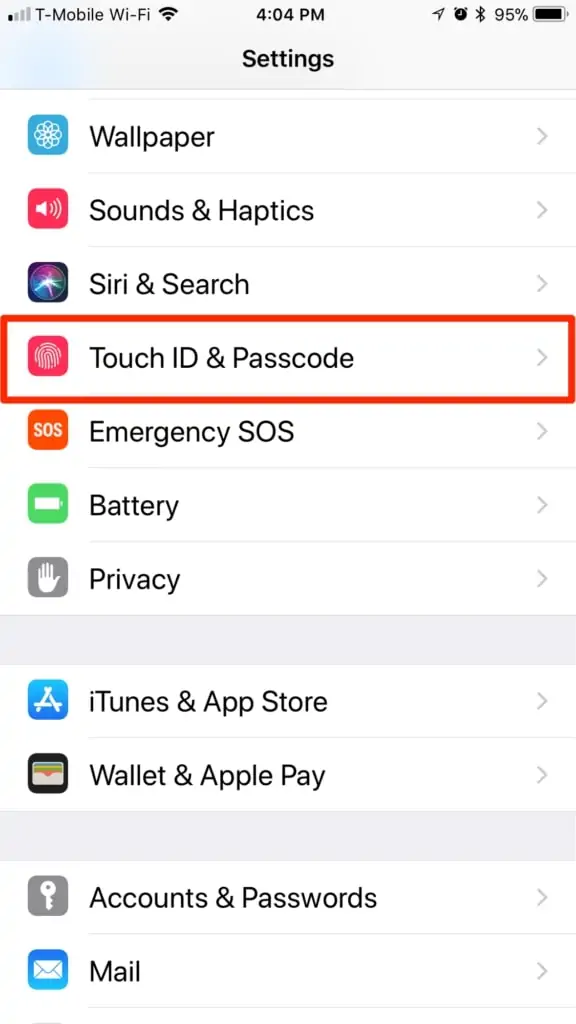
- In the Settings menu, look for the “Touch ID & Passcode” menu option (it’s about two screens down). Tap the menu selection when you find it.
- If you already have a passcode set, you’ll be asked to enter it.
- You’ll now see the Touch ID & Passcode screen. Scroll down until you see the “Change Passcode” menu option. Tap that.
- Again, if you already have a passcode set, you’ll be asked to enter it.
- On the next screen, you’ll see a prompt to change your passcode. If you so desire, you can enter a six-digit passcode on this screen, enter the code one more time, and a new six-digit code will be set.
However, you can also set a custom alphanumeric code of any length, a custom numeric code of any length or the traditional four-digit numeric code.
- Once you have decided which type of passcode to use, enter it. You will then be asked to enter it again a second time to confirm it.


Setting Up Touch ID on Your iOS Device
Check this list to see if your iOS device supports Touch ID:
- iPhone 8 Plus
- iPhone 8
- iPhone 7 Plus
- iPhone 7
- iPhone 6S Plus
- iPhone 6S
- iPhone SE
- iPhone 6 Plus
- iPhone 6
- iPhone 5S
- iPad Pro (both the 12.9″ and 9.7″)
- iPad Air 2
- iPad mini 4
- iPad mini 3
- iPad 5th generation (Released 2017)
If your device is included in the list above, you can enable and set up Touch ID on your iPhone or iPad, allowing you to unlock your device, use it to log in to apps, and pay for goods and services both online and (with your iPhone) at participating merchants.


To set up Touch ID, do the following:
- On your iOS device, tap the “Settings” icon to open the Settings app.
- In the Settings menu, look for the “Touch ID & Passcode” menu option (it’s about two screens down). Tap the menu selection when you find it.
- If you already have a passcode set, you’ll be asked to enter it.
- Just a little way down from the Touch ID & Passcode screen, you’ll see the “FINGERPRINTS” section. Tap “Add a fingerprint” in this section.
- Your iOS device will now instruct you to scan a fingerprint.
Most people use their thumb for the first fingerprint – but if you’re in the right mood, go ahead and use your middle finger. (Just remember – you might need to use Touch ID in mixed company.)
- Lay the pad of the decided-upon finger lightly onto the Home button. (Don’t actually press the Home button, or it will cancel your scan.)
- When the device has performed the first scan of your finger, it will vibrate. Lift your finger and then bring it down lightly onto the Home button again. You’ll need to repeat this process until your iPhone or iPad has read enough of your fingerprint to recognize it.
Pro tip: Move your finger a bit for each scan and come in at a slightly different angle each time. This will allow you a bit of flexibility as to how you can lay your finger on the Home button when you need to unlock your device or pay for a purchase via Apple Pay.
- Your device will also ask you to adjust your finger and scan the edges of it. I usually hold my finger at almost a 90-degree angle for this part of the process. Continue to press and lift your finger, just as before, until the process is complete.


After completing the scan of your first finger, you’ll be taken back to the “Touch ID & Passcode” menu.
I usually name the fingerprint I just scanned. To do that, tap the print whose name you wish to change, then tap the “x” to delete the current name, and then enter a new name. I name them according to the finger, like “Right Thumb,” but I suppose you could call it anything you want. (Okay, “This Little Piggy Went to Market” it is.)
You can now repeat the process for up to four more fingers. However, you might consider allowing a trusted individual, such as your spouse, to scan a fingerprint. Doing so will enable them to unlock the device in case of an emergency. (This is particularly well-advised for butchers, who could lose a digit or five in a tragic bologna-slicing accident.)
Once your fingerprints have all been registered by your device, you can then rename them, as mentioned above, or delete any of them and scan a different digit.
When you’re back on the “Touch ID & Passcode” menu, you can set the following operations to be used with Touch ID.
iPhone Unlock
When this toggle switch is set to on/green, you can use any of your registered fingerprints to unlock your iPhone using Touch ID in place of entering your passcode.
Apple Pay
When this toggle switch is set to on/green, you can use any of your registered fingerprints to authorize Apple Pay payments at participating merchants.
iTunes & App Store
When this toggle switch is set to on/green, you can use any of your registered fingerprints to authorize purchases from the iTunes Store or App Store in place of typing out your iTunes password.
Setting Up Face ID on Your iPhone X or Newer
If you own an iPhone X or later iPhone model, you won’t have the option to set up Touch ID, as the iPhone X doesn’t come equipped with a Touch ID sensor or even a Home Button. Instead, Apple’s latest and greatest flagship handset boasts a new technology called Face ID.

Face ID scans the iPhone X user’s face to unlock the device, allow purchases from the iTunes and App Stores, and to allow Apple Pay payments. With a quick glance at the screen of the iPhone X, the user can enable all of the same types of tasks that a passcode or Touch ID did on previous iPhone models. For more information, visit the Apple Support website.
To set up Face ID on your iPhone X handset, do the following:
- Go to “Settings” -> “Face ID & Passcode.” If prompted, enter your passcode.
- Tap “Set Up Face ID.”
- Position your face directly in front of your iPhone X and tap “Get Started.”
- While looking straight into your iPhone, move the device until your face is inside the on-screen frame.
- When prompted, gently move your head to complete the circle.
- When the first Face ID scan is complete, tap “Continue.”
- Gently move your head to complete the circle for a second time, just as you did in the steps above.
- When Face ID setup is complete, tap “Done.”
If you didn’t initially set a passcode, you’ll be prompted to create one to use as an alternate way to verify your identity if needed.
You can choose the features that you want to use Face ID with, or reset Face ID, by going to “Settings” -> “Face ID & Passcode.”
#7 – Use a Password Manager
In other articles, I have discussed the value of using a password-management app on your computer or mobile device. iOS is no different.
With the hundreds of website and app logins you likely need to remember, a password manager keeps you from being tempted to backslide into one of the worst online sins: password reuse.
I have long used a password manager on both my Mac and my iOS devices, and I depend on it daily to help me maintain my numerous online logins. Although there are various password managers available today, my app of choice is 1Password.
To find out more about other password apps, just search for “password manager” in the App Store.
1Password
1Password is a popular password-management app developed by AgileBits. The app is cross-platform, meaning it works on Windows, macOS, iOS, and Android, so they have you covered for all of the popular computing platforms.
I use the macOS and iOS versions of 1Password on all of my devices. Both apps support syncing over iCloud, so no matter where I add a new login or change a password, both devices always have the latest versions ready for me to use.
Password managers allow you to save the various logins and passwords you create and use on a daily basis and then recall them for use via a single password. This encourages users to use a different password for every website or app, avoiding the sin of login/password reuse on multiple sites.


Most password managers, 1Password included, are not one-trick ponies. Instead, they offer a number of helpful features, storing secure notes and other types of information, all protected by encryption.
Many password managers on the iOS platform also offer the ability to be unlocked via the convenient Touch ID or Face ID features available on recent iOS devices. This removes the requirement of remembering even a single password, reducing the unlocking process to simply pressing the fingers you used for Touch ID or glancing at the screen with Face ID.
#8 – Password-Protect Notes in the iOS Notes App
While I’m on the subject of password-protecting things, let’s take a quick look at the Notes app. It’s one of the built-in apps in iOS and has had the ability to protect notes via password and Touch ID since the release of iOS 9.3.
Set a Password for a Note


You can easily password-protect older notes, as well as new ones, with just a few taps. Here’s how:
- Open the Notes app on your iOS device.
- Open or create the note you’d like to protect with a password.
- Tap the share icon in the upper right-hand corner of the display.
- Tap the “Lock Note” icon in the Share menu.
- Now, either enter a password or use Touch ID to protect the note.
- If you select the password option, and this is the first time you’ve locked a note with a password, you’ll be asked to enter a password that will lock this note and all future notes.
Note: If you forget this password, you will be unable to unlock your locked notes.
- To open a locked note, tap the note you wish to view and then tap “View Note” on the note screen. The Notes app will prompt you for a password or fingerprint.
How to Reset Your Password for Notes
You can change the password for notes via the Settings app.
- Open the Settings app and then tap the “Notes” menu option.
- In the Notes settings, tap the “Password” menu option.
- Tap the “Change Password…” option.
- Enter your old Notes password, then enter your new password – twice – in order to verify it.
- Set a Hint to help you remember the new password.
- Tap “Done,” which can be found in the upper right-hand corner of the screen.


You can also tap the “Reset Password” link on the Password screen and enter a new password that will only affect new notes. All old notes will still be locked with the old password.
#9 – Don’t Jailbreak Your Device
Ever since the early days of the iOS operating system, there have been iPhone users who have jailbroken their devices.
Jailbreaking is best described as running software that removes the Apple-imposed restrictions on an iOS device. This allows users to download and install apps and system utilities from sources other than Apple’s official App Store.
Jailbreaking proponents brag about the ability to use an iOS device however they want, with none of the restrictions Apple imposes on the standard “jailed” iOS operating system. They cite, and rightly so, that iOS doesn’t offer the same freedom of features like those provided by less-restrictive mobile operating systems, such as Android.
Somewhere around iOS 6 or 7, I jailbroke a device I had just replaced with the latest and greatest iPhone that was currently available. While I enjoyed playing with the new abilities and options that jailbreaking opened up to me, I soon realized that I would never be comfortable jailbreaking my daily driver device.

Call me old-fashioned, but I enjoy the “jail” a stock iOS device is kept in, as it also keeps me safer from malware and other hazards I might face when using a jailbroken device.
iOS jailbreaking dates back to 2007 and the original iPhone. For the first year of its existence, the iPhone and its operating system (not yet called iOS) restricted users to the stock apps that were installed at the Apple factory.
Users also had access to clever, yet limited, web-based apps that developers came up with. These limitations soon began to chafe many users, who decided to break the rules and find a way to develop and install apps onto their new preciouses, without the approval of the folks in Cupertino.
As jailbreaking has grown in popularity, Apple has waged a constant battle to shut down known jailbreaking methods. They do so by updating their iOS mobile operating system in order to close security holes the jailbreaking methods make use of to break the device free from its bonds.
Once Apple releases an update, the jailbreaking community then examines the new code for any security flaws that it can exploit to jailbreak the device once again. The chess game continues to this day.
The advantages of jailbreaking are attractive to users, due to the freedom it offers them to install apps that would not normally be allowed on their device. However, that same freedom offers a new batch of hazards that the users would not usually be required to face.
Jailbreaking and using unauthorized software opens iOS devices up to the possible installation of malware and viruses that would normally be caught by Apple’s rigorous app review process.
The Cydia App Store, where most jailbroken apps are downloaded and installed, does not require the same close review for inclusion in the store. This allows bad actor developers to slip in code that could possibly steal your personal information.

Software piracy is also a problem on jailbroken devices, as the lack of controls allows for easier installation of pirated apps, thus depriving developers of their rightful earnings. While software piracy is also present on stock iOS devices, the methods used are usually more complicated than on jailbroken devices, making it less attractive.
Users who have jailbroken their iOS device and then have issues with it, requiring them to visit an Apple Genius Bar for service, may find themselves turned away. An Apple support article about jailbreaking notes that the company “may deny service for an iPhone, iPad or iPod touch that has installed any unauthorized software.”

For the reasons above, I urge you not to jailbreak your iOS device. As iOS has been updated over the last few years, Apple has added numerous features to the mobile operating system that were once only available on jailbroken devices. There are, in my humble opinion, simply not enough reasons to jailbreak a device these days.
Wikipedia offers quite an informative entry on iOS jailbreaking, which goes into much more detail about the subject than available space allows me to offer here. I suggest interested readers visit the Wikipedia webpage for more information about the subject before deciding whether or not to jailbreak their device.
#10 – Wipe Your iOS Device Before Selling or Donating It
One really great thing about iOS devices is that they hold their value fairly well. This means that by selling your old device, you can recover a nice chunk of the purchase cost of your new device. When I bought my iPhone 8 Plus, I got $300 off the price of the new device by trading in my old iPhone 6 Plus.
Before selling your old device, you should always take the time to wipe the device of all of your personal information. The process also resets the device, so it will be ready for the next owner, with no fear of them being able to access any of your information.
Note: before wiping your old iOS device, always make sure you have a good backup of it, so you can restore your apps and settings to your new device. That makes things a bit easier – unless you just particularly enjoy starting over from scratch with every new device.
To wipe a device and get it ready for its next owner, do the following:
If you are wiping a device running iOS 10 or later, be sure to sign the device out of iCloud. Otherwise, the device might remain in Activation Lock, making life tougher for the next owner.
How to sign out of iCloud and the iTunes & App Store:
- If you’re using iOS 10.3 or later (this works with iOS 11 too), tap “Settings” -> “[your name].”
2. Scroll down and tap “Sign Out.” Enter your Apple ID password and tap “Turn Off.”


- If you’re using iOS 10.2 or earlier, tap “Settings” -> “iCloud” -> “Sign Out.”
- Tap “Sign Out” again, then tap “Delete from My [device]” and enter your Apple ID password.
- Go to “Settings” -> “iTunes & App Store” -> “Apple ID” -> “Sign Out” -> “Sign Out of iCloud and Store.”
Once that has been accomplished, do the following to erase your iOS device and restore it to its original factory settings:
- On your iPhone, iPad or iPod touch, go to “Settings” -> “General” -> “Reset.”
- Tap “Erase All Content and Settings.” (If you turned on “Find My iPhone,” you might need to enter your Apple ID and password.)
- If asked for your device passcode or Restrictions passcode, enter it. Then tap “Erase.”


Once the device has wiped itself clean, it should reboot and display the familiar “Welcome” greeting you saw when you first set the device up straight out of the box.
Action Steps
We’ve taken a look at quite a bit of information in this article – but nothing you can’t handle. While we’ve shown that it can be a dangerous world out there, we’ve also seen that it’s quite simple to take the steps needed to protect you and your device from the perils of the world.
To keep your iOS device and all your personal data safe, always do the following:
Enable auto-lock and set as short a timeout period as is feasible.
This prevents anyone from possibly getting a look at your device and what it holds if you happen to leave it lying around.
Turn on Two-Factor Authentication.
This ensures that even if someone guesses your iCloud password, they can’t use it to log in to your account via another device or computer without knowing a unique verification code that is only sent to devices that you trust.
Turn on “Find My iPhone.”
This highly useful feature of iOS allows you to find your iPhone or iPad if you’ve misplaced it – or worse, it’s been stolen. Using Find My iPhone, you can locate, lock and even erase their device, all remotely through a convenient web interface.
Keep your iOS device updated to the latest version of the iOS operating system.
When a new update is ready, your device will let you know. Updating usually only takes a short amount of time, and the process can even be set to run overnight.
Make Regular Backups of Your iOS Device.
Keep your device backed up. Make regular backups, both to iCloud and to your computer via iTunes. If you have a recent backup, life will be a lot easier when you need to restore your current device, or when you buy a new one.
Use a strong passcode, and on compatible models, your fingerprints via Touch ID or your face via Face ID.
This prevents anyone from picking up your unattended device and browsing your info.
Use a password manager.
If you’re using a unique password on every website or online service you use, keeping track of all those passwords is mind-boggling. A password manager protects your login information behind a single password, making it much simpler to keep track of everything.
Protect your Notes app with a password or Touch ID.
Sure, you might not need to protect this week’s grocery list, but you know that there’s plenty of info you’ve jotted down in the Notes app that prying eyes shouldn’t see.
Don’t jailbreak your iOS device.
This is a personal decision. I’ve decided it’s not worth it to me, due to the security risks. I cannot stress this enough: if you jailbreak your device, the security perils far outweigh any benefits you might gain.
Always wipe your device and set it back to its original factory settings before selling or donating the device.
This ensures no one will gain access to your information and allows the new owner to get a fresh start with the device.
By making use of the 10 handy tips I’ve laid out in this article, you can ensure you’ll be protected from hackers, be able to find your device if it is lost or stolen, keep your data safe from being monitored and make a well-informed decision as to whether or not to jailbreak your device. Stay safe, my friends.
Contents [hide]
- #1 – Enable Auto-Lock and Set the Timeout
- #2 – Turn On Two-Factor Authentication
- #3 – Use “Find My iPhone”
- #4 – Keep Your Device Updated to the Latest Version of iOS
- #5 – Back Up Your Device Regularly
- #6 – Set Up Your Device’s Passcode & Touch ID or Face ID
- #7 – Use a Password Manager
- #8 – Password-Protect Notes in the iOS Notes App
- #9 – Don’t Jailbreak Your Device
- #10 – Wipe Your iOS Device Before Selling or Donating It
- Action Steps