Amazon’s Fire TV family – which includes the Amazon Fire TV, Fire TV Stick, Fire TV Cube, and various makes and models of smart TVs with Amazon Fire TV software built-in – are some of the most popular streaming devices available on the market today.
Amazon Fire TV connected devices offer access not only to Amazon’s Prime Video library of content but also to apps from most major streaming providers, including Netflix, Showtime, HBO, BBC iPlayer, Hulu, Disney+, Apple TV+ and numerous other streaming providers, both well-known and obscure.
However, much of the content from streaming services is geographically restricted. That means the content you enjoy inside the borders of your home country may not be available if you’re visiting or living in another country.
Luckily, many of the Virtual Private Network (VPN) providers I’ve told you about here on Pixel Privacy have made available Amazon Fire TV versions of their apps.
This makes it possible to access geo-blocked streaming content and to keep your online viewing habits safe from prying eyes when using apps like Kodi, which while a legal app, can be used to access unlicensed copyrighted materials. (Not that any of you would do that, right? I didn’t think so.)
What Are the Best VPNs for Amazon Fire TV Devices?
When you’re looking for a VPN for use with your Amazon Fire TV Stick or other Amazon Fire device, you’ll want to look for a provider that delivers fast download speeds (nothing is more aggravating than having your video stream pause to buffer right when the action is getting good).
And, if you’re going to be using Kodi, you’ll want to make sure the VPN works well with all popular Kodi add-ons.
As I mentioned above, many of my favorite VPN providers now offer native apps for the Fire TV platform. Providers that do include NordVPN, ExpressVPN, CyberGhost, Surfshark, IPVanish , and many others.
When we discuss how to install a VPN on your Amazon Fire TV Stick, we’ll be using NordVPN as an example.
NordVPN is a reliable VPN provider, with a lightweight app for the Amazon Fire TV platform that doesn’t put too heavy a hit on your Fire TV’s precious system resources. The app offers excellent protection and delivers fast speeds, perfect for your streaming needs.
If you’ve already decided on another provider, don’t fret, as the installation process for other VPNs that offer Fire TV apps will be the same. You’ll simply need to substitute the name of your VPN provider in place of NordVPN.
Following our how-to section on installing Fire TV-compatible apps, I’ll also walk you through the steps of installing and using a provider’s Android app on an Amazon Fire TV device. (This can be done because Amazon Fire devices use a modified version of the Android operating system.)
The process is a bit more involved, and you might find that the experience isn’t as satisfactory, since Android was originally intended for touch devices.
One other caveat: If you own a first-generation Fire TV Stick, you will need to upgrade your device to a newer model if you want to run a VPN app and another app simultaneously.
First-generation Amazon Fire TV Stick connected devices do not have the processor horsepower to run two apps simultaneously. However, there are ways to use a VPN with your first-gen Fire TV Stick – more about that later.
Method #1: How to Install NordVPN on a Fire TV Device
The NordVPN app (and many other VPN providers’ apps) is available in the Amazon Appstore and requires only a few steps to quickly install the app and get up and running.
While I use NordVPN in the following steps, you should still be able to follow along if you’re installing another native Amazon Fire TV app.
- At the Fire TV Home Screen, use your remote control to navigate to “Apps” -> “Categories” -> “Utility.” Alternatively, you can search for “VPN” or “NordVPN.” (Many Fire TV models will allow you to use Alexa Search to find apps. If yours offers the feature, press the Microphone button on your remote and say “VPN” or “NordVPN.”)
- No matter which method you use to find the NordVPN app, once you do find it, click on it using your remote.
- Click the yellow button marked “Get” to download and automatically install the NordVPN app.
- Once the app has downloaded and installed, click the yellow button labeled “Open” to launch the IPVanish app.
- Enter your NordVPN account username and password. While this can prove irritating when using the Fire TV Remote, you should only need to do it once. (Or, you can use the Amazon Fire TV app’s keyboard on your smartphone or tablet to enter the text.)
- Click the “Login” button.
- On the next screen, you can either click “Connect,” which will connect you to a VPN server of the provider’s choosing, or you can manually select a server to connect to.
That was pretty easy to follow, right? While this is definitely the best way to install a VPN on your Amazon Fire TV device, some VPN providers still don’t offer a native app for the Fire.
When this is the case, you’ll need to install the provider’s Android app on your Fire TV device. We’ll cover that procedure in the next section.
Method #2: Install an Android VPN App on Your Amazon Fire TV
Before we begin, let me warn you that if you sideload an Android app, you will not receive regular updates to the app when the provider issues them. This means you may be left unprotected if the provider fixes an important bug.
While the following method will work, I recommend that you subscribe to a VPN provider that offers a native Fire app, like IPVanish or the other providers I’ve mentioned. Consider yourself warned.
Prepare Your Amazon Fire TV to Allow App Sideloading
Before we begin sideloading apps, we need to allow your Fire TV device to install apps from unknown sources.
- Using your Fire TV Remote, go to “Settings” -> “Device.”
- Scroll down in the list that appears until you see “Developer Options.” Click on that option.
- Toggle to “ON” both the “ADB debugging” and “Apps from Unknown Sources” options.
- Return to the System menu and click “About.”
- Click on “Network” on the “About” screen.
- Write down your Fire TV’s IP address for later reference. (Or, you can simply take a photo of your television screen with your smartphone’s camera.)
You have now set your Amazon Fire TV Stick (or other Amazon Fire TV device) to allow the installation of apps from outside the Amazon Appstore ecosystem. I will now share the two ways you can install your VPN provider’s Android app onto the Amazon Fire TV.
Alternate Installation Method #1: Install the Android VPN App Via Direct Download
This method is your best option if your VPN provider makes an Android app available as a direct APK file download from their website, rather than from Google Play. (Some providers do both.)
I strongly advise that you only download APK files from the provider’s website. APK files from a third party could be infected with malware or other nasties.
I’ll continue to use NordVPN as an example in this section, but I strongly advise that Amazon Fire TV users only install the native Fire TV app from the Amazon Appstore.
- At the Fire TV Home Screen, use your remote control to navigate to the Search Bar screen, and then enter “Downloader” into the Search Bar.
- In the results, look for the Downloader app (with the orange logo) and install it.
- Once the Downloader app has been installed, run the app.
- Enter the direct download URL to the VPN’s APK file. If the URL is one of those long, involved URLs that companies seem to love to use, just type in the URL for the provider’s Android app download page (https://nordvpn.com/download/android/ in the case of NordVPN), and the page will open up in the “Downloader” browser. You can then download the APK file from there.
- Once the download finishes, you should be prompted to install the app. If this doesn’t happen, open your downloads in the Downloader app and click the APK file.
- The app should install. I’ll tell you where to find the app on your Fire TV in the “Find the VPN App and Connect to the VPN” section.
You may find that your VPN provider doesn’t openly display a download link for an APK file. In that case, you may be able to find one by using the provider’s site search feature or by contacting customer service.
Once you can get a link to the APK file, you can use the Downloader app to download and install it on your Amazon Fire TV.
If customer support sends you the APK file as an email attachment, you can save it to a cloud storage service such as Dropbox, and then download the file from there using Dropbox.
Alternate Installation Method #2: Sideload the VPN App Using Another Android Device
This method will require you to own a separate Android device, like a tablet or a smartphone, that has access to Google Play. (Most Android devices do have access.)
- On the Android device, download and install Apps2Fire from Google Play.
- On that same Android device, install the VPN app from your VPN provider of choice from the Google Play Store.
- Launch the Apps2Fire app on your Android device and tap the menu icon (it’s the three dots in the top-right corner).
- Tap “Setup.”
- Under “IP address of your Fire TV,” enter the IP address you wrote down or took a screenshot of in step 6 of “Prepare Your Amazon Fire TV to Allow App Sideloading.”
- Tap “Save”.
- Tap the menu icon again (it’s those three dots, remember?) and tap “Upload Apps.”
- Tap the VPN app you previously installed on your Android device to upload it to your Fire TV.
- The app will install to your Fire TV. In the next section, I’ll show you how to enable the VPN on your Amazon Fire TV device.
Find the VPN App and Connect to the VPN
Now that you’ve installed your provider’s VPN app using either of the above methods, it’s time to log in and connect.
However, the app may be a bit tough to find on your Fire TV, as the app won’t show up in the top-level Apps menu. So, let’s find it.
- Go back to the main menu on the Fire TV menu.
- Go to: “Settings” -> “Applications.”
- Click on “Manage installed applications.”
- Find and click on the VPN app you installed using one of the above methods.
- You’ll now see a sub-menu appear. Click on “Launch application.”
- Enter your VPN username and password. (This could require using a mouse app on your Android device, or a Bluetooth mouse. I’ll tell you more about this in the next section.)
- Once you’ve logged in, either click the connect button or select a specific server location and then connect. Either way, you should now be connected to your VPN provider. You’ll remain connected until you manually disconnect from the service, or until you power off your Amazon Fire TV device.
How to Control Your Fire TV Stick VPN Using a Bluetooth Mouse or an Android Mouse App
You’ll find that native Android apps are made to be used with the touch screens found on Android smartphones and tablets.
This poses a problem when using the apps with your Amazon Fire TV because no matter how much you tap on your television screen, nothing will happen. (Well, you might damage the TV, so don’t poke at it with your finger. Seriously, back slowly away from the TV and sit back down.)
If you have an extra Bluetooth mouse, you can connect it to your Fire TV and control your VPN app that way. Or, you can use an Android tablet or phone running a “remote” app to remotely control the Fire TV using your device’s touchscreen.
While Amazon does offer an Android Amazon Fire TV app, it doesn’t offer mouse control, so unless you’re looking to control other functions of the Fire TV with your Android device, don’t bother downloading it.
I’ve tried a few of the apps, and CetusPlay works best for me. The app can act as a regular Amazon Fire TV Remote, and also offers a mouse mode. So, win-win.
As far as I was able to tell, iOS users are left out in the cold. While there are Amazon Fire TV remote control apps in the iOS App Store, they don’t include a mouse mode. If I missed seeing your favorite app that does allow for “mousing,” let me know in the comments section below.
Method #3: Connect Your Amazon Fire TV to a Physical WiFi Router
If you can’t find an Amazon Fire TV version of your VPN provider’s app, or if you don’t have internet access to an Android device to sideload from, or if your provider doesn’t offer an APK version of their app (or if you have a first-generation Amazon Fire TV Stick), there is another way to use a VPN with your Fire TV. Set up your WiFi router to work with your VPN.
A VPN-enabled WiFi router not only protects and enhances your online activities on your Amazon Fire TV, but it also protects and enhances the online activities of all of the internet-connected devices that connect to the router.
I won’t attempt to provide step-by-step instructions on how to set up your VPN provider for use with your WiFi router. Routers come in a variety of makes and models, with numerous versions of firmware, some of which support VPNs and some of which don’t.
Firmwares that support VPNs all vary in their configuration processes. That means there’s no way to cover the process in this limited space.
If you’d like to find out if your WiFi router is compatible with your VPN provider, the provider’s customer support is your friend, so check with them. You can also check with the customer support folks for your router, as well as Google for more information on router compatibility with VPNs.
Your router itself may also yield some information. Check the back or bottom of your router, which should tell you both the local IP address for your router and possibly the admin login credentials for logging into the router via your web browser.
Once you’ve logged into the router, look for VPN configuration options. If available, the configuration page should tell you what you’ll need to get everything set up for use with your VPN.
If your WiFi router doesn’t support VPN connections right out of the box, it may be possible to replace its stock firmware with open-source firmware, such as DD-WRT, OpenWRT, or Tomato.
This process is called “flashing” and it’s not for the faint of heart. If you attempt to flash your router with the wrong firmware, you could brick your router, which means it could be left completely inoperable – in other words, a “brick.” If you don’t feel up to all of this, you can purchase pre-flashed routers from your VPN provider.
Method #4: Connect Your Fire TV to a VPN-Protected Hotspot on Your Mac or Windows PC
If (DEEP BREATH!) you can’t find an Amazon Fire TV version of your VPN provider’s app, or if you don’t have access to an Android device to sideload from, or if your provider doesn’t offer an APK version of their app, or if you don’t have a VPN-compatible router (or if you have a first-generation Amazon Fire TV Stick), there is still hope. (WHEW! That may be the longest run-on sentence I’ve ever written!)
If you have a Windows 10 or MacBook laptop with an Ethernet connection and a WiFi connection, you can run the provider’s app on your machine and share the protected connection with your other devices, including the Amazon Fire TV Stick.
How to Share Internet Connection On Windows 10 PC
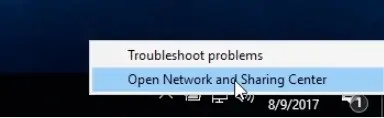
- Right-click the Network icon in the Notification area. (The icon can look like it does below, or like the well-known “WiFi” signal symbol, depending on your current network connection.)

- Click on “Open Network and Sharing Center” in the shortcut menu that pops up.
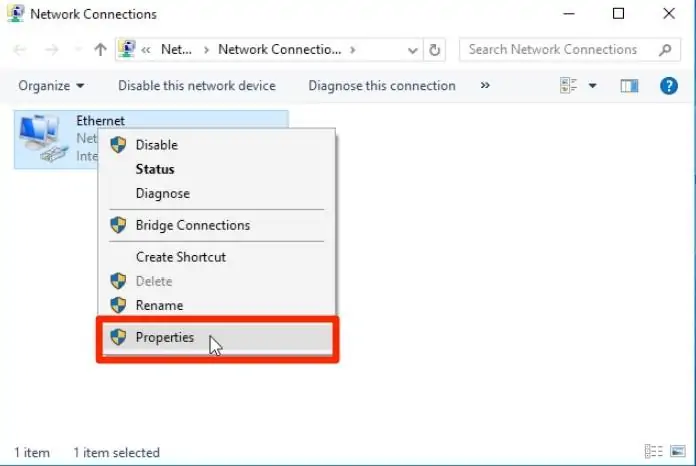
- When the “Network and Sharing Center” window opens, click “Change Adapter Settings” in the left-hand column to open a Network Connections window.
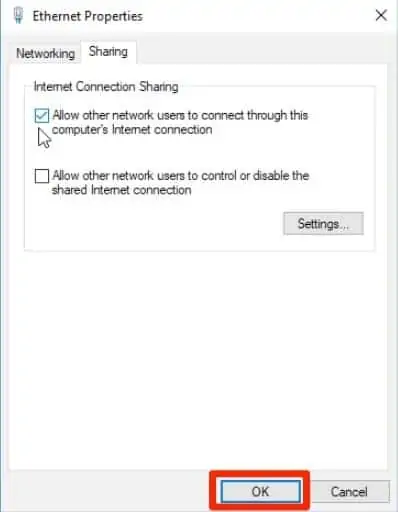
- Right-click the internet connection and then click “Properties” on the shortcut menu to open the Properties dialog box for the connection.
- Click the “Sharing” tab.
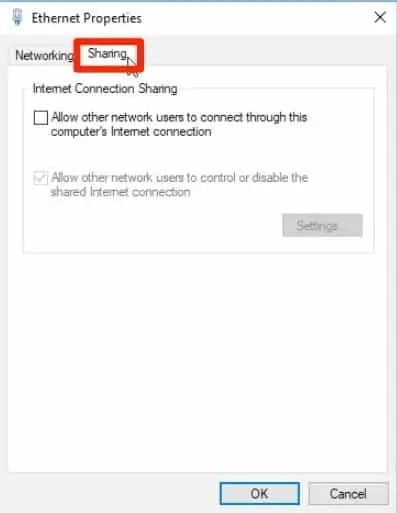
- Click on the “Allow Other Network Users to Connect Through This Computer’s Internet Connection” checkbox to select it.
- Click “OK.” Windows should begin sharing the connection.
How to Share Internet Connection On Mac (Click to Expand)
- Click the Apple icon in the upper left-hand corner of your Mac’s Desktop.
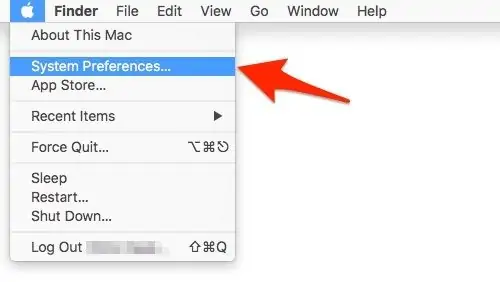
- Click “System Preferences” in the pull-down menu that appears.
- In the System Preferences window, click the “Sharing” icon.

- In the left-hand pane of the Sharing window, click the “Internet Sharing” checkbox to select it.
- Click the “Share your connection from” pop-up menu on the right-hand side of the window, then click the internet connection you wish to share. In the list below, we’re selecting the “IPVanish VPN” option.
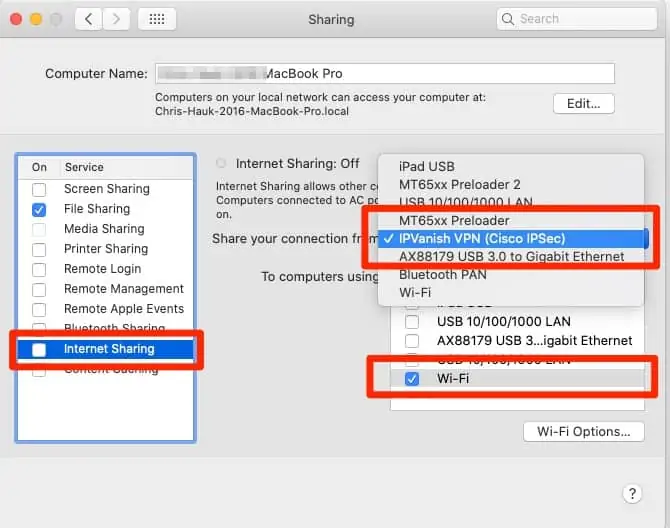
- In the “To computers using” list, click the checkbox of how you want to share the Mac’s internet connection. I chose “Wi-Fi,” as shown above.
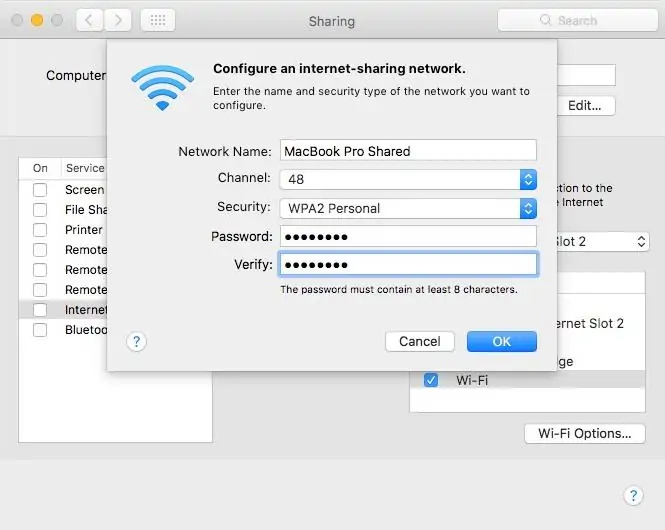
- Click the “Wi-Fi Options…” button to customize your Mac’s WiFi sharing options. Here, you can set the sharing network’s name, which channel it will use, and whether or not it requires a password. (I highly recommend enabling security and requiring a password. Safety, safety, safety.)
- Go to your Amazon Fire TV device and look for the shared Wi-Fi connection you just created and connect to it.
Why Should You Use a VPN?
While this article has concentrated on using a VPN with your Amazon Fire TV Stick or other Fire TV device to hide your online activity and open access to blocked digital content around the globe, there are also other advantages to using a VPN.
The same VPN you use on your Fire TV is also available on most of your other connected apps, including Windows, Linux, macOS, iOS, and Android devices. Installing and using a VPN app on these devices provides many benefits.
A VPN protects your online activities from the prying eyes of others, including your own Internet Service Provider, your government, and hackers who would love to steal your personal info, such as credit card and banking info.
By preventing your ISP from monitoring your activities, it also prevents the ISP from throttling or blocking your connection, simply because you’re engaged in P2P file sharing, viewing movies on certain streaming content services, or conducting any other “unapproved” online activity.
A VPN is also a must for internet users who connect regularly to public WiFi hotspots, such as those found in hotels, Starbucks, and other public locations.
Most public hotspots are unprotected by encryption, leaving your online activities open to observation by the hacker sitting at the next table. A VPN ensures that your online activities remain hidden in a tunnel of encryption.
In Closing
When you’re using any internet-connected device, someone is monitoring you. By using a VPN – such as NordVPN, the one featured in this article – you ensure that your online travels are kept secure with military-grade encryption.
A VPN also opens internet access to digital content from other regions, enhancing your Amazon Fire TV entertainment options. Make sure you select a fast VPN provider with no data caps, such as NordVPN.
How to Install VPN FAQ
Will I Break My Firestick If I Install a VPN?
You will not break your Amazon Firestick by installing a VPN. However, I strongly recommend only installing VPN apps offered directly from Amazon’s Appstore. This ensures the VPN app isn’t being provided by bad guys to monitor your online activities and steal your personal information.
Is There a Free VPN for Firestick?
Yes, there are free VPNs available for the Firestick, but I strongly suggest that you avoid them. Most free VPNs place daily or weekly data caps on their users’ data usage and also severely throttle their users’ connection speeds. Plus, many free VPNs are known to be logging their users’ online activities and selling that information to nosy third parties.
Can I Have My VPN Connected All the Time?
Yes, as long as your VPN doesn’t limit your daily or monthly VPN usage with data caps, you can have your VPN connected all of the time. If you use public WiFi hotspots on a regular basis, I strongly recommend leaving your VPN connected.
If most of your internet use is from your home, whether to leave your VPN connected all of the time depends on several factors. If you stream quite a bit and aren’t viewing content from other parts of the world, you may want to leave it turned off, especially if your ISP connection speeds are slow. A VPN, even a quality one like IPVanish, can slow your speeds.
Contents [hide]
- What Are the Best VPNs for Amazon Fire TV Devices?
- Method #1: How to Install NordVPN on a Fire TV Device
- Method #2: Install an Android VPN App on Your Amazon Fire TV
- Method #3: Connect Your Amazon Fire TV to a Physical WiFi Router
- Method #4: Connect Your Fire TV to a VPN-Protected Hotspot on Your Mac or Windows PC
- Why Should You Use a VPN?
- In Closing
- How to Install VPN FAQ
- Will I Break My Firestick If I Install a VPN?
- Is There a Free VPN for Firestick?
- Can I Have My VPN Connected All the Time?