Perhaps one of the most important services on the internet is one that I’m betting most people never give a second thought to, the Domain Name System (DNS).
In this article, I’ll explain how DNS servers can be a threat to your privacy, what a DNS leak is, and how you can fix it.
What Is the Domain Name System (DNS)?
The Domain Name System is a decentralized naming system for online resources, such as computers and other services.
DNS translates domain names into IP addresses, removing the need for a user to memorize long strings of numbers in order to access websites and services while connected to the internet.
For example, the site you’re visiting at the moment carries an IP address of “104.27.166.50”. While some of you may be able to memorize such a long string of numbers (and you know who you are), it’s much easier to remember to type in “pixelprivacy.com” to visit my website.

When you enter a website address in the address bar of your favorite browser, the domain name is sent to a DNS server, which looks up the IP address for that domain name. The IP address is returned to your browser.
Your browser then sends the full request to the web server at that IP address, and the web page loads into your browser. All of this usually happens in the blink of an eye.
While this is a logical and convenient way to manage internet traffic, it opens up a large can of worms when it comes to your online privacy.
How the Domain Name System Allows Others to Track You Online
As I mentioned in the section above, when you enter the domain name of a website in your browser, the request goes to a DNS server, where the website’s IP address is found.
Unless you have customized your computer, mobile device, or router to use a different source for DNS, your DNS requests will go to DNS servers owned and operated by your Internet Service Provider.
This is a privacy concern, as your internet traffic passes through your ISP’s DNS servers, which record your data. Resource requests are recorded in a log, along with the IP address of the customer who requested the address, the date and time of day and other sundry information.
In many countries, these DNS server logs can be subpoenaed by the government, law enforcement agencies, or entertainment industry lawyers to allow them to track your activities on the web.
In some countries, the United States included, ISPs can sell these logs to advertisers and other third parties without needing your approval to do so.
Can This Be Prevented?
Luckily, online tracking like this can be prevented by using a Virtual Private Network (VPN) to keep your online travels under wraps.
A VPN routes your online connection and all of its DNS requests through its own VPN servers, keeping them from prying eyes. At most, all your ISP can see is that you’re connected to a VPN provider. They can’t see any of the activities you participate in while connected to the VPN.
Is This Foolproof?
As a rule, using a VPN is enough to keep your DNS requests undercover.
However, some VPN providers don’t do a good job of hiding your requests, leaking the DNS data from your VPN sessions and opening you up to monitoring.
In the next sections of this article, I’ll explain what a DNS leak is and how you can test your VPN connection to detect DNS leaks. I’ll then explain why DNS leaks happen and offer ways to help you prevent leaks from happening again.
What Is a DNS Leak?
When you connect to a VPN, it creates an encrypted connection, which keeps your internet traffic in a “tunnel” that hides all of your internet activity, DNS requests included. No one except for your VPN provider can see what you’re up to—not your ISP, the government, or your (un)friendly neighborhood hacker (it’s important to trust that your VPN isn’t monitoring or recording your online activities, so only subscribe to a reputable VPN provider, like NordVPN).

When your computer or other device is connected to a VPN provider, all of your DNS requests should only go through the encrypted tunnel to the VPN service’s DNS servers.
When this is working properly, all your ISP or anyone else can see is that you are connected to a VPN. Plus, all of your internet traffic is encrypted, so no outside party can monitor any of the content you’re accessing.
However, if your VPN app isn’t doing its job, or if you’re connected to a misconfigured network, your DNS requests can “leak” outside of the encrypted tunnel.

The DNS requests then go through the ISP as they did when you weren’t using a VPN. This leaves the DNS request wide open for observation, and your IP address, location, and browsing data are once more up for grabs.
How Can I Tell If My VPN Has a DNS Leak?
There are a variety of websites that will test your VPN connection for DNS leaks, including many supplied by VPN providers.
I generally use and suggest the IPLeak website, as it is easy to use and offers a good amount of information about my connection.
Before beginning a test for any VPN DNS leaks, I suggest visiting the IPLeak site and allowing the site to run its tests before you connect to your VPN provider.
Once you get the results of the IPLeak test (which runs automatically), make a note of the IP address shown under “Your IP Address” near the top of the page. Also, make note of the DNS addresses and the number of DNS servers shown in the “DNS Addresses” section.
You don’t have to write down all of the addresses—just jot a few down or take a screenshot for later reference.
As you can see in the screenshots below, IPLeaks can see the DNS servers my ISP provider uses—all 54 of them (in the interest of brevity, I’ve only included a small number of them here). It can also tell that my normal, ISP-provided connection originates in Tennessee.


Now, it’s time to connect to a VPN provider and run the tests again.
I’m using NordVPN, but you can certainly use your VPN of choice. You can connect to any available VPN server or just allow your VPN app to choose one for you.

Now, visit the IPLeaks website again, and allow the DNS Leaks tests to auto-run again through your VPN.
As you can see in the screenshots below, my provider is doing a great job of preventing any DNS leaks, as it appears that my connection is coming from Delaware and that the single DNS server is located in Texas.


This shows that my VPN is providing a properly protected connection and that none of my DNS info is leaking.
If IPLeaks showed that the DNS servers from the ISP test match the DNS servers from the VPN test and that the IP addresses were the same as well, that would indicate a possible DNS leak in my VPN connection.
That would mean the VPN isn’t doing its job, and that it’s time to find a new provider.
DNS Leaks: Problems and Solutions
There are various reasons that a DNS leak can occur. In this section, I’ll go over the 5 most common DNS leak causes, and also share solutions to those problems, so you can deal with them if they should arise.
Problem #1: An Improperly Configured Network
An improperly configured network is one of the most common reasons for DNS leakage to occur, especially for users who connect to different networks on a regular basis.
Road warriors may see this issue more than other users, as they work from an office, but also connect to their wi-fi network at home or a wi-fi hotspot in a coffee shop, airport or hotel.
Since a VPN requires that your computer be connected to the internet via a local network before firing up your VPN protection, improperly configured DHCP settings might automatically assign a DNS server to handle your requests, and that DNS server could belong to your ISP or the ISP of the hotspot vendor.
Even if you connect to a VPN on this problem network, your DNS requests could be bypassing the VPN’s encrypted tunnel, leaking DNS all over the place (and nobody wants to have to clean THAT up).
Here’s the Fix:
In most cases, you can force your computer to use the VPN provider’s DNS servers simply by configuring the VPN to only use its own DNS server.
While VPN app settings vary from provider to provider, you’ll likely see something like the screenshots below, which shows the ExpressVPN Mac app’s “DNS” options.
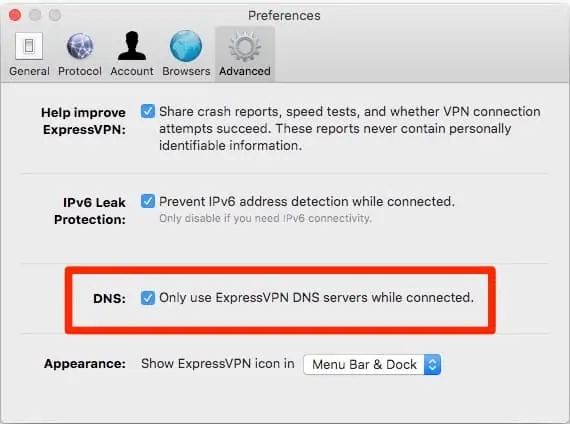
If your VPN app doesn’t offer a setting (as seen above), contact your provider’s customer support folk and ask them how to force your device to use their DNS servers. If they can’t help you, or if you’re not happy with their answer, change providers.
Problem #2: No Support For IPv6
The IP addresses most of us are familiar with are called IPv4 addresses.
They are 32-bit addresses, consisting of four sets of up to three digits, such as “123.04.321.23” (I have no idea where that IP address would take you, as I just made it up on the spot).
With the advent of an always-connected world, with computers, smartphones, tablets, game consoles, Smart TVs and even smart refrigerators connected to the internet, the pool of IPv4 addresses is running dry.
Instead of being limited to a 32-bit address scheme of four sets of up to three digits, like IPv4 is, IPv6 uses a 128-bit address, theoretically allowing 2^128, or approximately 3.4×10^38 addresses (WHEW! That’s a lot of addresses).
| Sample IPv4 Address | Sample IPv6 Address |
| 123.04.321.23 | 2001:db8:85a3:8d3:1319:8a2e:370:7348 |
The internet is in the beginning stages of a transition from IPv4 to IPv6, and the move won’t take place overnight. This can create a lot of problems, especially for VPNs that don’t currently offer IPv6 support.
If a VPN doesn’t support IPv6 or doesn’t know how to block IPv6 requests, then requests sent to or from your machine via IPv6 will jump outside the VPN’s encrypted tunnel, leaking information for all to see.
Websites are currently in transition, like the rest of the internet, and while many have both IPv4 and IPv6 addresses, quite a few still have only IPv4 (and yes, there are a few websites that are IPv6-only).
Whether this causes an issue for your VPN depends on a number of factors, such as your ISP, your router and the website you’re attempting to access.
While IPv6 leakage isn’t yet as dangerous as a standard DNS leak, the day will soon come when it is.
Here’s the Fix:
Check to see if your VPN provider has full support for IPv6. This is the ideal situation, and you won’t need to worry.
However, your provider should at least offer an option to block IPv6 traffic. While this is a stopgap measure, it’ll get you through until more VPN providers support IPv6.

Problem #3: Transparent DNS Proxies
Some ISPs have taken it upon themselves to force the use of their DNS servers, even if a user has changed their settings to use a third-party provider, such as OpenDNS, Google, or a VPN provider’s servers.
If any changes to DNS settings are detected by the ISP, it will use a “transparent proxy”, which is a server that intercepts and redirects your web traffic to force your DNS request to the ISP’s DNS servers.

This is basically your ISP forcing a DNS leak and attempting to keep it hidden from you.
However, most leak detection tools, like IPLeak, will detect an ISP’s transparent proxy in the same manner as a standard leak.
Here’s the Fix:
Fixing this “leak” depends on which VPN provider and which VPN app you’re using.
If you’re using a VPN provider’s app, look for the option to force the use of the VPN provider’s DNS servers. Enable it.
If you’re using the OpenVPN open-source app to connect to your VPN, find the .conf or .ovpn file for the server you’re connecting to, open it in a text editor, and add the following line:
block-outside-dns
You can consult the OpenVPN Manual to find out where your config files are stored.
Problem #4: Windows 8 and 10: The “Smart Multi-Homed Name Resolution” Feature
Starting with Windows 8, Microsoft introduced the “Smart Multi-Homed Name Resolution” feature, which was developed to increase the speed of web browsing.
The feature sends out DNS requests to all available DNS servers and accepts the response from whichever DNS server is the first to respond.
As you can imagine, this can cause DNS leakage, as well as the horrible side effect of leaving users open to DNS spoofing attacks.
The Fix:
This feature is a built-in part of Windows and can be difficult to turn off.
However, Windows users who connect to their VPN via the OpenVPN app can download and install a free plugin to resolve the issue.

Windows users that use their VPN provider’s native app should contact the provider’s customer support department for help with the issue.
Problem #5: Windows’ Teredo Technology
Teredo is a built-in feature of the Windows operating system and is an attempt by Microsoft to ease the transition between IPv4 and IPv6. The purpose of Teredo is to allow the 2 address schemes to co-exist without issue.
While I’m sure Microsoft meant well, they opened a huge, leaking security hole for VPN users. Teredo is a tunneling protocol, and in some instances, it can take precedence over your VPN’s own encrypted tunnel.
Go get your virtual mop, ’cause here come the leaks.
The Fix:
Teredo is easy enough to fix for users comfortable with the Command Prompt. Open a Command Prompt window and enter the following:
netsh interface teredo set state disabled
Be warned that you might experience issues when connecting to certain websites, servers, and other online services, but you will regain the security that Teredo throws away.
How Can I Prevent DNS Leaks in the Future?
We’ve tested for DNS leaks, and hopefully, there weren’t any discovered. Or, if you did discover a leak, at least you now have the tools and knowledge to plug those leaks.
But what can you do to prevent a leaky future?
By following the 5 steps in this section, you should be inoculating your online activities against any future leakiness.
1. Only Use a Trusted, Independent DNS Provider
Most VPN providers have their own DNS servers, and their app will automatically connect your device to use those servers in place of your ISP’s sometimes slow, and always insecure, DNS servers.
Even if you’re not using a VPN, you can still avoid using your ISP’s DNS server, making it hard for an ISP to track your online activities.
Instead, you can use a reliable third-party DNS server, like those offered by OpenDNS, Google and others.
Here are some popular DNS server address options:

- Preferred DNS Server: 8.8.8.8
- Alternative DNS Server: 8.8.4.4
- Preferred DNS Server: 208.67.222.222
- Alternative DNS Server: 208.67.220.220

- Preferred DNS Server: 1.1.1.1
- Alternative DNS Server: 1.0.0.1
Other DNS options can be found here.
Follow the steps below to change your DNS settings in Windows and macOS. Linux users will need to consult the manual for their flavor of Linux, but it shouldn’t be much different.
If you’d like to change the DNS setting for your wi-fi router, consult your router manual or contact the manufacturer for more information.
To change your DNS settings in Windows 10, do the following:
- Go to the Control Panel.
- Click the “Network and Internet” option.
- Click the “Network and Sharing Center” option.
- In the left-hand panel on the next menu, you’ll see a “Change Adapter Settings” option. Click that.
- Find the “Internet Protocol Version 4” option in the window that opens and click it.
- Click on “Properties”.
- Click on “Use the following DNS server addresses” in the Properties window.
- Enter the preferred and alternative DNS server addresses from one of the options.
- Click the “OK” button.
To change your DNS settings in macOS, do the following:
- Click on the Apple menu.
- Click on “System Preferences” in the menu that appears.
- Click the “Network” icon—it should be in the 3rd row down.
- Click on your network interface from the left side (it’ll probably be labeled “wi-fi”, “Ethernet” or something similar).
- Click the “Advanced” button, found in the lower right-hand corner of the Network window.
- Click the “DNS” tab at the top of the screen.
- To add a new DNS server, click on the [+] (plus) button found below the list of DNS servers that may already be there.
- To edit an existing DNS server, click twice on the DNS IP address you want to change.
- To remove a DNS server, select a DNS server IP address and then either click the [-] (minus) button found below the list or hit the “delete” key on your Mac’s keyboard.
- Use the DNS server address(es) I mentioned earlier or the information for your favorite DNS provider.
- When you’re finished making changes, click on the “OK” button.
- Click on “Apply” for the changes to take effect.
- Close System Preferences as you normally would.
2. Set Your VPN or Firewall to Block Non-VPN Traffic
Check your VPN client to see if it offers an option to automatically block any traffic that isn’t going through the VPN.
Some providers call this “IP Binding,” while others may call it a “kill switch”. Check with your VPN provider to ensure that your VPN offers it. If it doesn’t, look elsewhere for your VPN service.

Windows users can also configure their Windows Firewall settings to only allow traffic in and out via a VPN. Here’s how to do that (steps may vary depending on the version of Windows you’re using. These instructions are for Windows 10).
- Connect to your VPN.
- Log into your Windows machine as an Administrator.
- Open the Network and Sharing Center. You should see both your ISP connection (labeled as “Network”) and your VPN (labeled with the name of your VPN provider).
Note: The “Network” should be identified as a Home Network, while your VPN should be identified as a Public Network. If either shows up as something different, you’ll need to click on them and set them to the correct network type.
- Open the Windows Firewall settings.
- Click on “Advanced Settings”.
- Find “Inbound Rules” in the left-hand panel. Click it.
- In the right-hand panel, you should now see an option for “New Rule…” Click that.
- When the new window appears, click “Program” and then click “Next”.
- Select either “All programs” or an individual application you want to block non-VPN traffic for. Then click “Next”.
- Click “Block the Connection” and click “Next”.
- Make sure to check the “Domain” and “Private” checkboxes, but not the “Public” checkbox. Click “Next”.
- You’ll go back to the Advanced Settings menu for the Windows Firewall. Find “Outbound Rules” in the left-hand panel. Click it and repeat steps 6 through 10.
Once you’ve completed the steps above, your firewall will be set up to route all of the traffic to and from your computer through your VPN.
3. Regularly Perform a DNS Leak Test
Prevention is a great step, but from time to time, you’ll want to check to make sure everything is working as it should.
Perform a DNS leak test on a regular basis. Follow the steps I walked you through in the “How Can I Tell If My VPN Has a DNS Leak?” section earlier in this article.
4. Consider VPN-“Monitoring” Software
There are software packages that will monitor your VPN connection to make sure your DNS requests aren’t going outside of your VPN’s encrypted tunnel of protection.
This would be an added expense on top of what you’re paying for your VPN service, but it may be worth it if you’re worried that your VPN may be leaking DNS requests on a regular basis.
VPN Watcher will prevent applications from sending data requests when your VPN connection goes down. It’ll run you $9.95, but there’s also a try-before-you-buy option.
PRTG VPN monitoring is a valid option for corporate users who want to monitor their entire VPN network. Pricing varies depending on the number of users you want to monitor. A 30-day free trial is available, as well as a “freeware” version for smaller networks.

5. Try a Different VPN Provider
If your testing shows that your VPN is leaking DNS requests, you may want to check with your provider for an app update—or find a new VPN provider altogether.
Look for a VPN provider that offers DNS leak protection, full IPv6 protection, support for OpenVPN, and the ability to deal with any possible transparent DNS proxies.
For more information about your VPN options, be sure to read my VPN reviews, where I run today’s top VPN providers through their paces, and reveal how well each VPN performs and protects you.
DNS Leak FAQs
How Do I Fix a DNS Leak?
Use only a trusted and anonymous DNS provider. Many VPN providers offer their own DNS servers for use by their customers. There are also private DNS services that can be used in the place of your ISP's DNS servers.
Does a VPN Give Reliable DNS Leak Prevention?
While it depends on the provider, many VPNs offer their own DNS servers. Check with your VPN provider for more information.
What is DNS Hijacking?
DNS Hijacking (also known as DNS Poisoning or DNS Redirection) is when a bad actor takes control over a DNS server, allowing them to redirect users to fake versions of the sites they're trying to reach. This threat is bad enough that the FBI published a report on the dangers. Hijacking is also when malware overrides a device's TCP/IP configuration to point to a bad guys DNS server.
Internet Service Providers can also "hijack" your DNS, forcing you to use the provider's DNS servers. I personally change my settings to use Cloudflare's 1.1.1.1 DNS services, completely avoiding my ISP's DNS servers.
Conclusion
In this article, we’ve taken a look at what a DNS leak is, why it’s a bad thing, how to test to make sure your VPN isn’t leaking and how to fix it if it is.
The best way to make sure that your VPN isn’t leaking your DNS request information, thereby opening your online travels up to the prying eyes of outsiders, is to find a reliable VPN provider that provides leak-proof VPN connections.
I have found ExpressVPN to be the best bet, as it’s an all-around, well-performing VPN service that provides solid, leak-proof security for my internet connection.
Contents [hide]
- What Is the Domain Name System (DNS)?
- How the Domain Name System Allows Others to Track You Online
- What Is a DNS Leak?
- How Can I Tell If My VPN Has a DNS Leak?
- DNS Leaks: Problems and Solutions
- How Can I Prevent DNS Leaks in the Future?
- DNS Leak FAQs
- How Do I Fix a DNS Leak?
- Does a VPN Give Reliable DNS Leak Prevention?
- What is DNS Hijacking?
- Conclusion