
At a Glance
Has online privacy been on your mind recently? In today’s news, it’s common to read about the increase in data breaches, online identity theft, government interference, and government-funded attacks – or governments accusing each other of attacks, at least. And that’s just what you read on the news and other informative websites!
But how much do we really know about these online threats? How much does the NSA – and other countries’ cyber intelligence teams – know about you? It’s safe to assume that these agencies have quite some intelligence data, and even if they don’t have any data on you yet, they could get it rather easily – for example, by diving into your email history.
Why Are My Emails at Risk?
Although email is one of the oldest methods of online communication, most email service providers still don’t do a great job of protecting your privacy.
By default, the most well-known email providers, like Gmail, Yahoo, and Outlook, don’t protect your emails using encryption methods. That means that your email messages and attachments are readable in plaintext (visible to anyone who intercepts your emails).
Perhaps for most people, the general content of their email messages is neither very secret nor very sensitive information. But sometimes an email message can be personal, and knowing that an email would be protected and only readable by the recipient would offer some peace of mind.
Additionally, sending sensitive personal/payment details via an email message that, for example, contains your bank account or credit card details makes the email worth being protected by encryption.
Most standard email providers send email messages in plaintext. If an email message is intercepted during transit, it’s easy for someone to snoop on the content of the email, because they can simply read the plaintext.
If you choose to encrypt your email messages, you can be sure that potentially intercepted messages can’t be read by hackers, government security teams, or anyone else who gets their hands on it – only the recipient with the decryption key can read it.
Why Should I Encrypt My Emails?
Encrypting your emails is a good solution to protect the personal messages you send to your friends, family, loved ones, colleagues, employer, and others.
A number of good reasons exist to opt for secure and encrypted email messages.
Think about your usernames and passwords, job agreements, contracts, confidential files, job offers, employee performance reports, sensitive internal company data, etc. These are just a few examples of information that should be kept secret and hidden.
Encrypting your email messages doesn’t ensure complete privacy and protection against the biggest government agencies, such as the NSA and other countries’ agencies of that caliber.
But encrypting your emails will definitely keep your data safe from unwanted snoops, hijackers, hackers, and other types of cyber thieves who are after your data. There are quite a lot of hackers and “small fish” cyber thieves on the internet that could cause serious damage to you on both a personal and business level if your data falls into their hands.
Also, large corporations and even your very own Internet Service Provider (ISP) are selling your data to third parties, and it’s for that reason that they’re often brought up in discussions about privacy. However, they are by no means the only entities that are selling your data or are interested in your data.
Considering the number of entities that would love to get a look at your data, I’m pretty sure you’d want to do anything to protect your privacy. Encrypting your emails is an important step to take in that direction.
In this guide, I’ll explain how to encrypt your email using different devices and email providers.
But first, let’s start with some basic principles, like why you should encrypt your emails, how email encryption works, and what methods of email encryption exist.
What Is Encryption?
Encryption in its most simplified explanation is as follows:
Plaintext (readable text) is scrambled into ciphertext (unreadable text). The data or text is encrypted by a unique encryption key, and in return, can only be decrypted by a unique decryption key.
The encrypted text is absolutely unreadable by humans and extremely hard to crack – if possible at all.
When you encrypt an email message, the entire message is transformed into random, unreadable characters and numbers. In such a case, only the recipient is able to decrypt the message. Obviously, the recipient has to have the decryption key.
To be certain that only the recipient can read the message, the involved parties can use the symmetric or asymmetric encryption method.
What Are Symmetric and Asymmetric Encryption Methods?
In short, symmetric encryption applies to a situation where the sender encrypts the email message and communicates (shares) the key with the recipient – this can be done over the phone or in a face-to-face meeting. Symmetric encryption uses the same key for encrypting and decrypting the message.
The safer, yet more complex, method of encryption is the asymmetric encryption method. Asymmetric encryption means that both parties own a set of keys: a private key and a public key.
In contrast to symmetric encryption, which uses the same key for encryption and decryption, asymmetrically encrypted messages can’t be decrypted with the same key it was encrypted with.
Messages encrypted with a public key can only be decrypted with a private key, and vice versa: messages encrypted with a private key can only be decrypted with the public key. Both the public and private keys are mathematically connected to one another.
The public key can be stored, along with your name and email address, on a public server, accessible to anyone.
For instance, you can search for someone’s public encryption key and email address, then send them an email message and encrypt the email with the recipient’s public key.
This process ensures that, during transit, the email isn’t readable (plaintext). It’s encrypted and unreadable to any party that might try to intercept the message and snoop around.
The only one who is able to decrypt the message is the recipient – by using their private key because the email message was encrypted with their public key.
This encryption method assures complete privacy and secrecy when sending important emails that contain sensitive information or payment details. It’s safer than symmetric encryption because you don’t need to exchange any secret information beforehand.
What Methods Can I Use to Encrypt My Emails?
There are a few different methods you could use in order to encrypt email messages. Two important encryption methods are the following:
Secure/Multipurpose Internet Mail Extensions (S/MIME)
The S/MIME is like a digital fingerprint. The extension will verify the identity of the receiver, so only that person can read the email message.
The S/MIME extension can be configured through a centralized “certificate authority” (CA). CAs are security companies (such as Comodo, Symantec, GlobalSign, and Digicert) that are trusted distributors of privacy protection certificates.
In order to encrypt your emails, you’ll need an individual certificate from one of these certificate authorities.
The S/MIME is relatively easy to use and implement on desktop email clients (Outlook and Thunderbird, for example), but harder to use on web-based email clients (Gmail, Yahoo, etc.).
Pretty Good Privacy/Multipurpose Internet Mail Extensions (PGP/MIME)
PGP/MIME is an incredibly strong protection measure for encrypting emails. The advantage of PGP encryption is that it’s more flexible and (often) less expensive – this also applies to web-based email clients.
Its flexibility allows you various encryption methods that contain different security protection levels for your email message. Most PGP encryption schemes are free of charge as well!
These features make PGP/MIME an outstanding method of encrypting your email messages. Here’s a list of several quality resources, software, plugins, and more – I’ll discuss some of the best resources in detail below.
Let’s go ahead and explore how to encrypt your email messages on different operating systems and email clients.
Encrypting Email Messages in Microsoft Outlook
Before you can encrypt email messages in Microsoft Outlook, you must get a digital certificate from a CA. In some cases, an employer might provide you with a digital certificate. If not, you can get a certificate from Comodo, GlobalSign, Digicert, or any other trusted CA.
You can create one by following the steps below:
Step #1: In the file tab, click “options.”
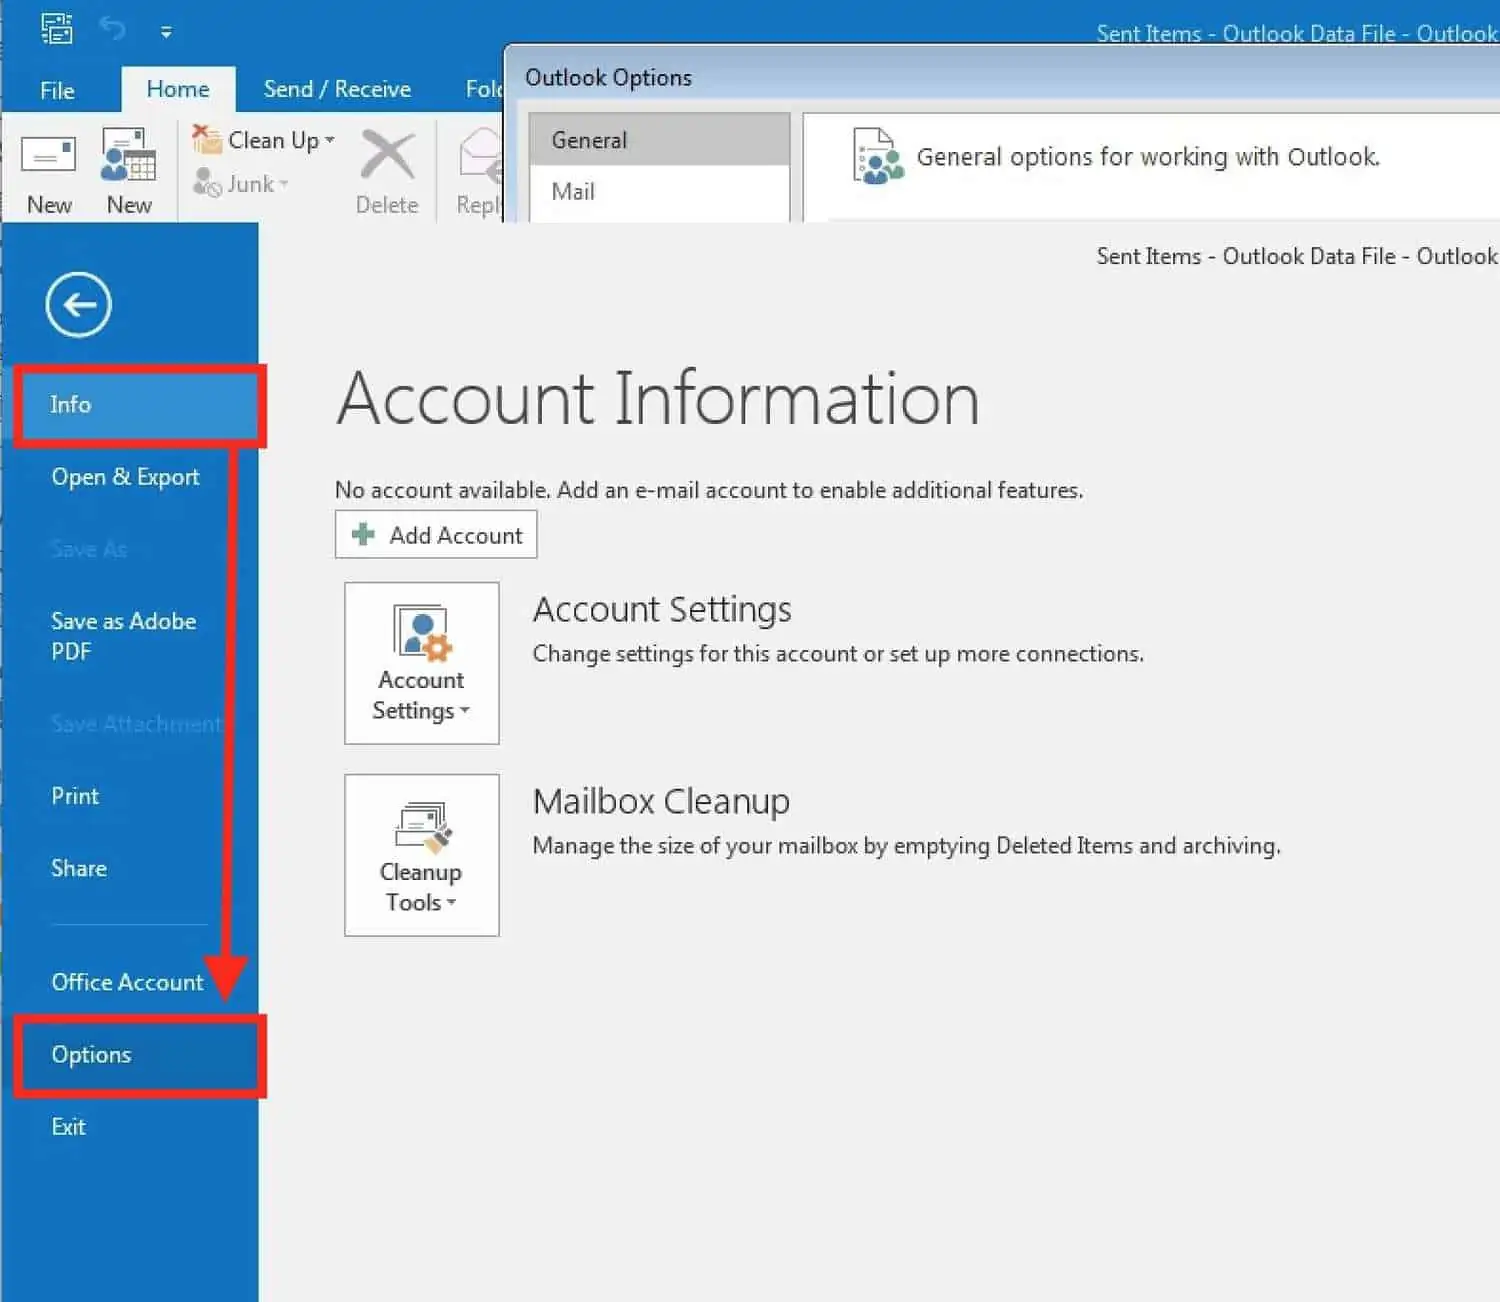
Step #2: Then, click “Trust Center.”
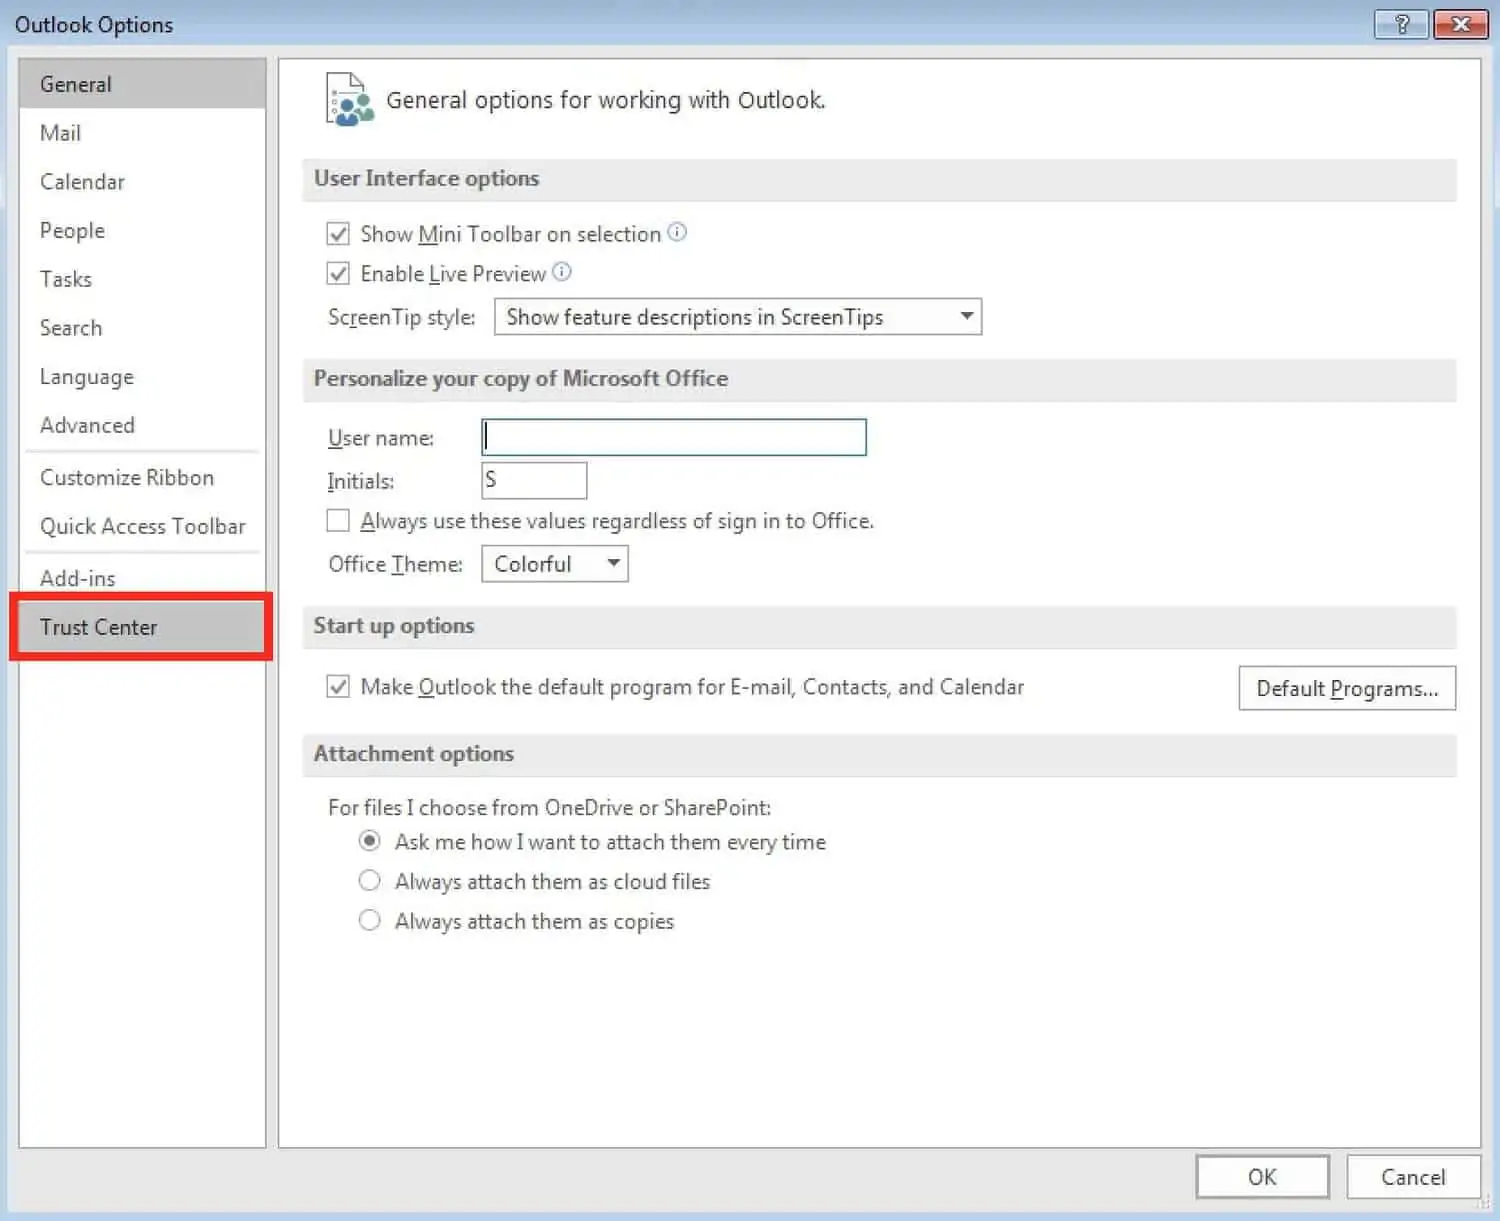
Step #3: In Microsoft Outlook Trust Center, click “Trust Center Settings.”

Step #4: In the email security tab, under Digital IDs, click “Get a Digital ID.”
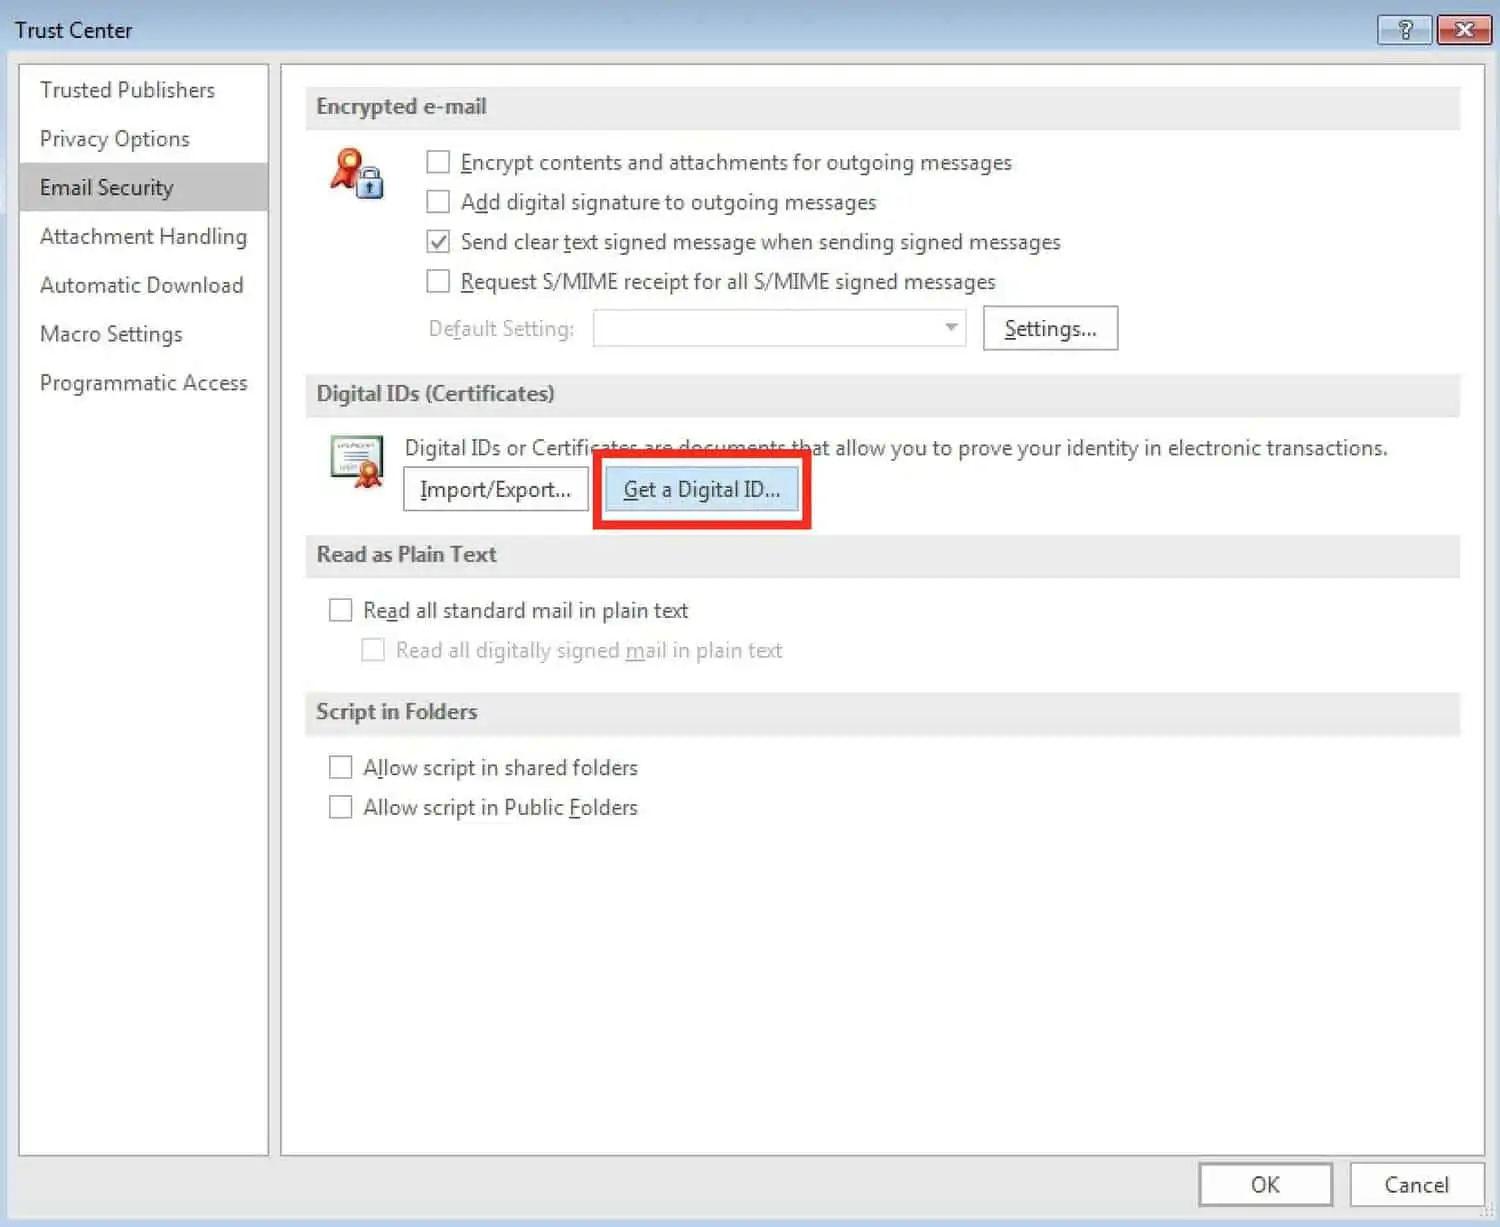
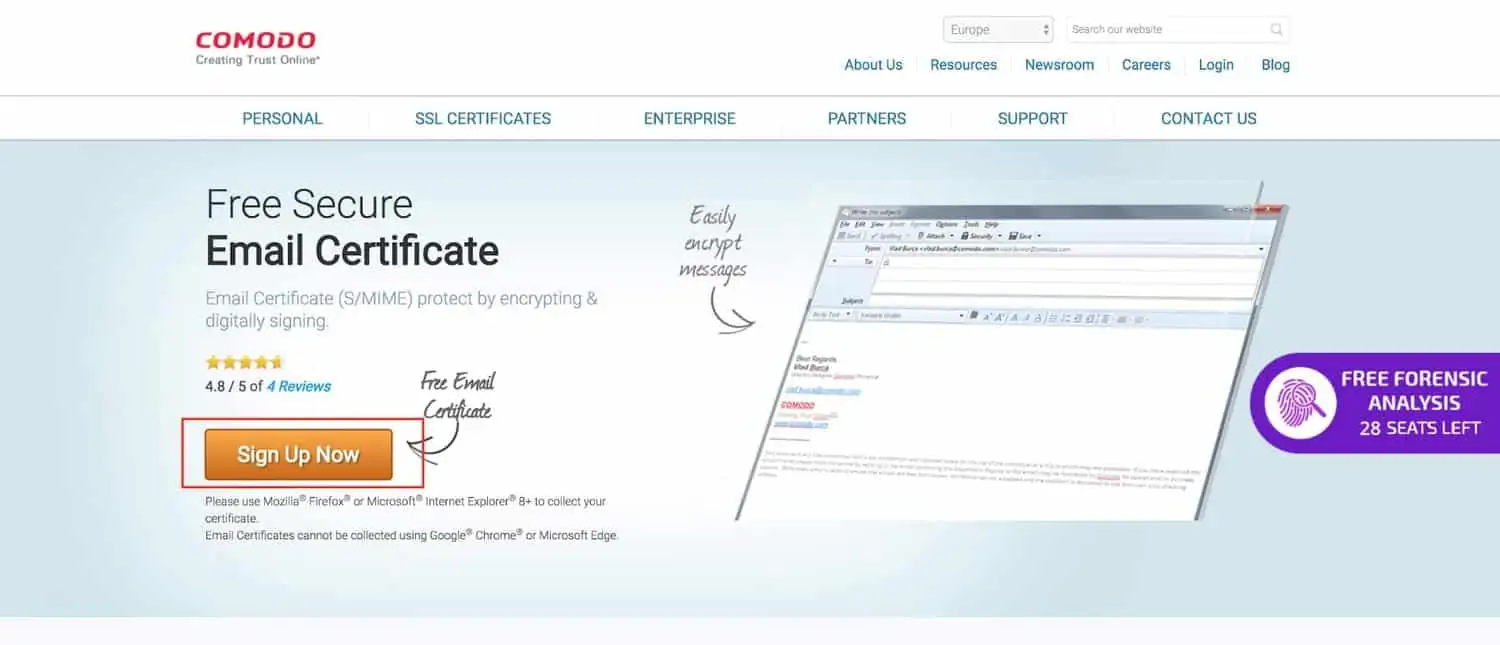
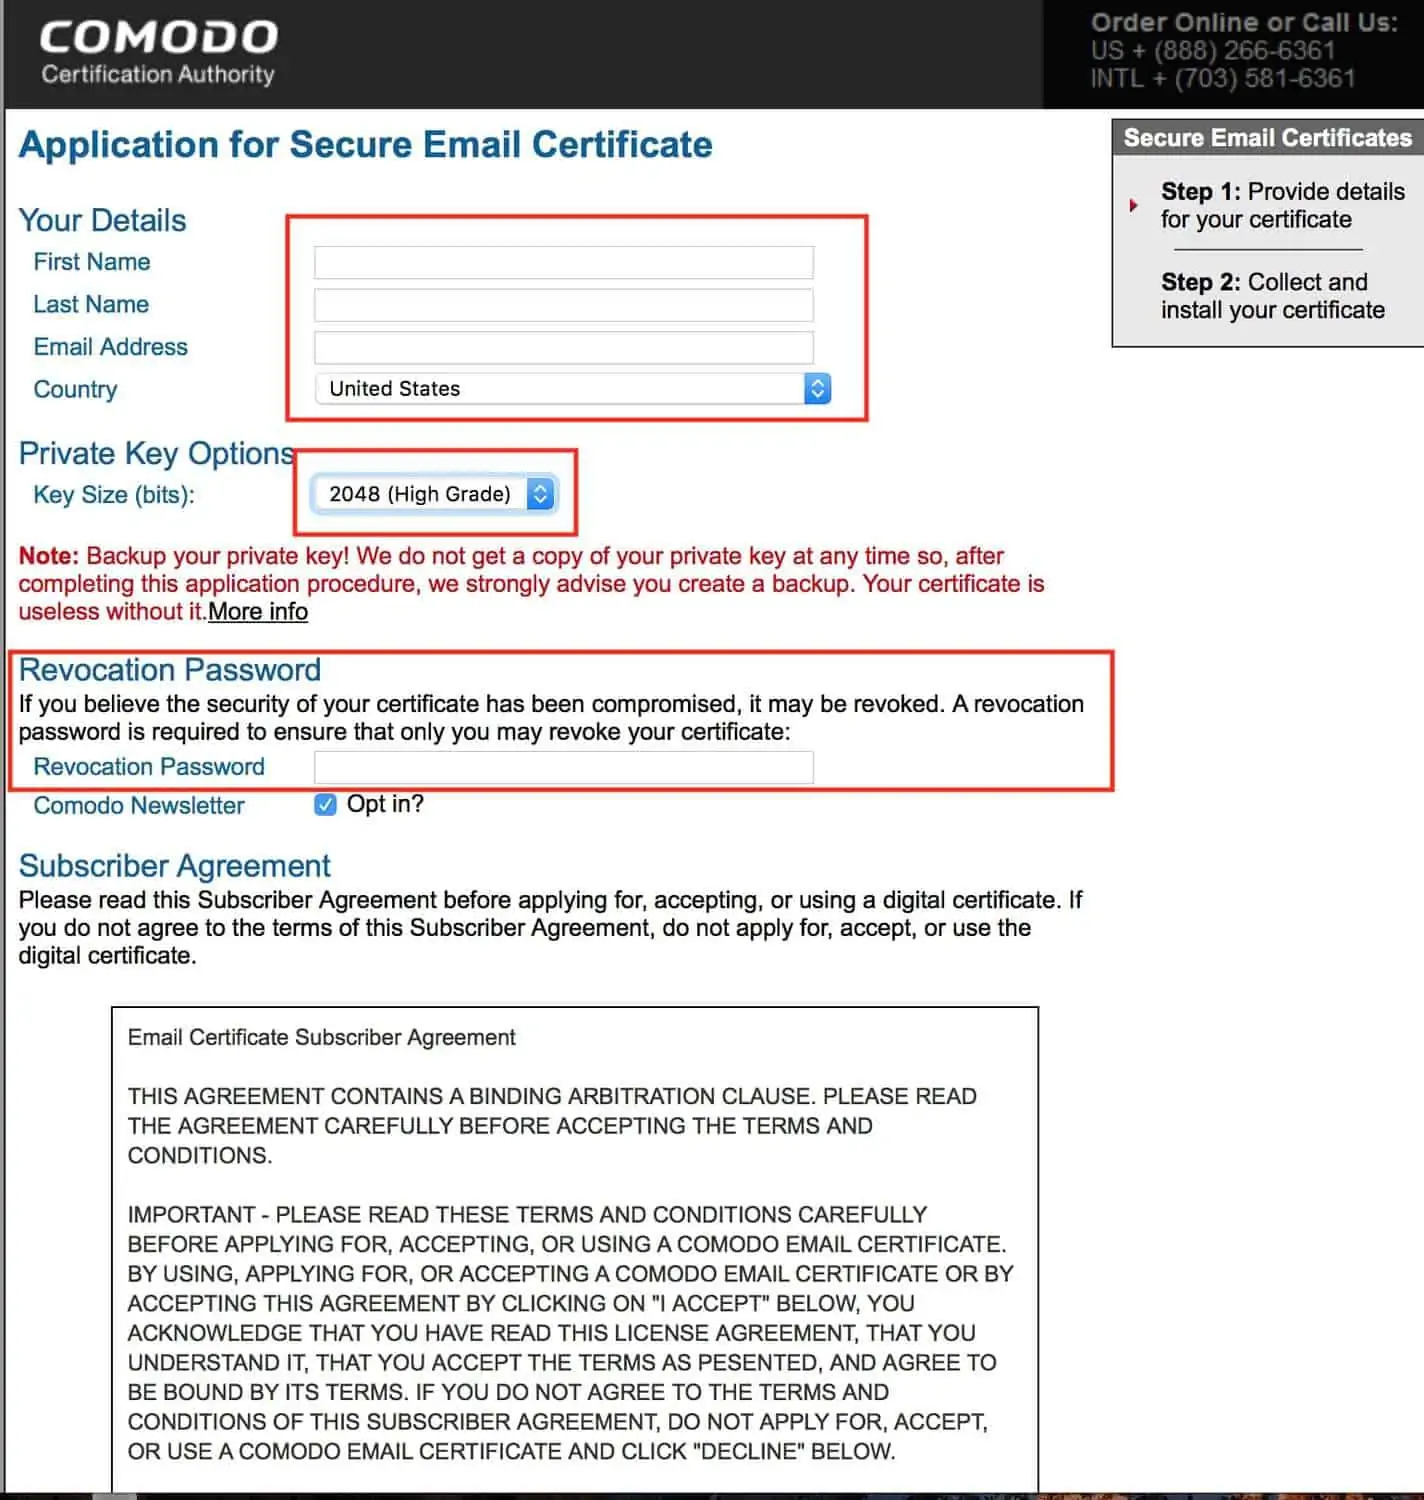
I recommend using Comodo because they provide free secure email certificates. Click on the link and then click “Sign Up Now.” Then, follow the instructions on the next page.
When you’ve completed the registration steps, you’ll receive a “Digital ID” in your inbox.
In order to install/activate your newly-acquired digital ID in Outlook, follow the steps below:
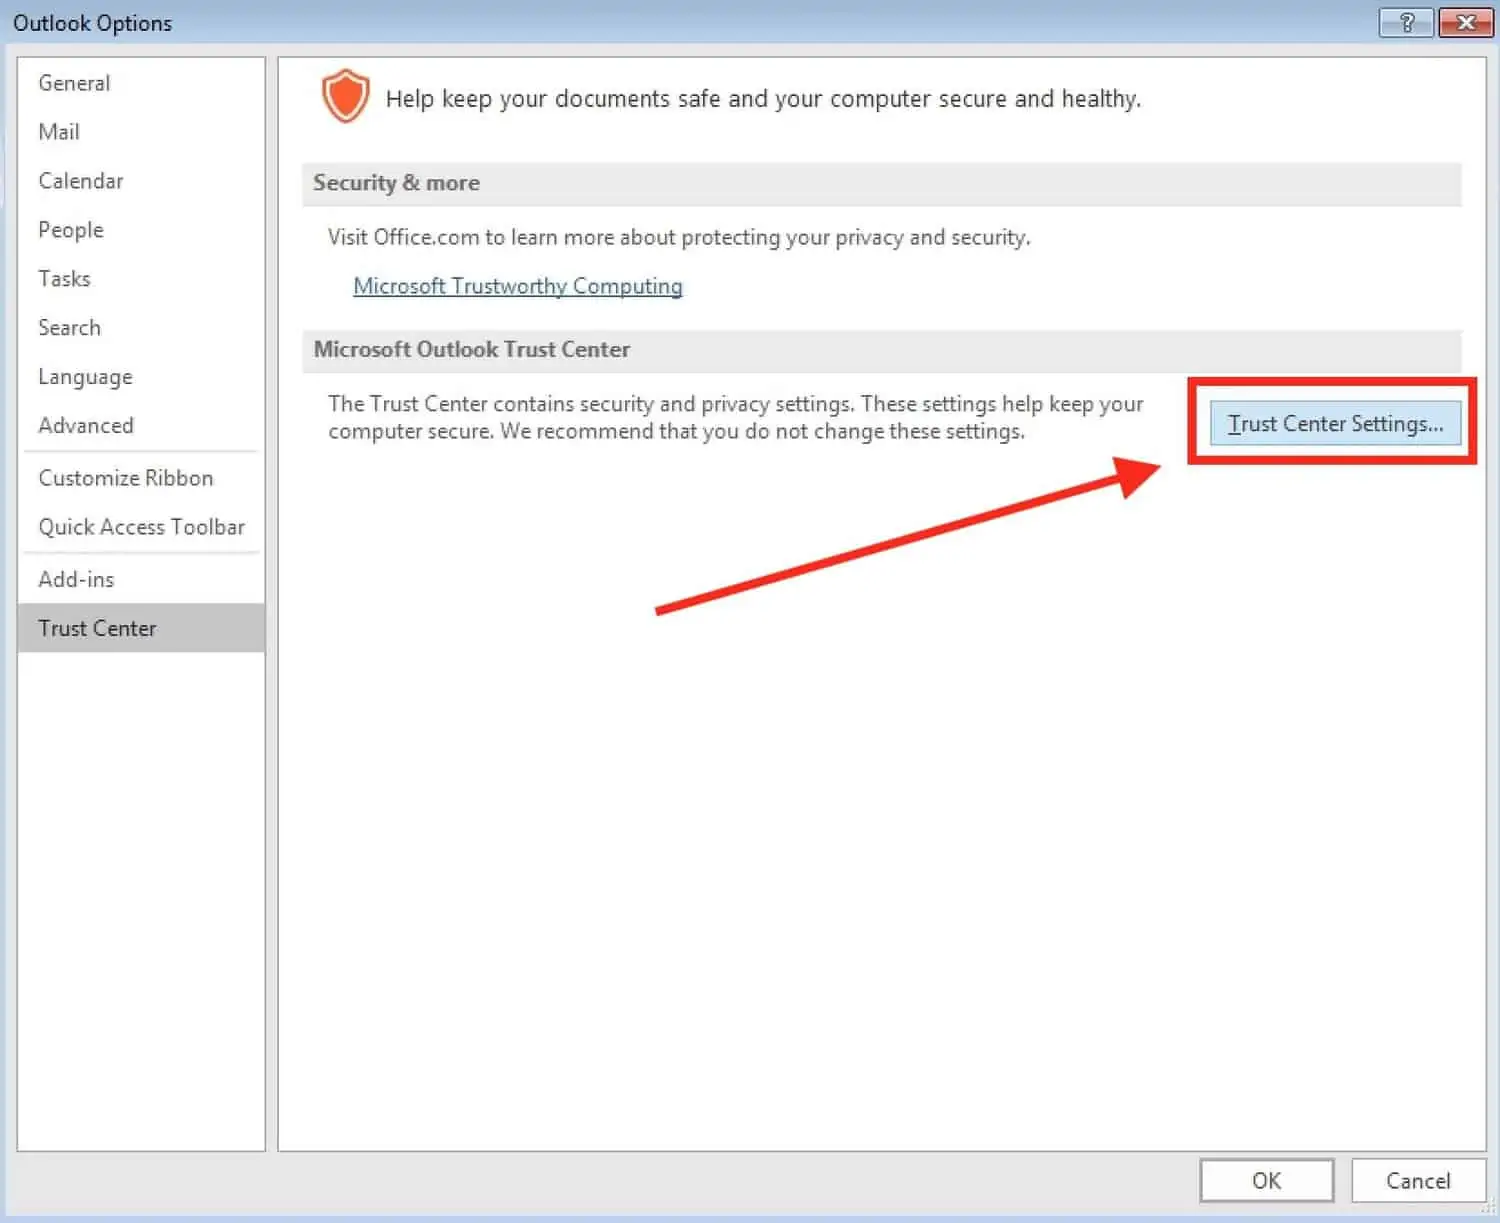
Step #1: Go to the file tab and click “options.” Then select “Trust Center.”

Step #2: When you’re in Microsoft Outlook Trust Center, click “Trust Center Settings.”
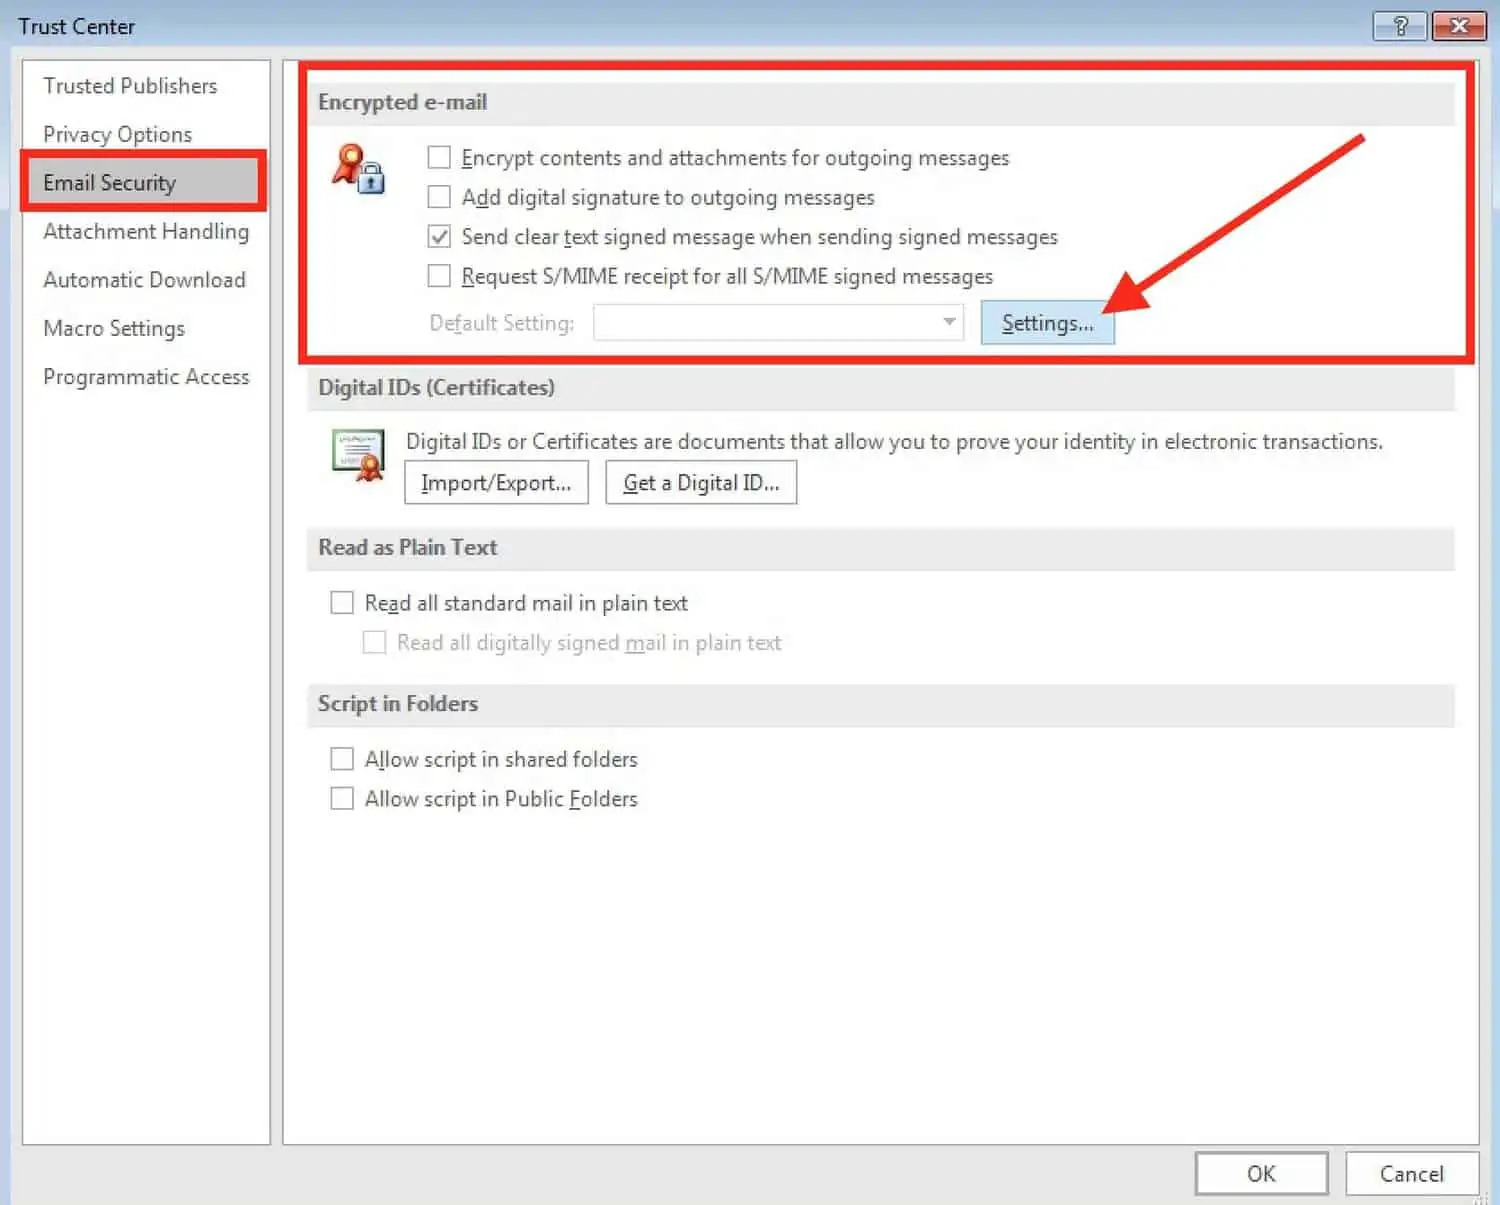
Step #3: Go to the email security tab and select “Encrypted e-mail,” then click “Settings.”
Step #4: Then, make sure the S/MIME encryption method is selected in the format box. Make sure that both default security settings checkboxes are checked.
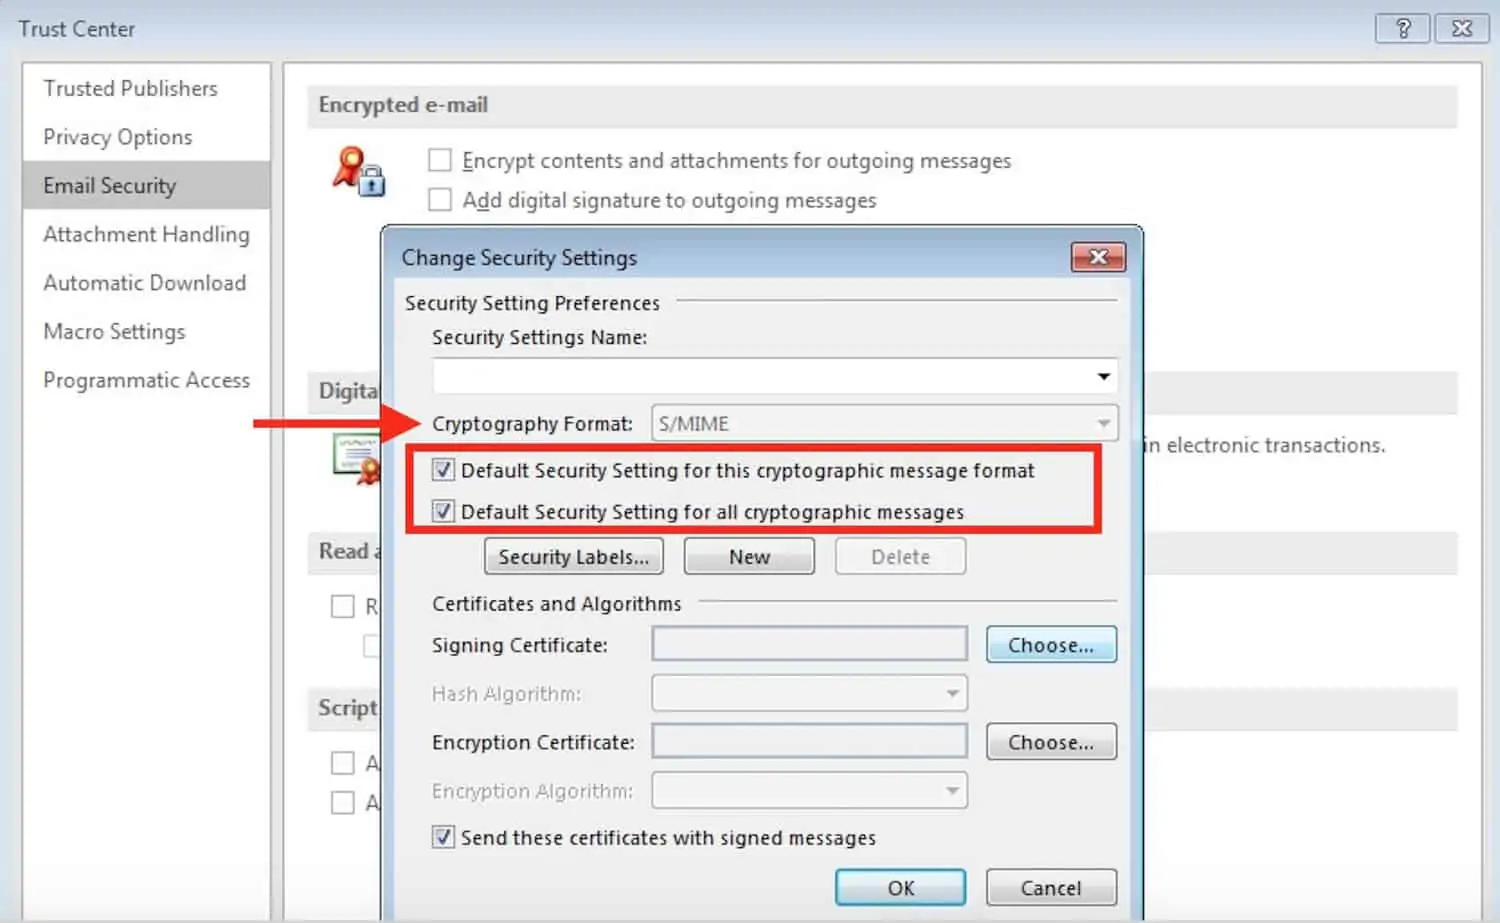
Once you’ve done this, it’s time to insert your certificates.
Step #5: Under the section “Certificates and Algorithm,” locate “Signing Certificate.” Click “Choose.”
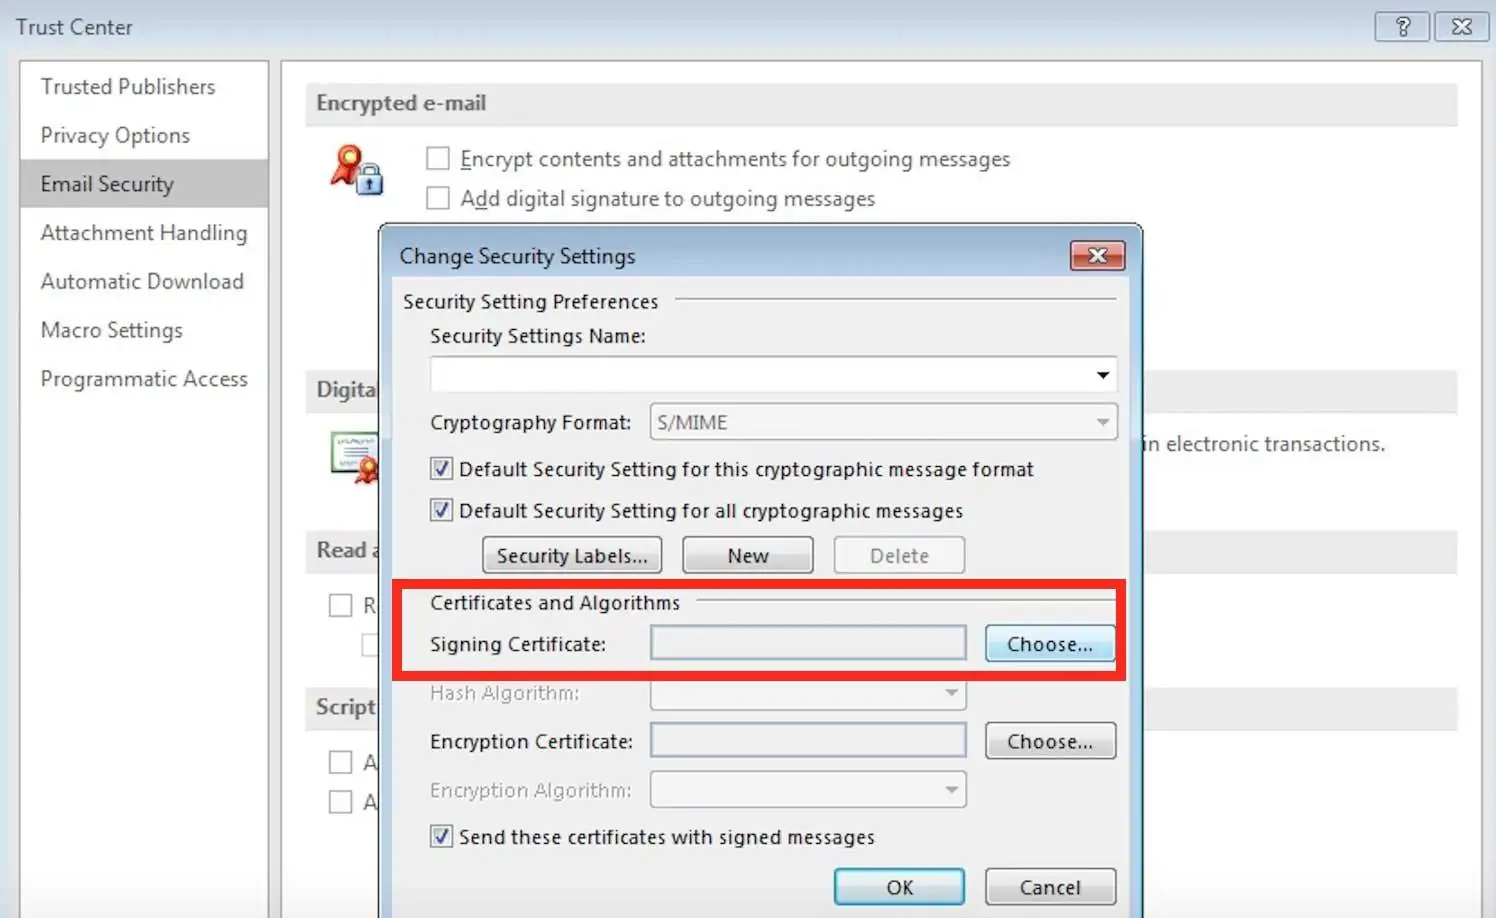
Step #6: In the “Select Certificate” box, choose the Secure Email Certificate that Comodo has sent to you, if the certificate isn’t already selected by default.
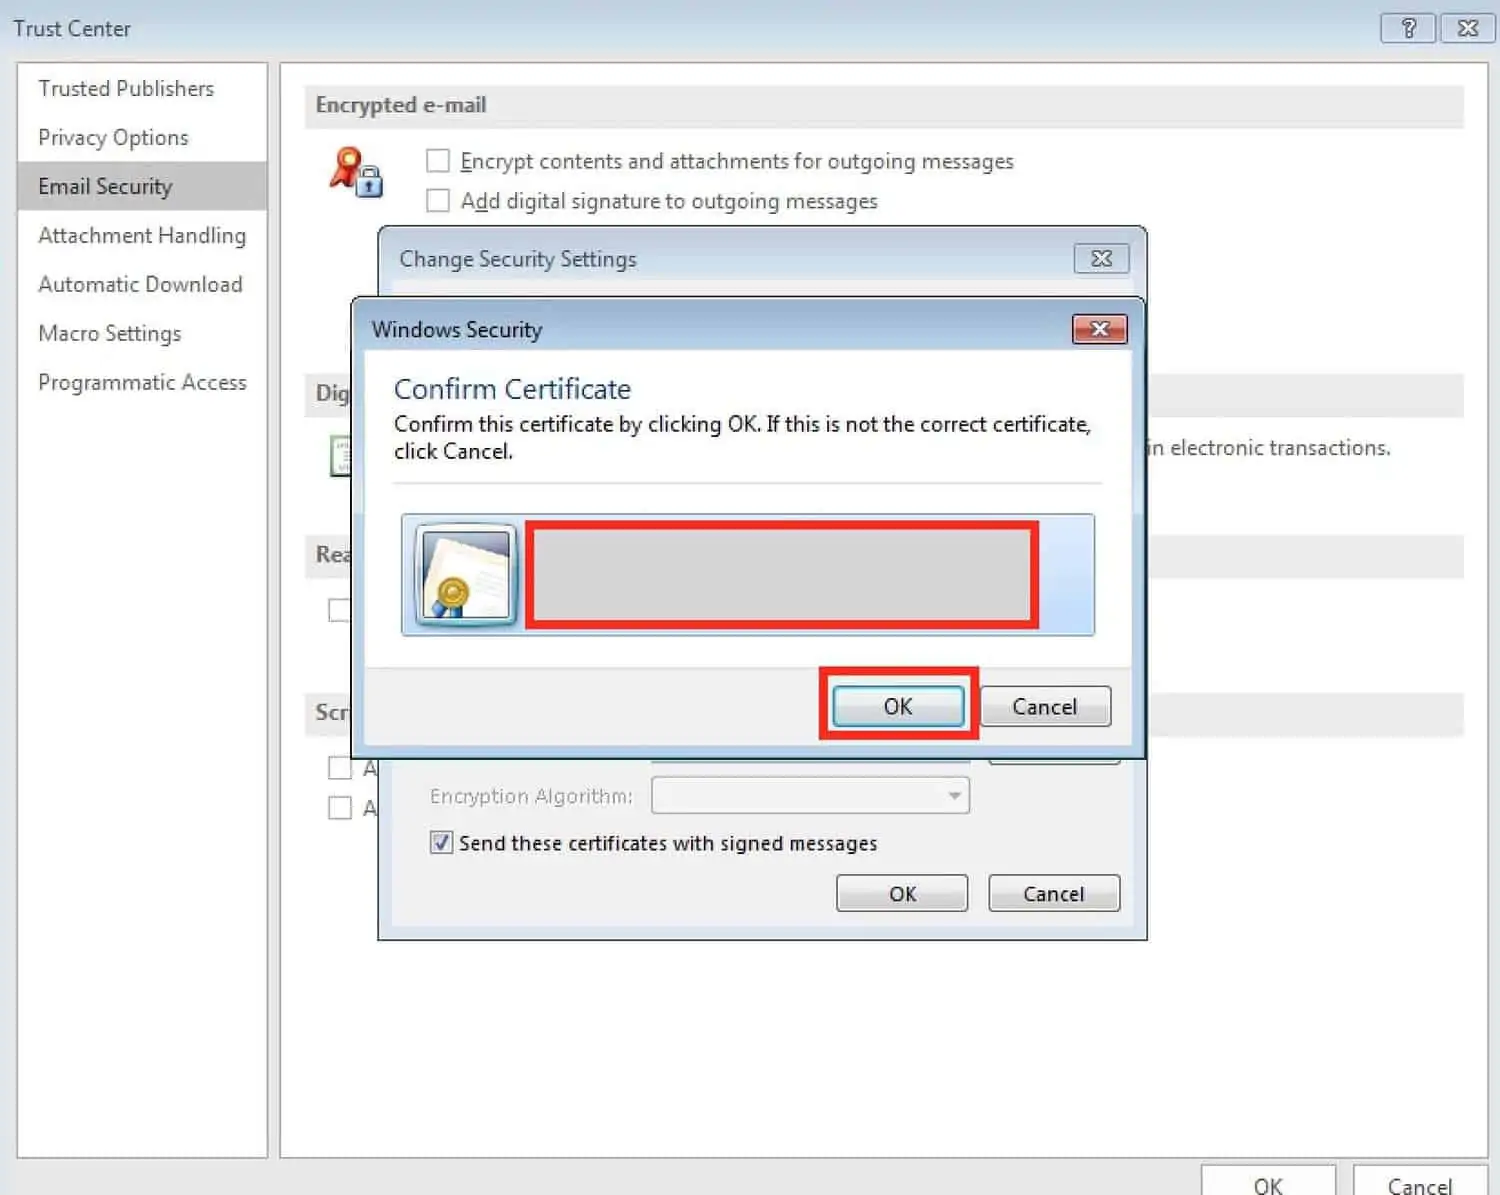
Step #7: Check the last box in the window labeled “Send these certificates with signed messages.”

Step #8: Hit the “OK” button to save all the changes.
At this point, you’ve successfully installed a certificate onto your email client. But, the security certificate is not applied to your emails by default. So, it’s important to finalize the last few steps in order to attach your digital ID to an email.
Follow the next steps to complete the final part:
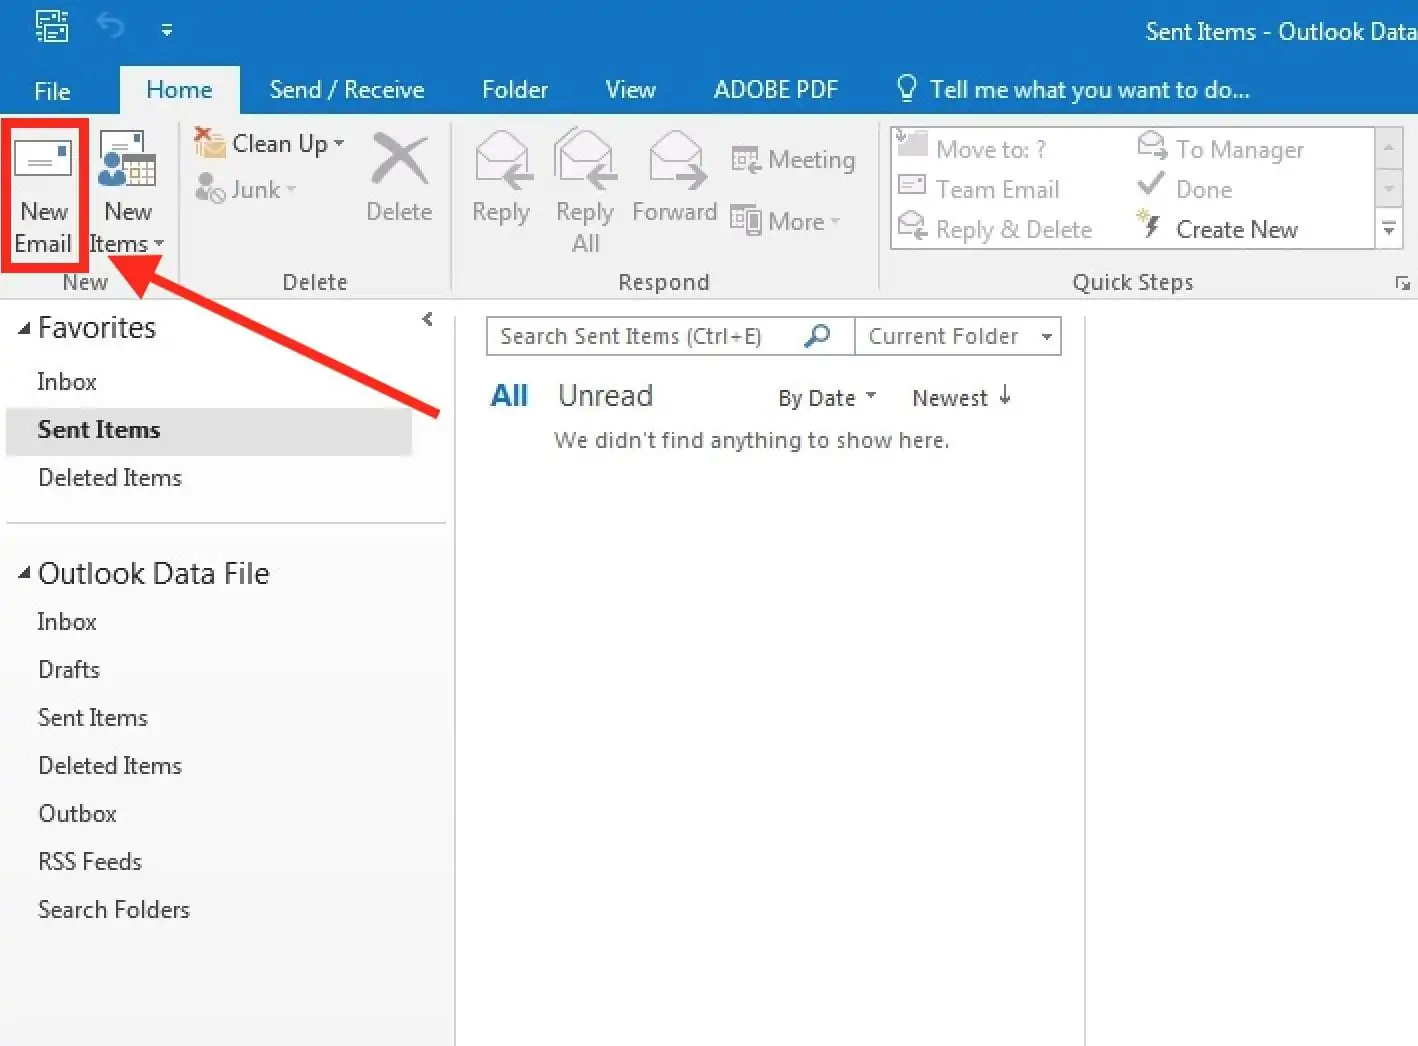
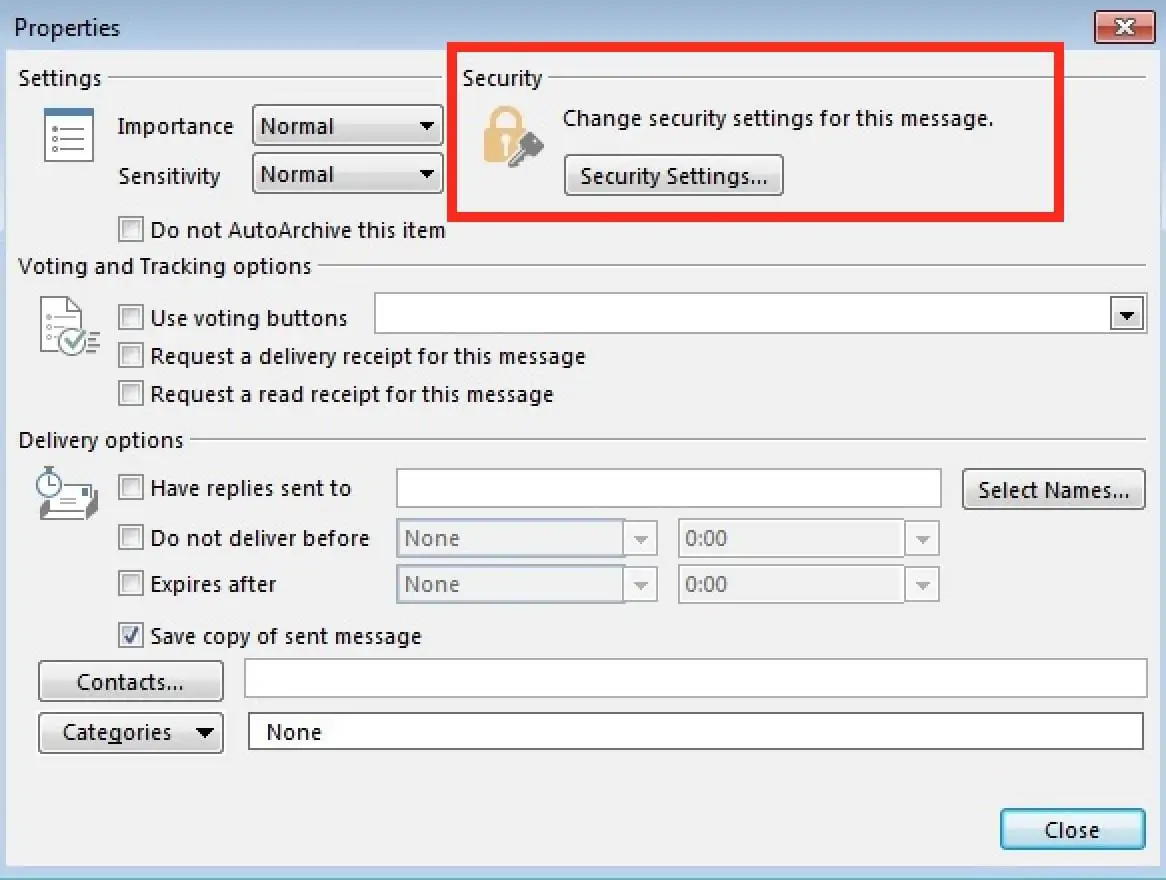
Step #1: In Outlook, open a “New Message.”
Step #2: In the new message window, go to “Message Options.”
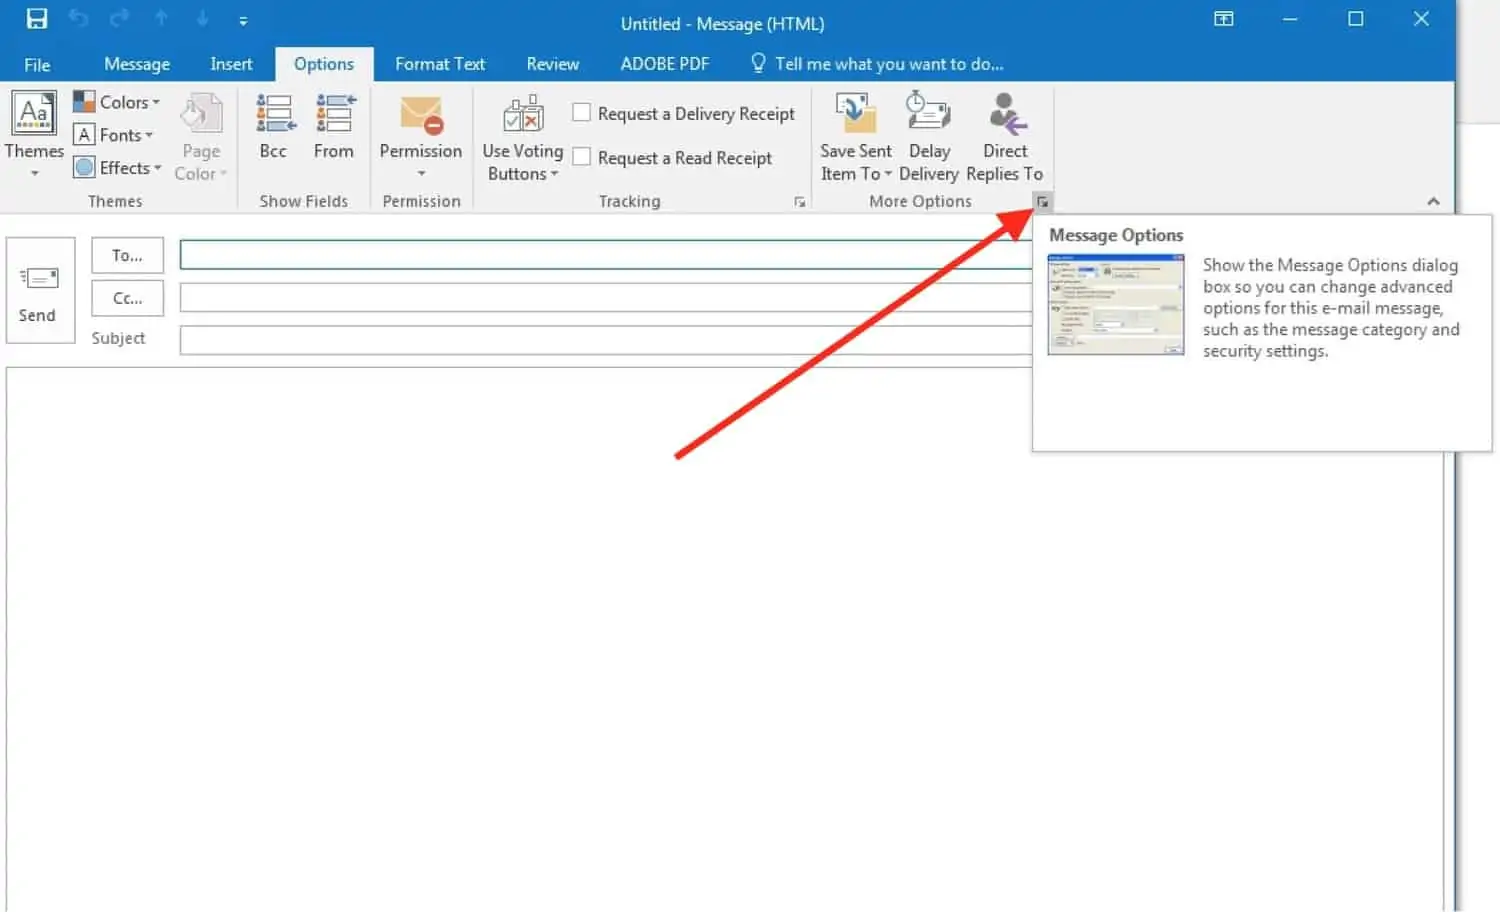
Step #3: Then, click on the “Security Settings.”
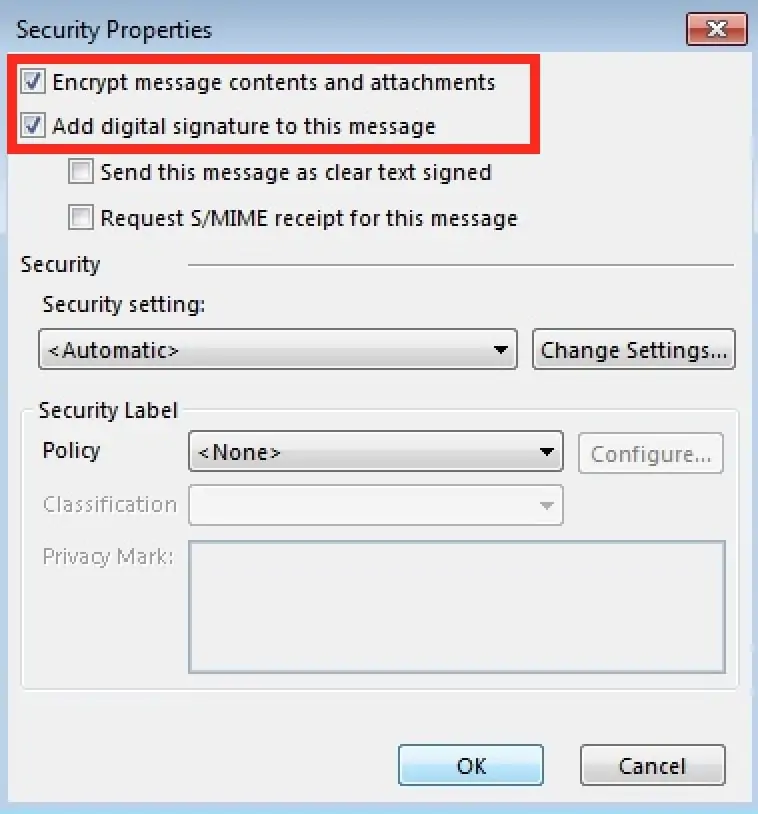
Step #4: In the Security Properties window, tick both the boxes “Encrypt message contents and attachments” and “Add digital signature to this message.”
Step #5: Leave the “Security Settings” on default <Automatic>.
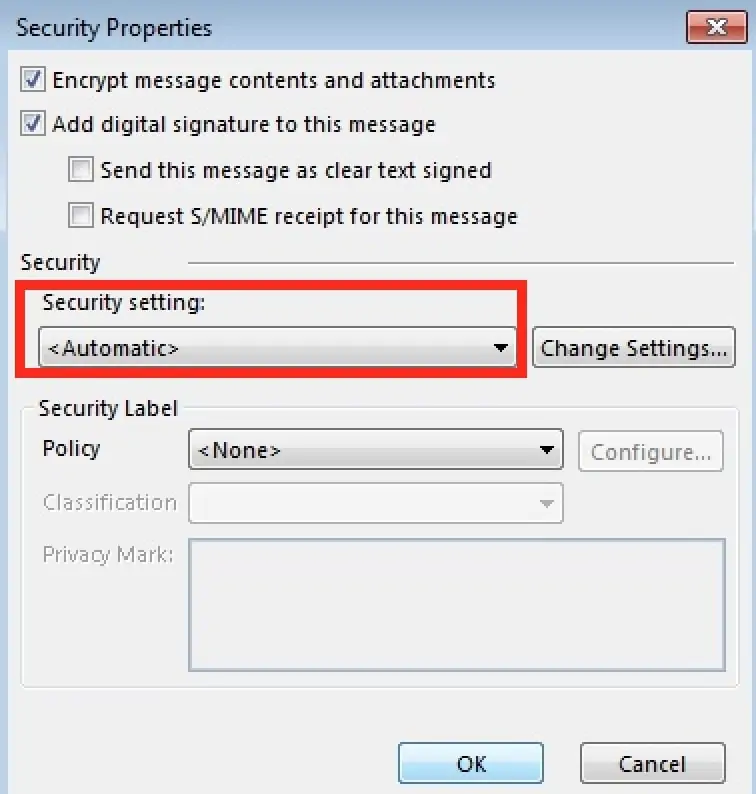
Step #6: To finalize the encryption, click “OK” and go back to the new email message.
Remember, after completing the steps listed above, you have now enabled and added your digital ID to your emails, but this isn’t the same as encrypting email messages.
In order to exchange encrypted email messages with someone, you must send at least one email with your digital ID attached, and the other way around – the recipient must do the same.
By doing so, Outlook can verify both parties as trusted.
In order to avoid the first exchange of the digital signature, you can view certificates of people in your contact list. In order to view the certificate of the person you want to exchange encrypted messages with, follow the next steps:
Step #1: In the navigation bar, click “People.”
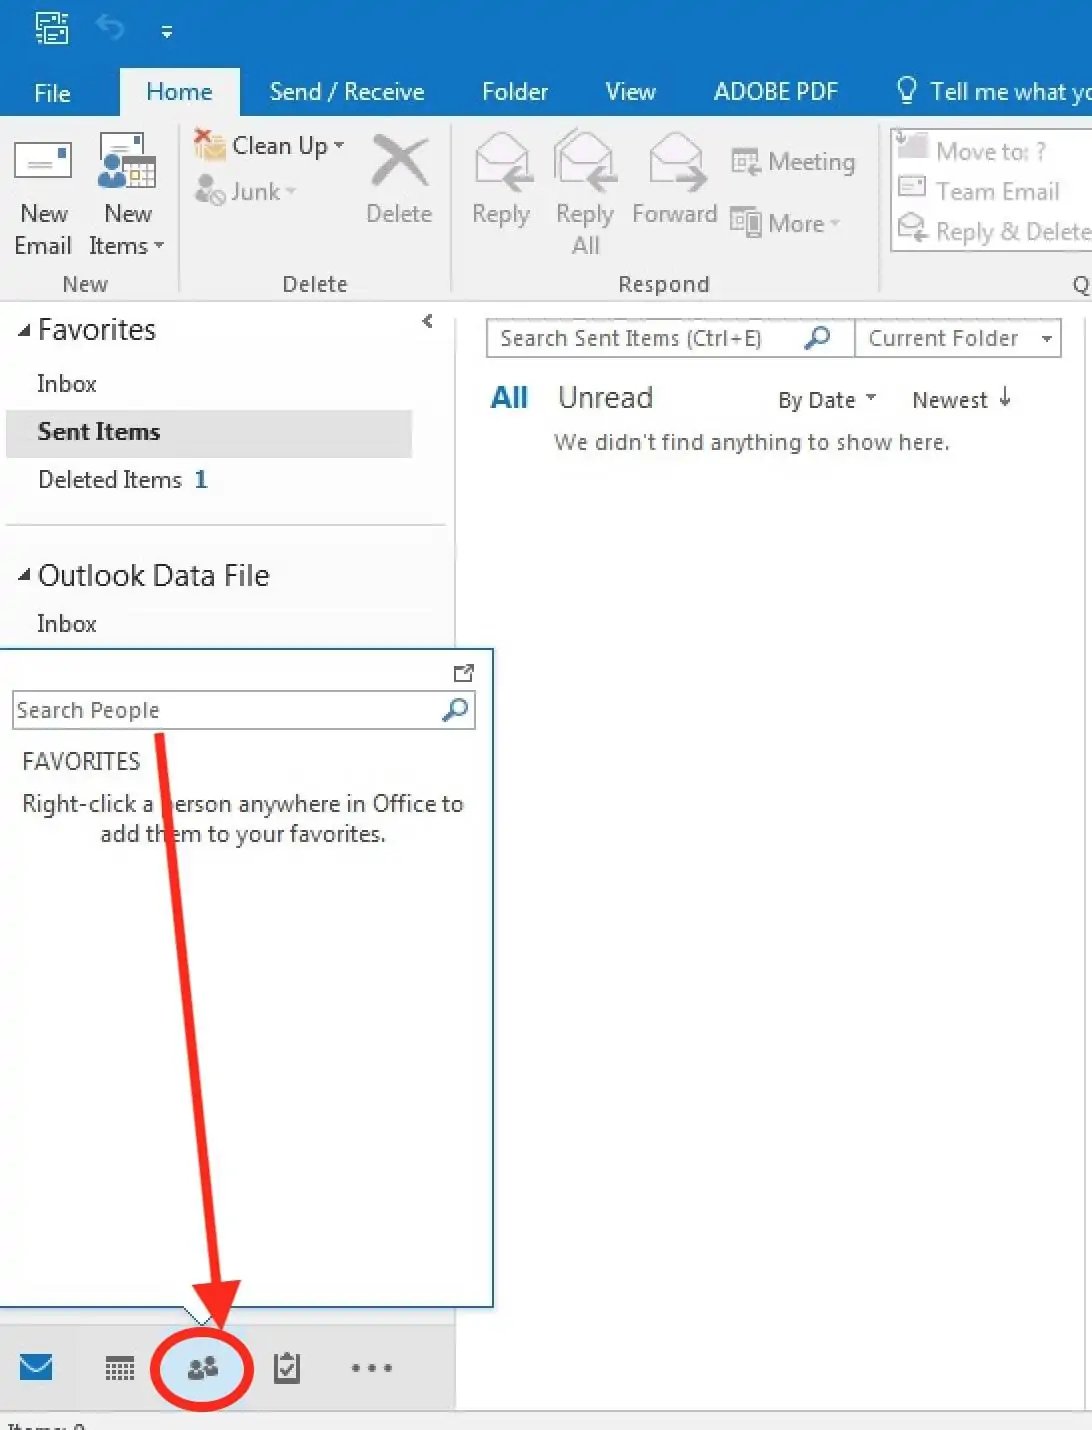
Step #2: Next, on the home tab, click “List.”
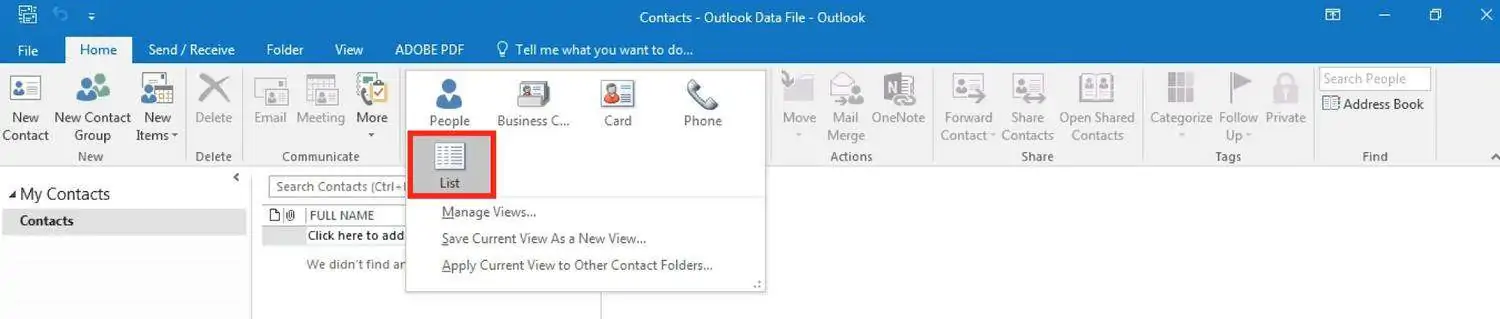
Step #3: Double-click the person’s name and then, in the Contact tab, click “Certificates.”

When both you and the recipient possess each other’s digital certificate/ID, you can save the certificate to your address book in order to send and receive encrypted emails.
Creating and Using A Certificate in macOS Mail
While your iCloud email is encrypted while it’s sitting on Apple’s servers, iCloud Mail does not use end-to-end encryption because it needs to be compatible with the global email system. However, Apple’s email clients do support optional S/MIME for message encryption.
In order to encrypt email messages in your macOS Mail, you need to create or buy a certificate from a CA.
The encryption process works similarly to the encryption process in the previous section for Outlook users – you must share your certificate with the recipient and vice versa.
So, how can you create a certificate on your macOS device? Follow the next steps to find out:
Step #1: Go to Finder -> Applications -> Utilities and then double-click “Keychain Access.”
Step #2: When Keychain Access is opened, go to the top left corner and click “Keychain Access,” find “Certificate Assistant” and click “Create a Certificate.”
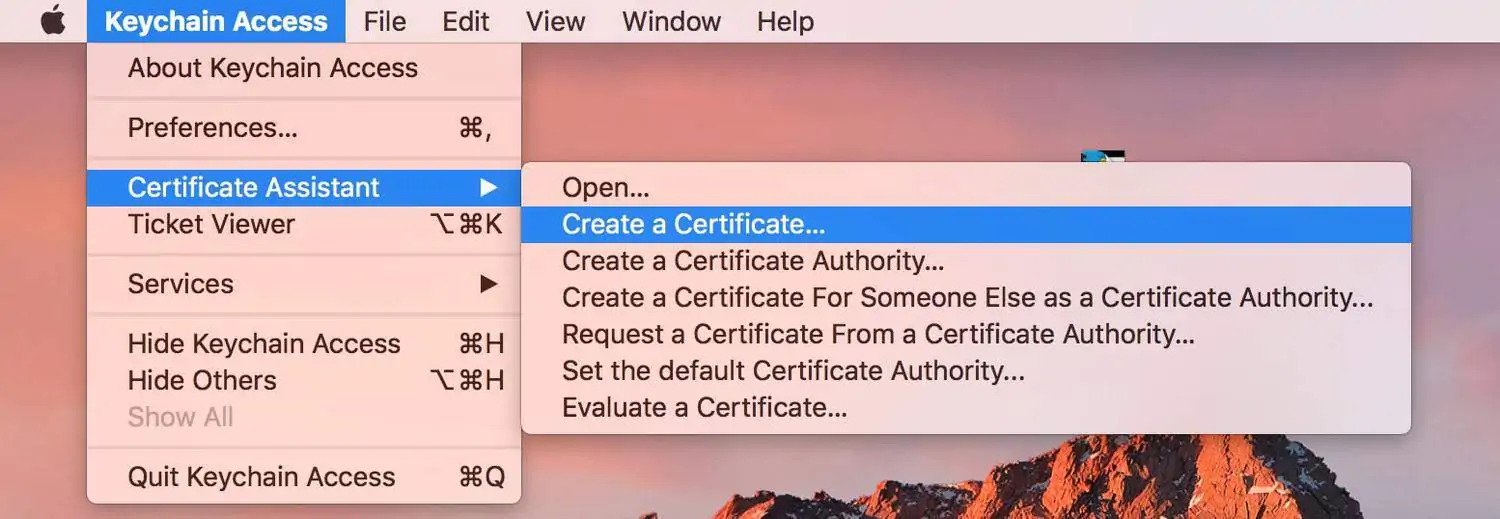
However, if you would rather use a certificate from a CA, then instead of selecting “Create a Certificate,” you can select “Create a Certificate Authority.”
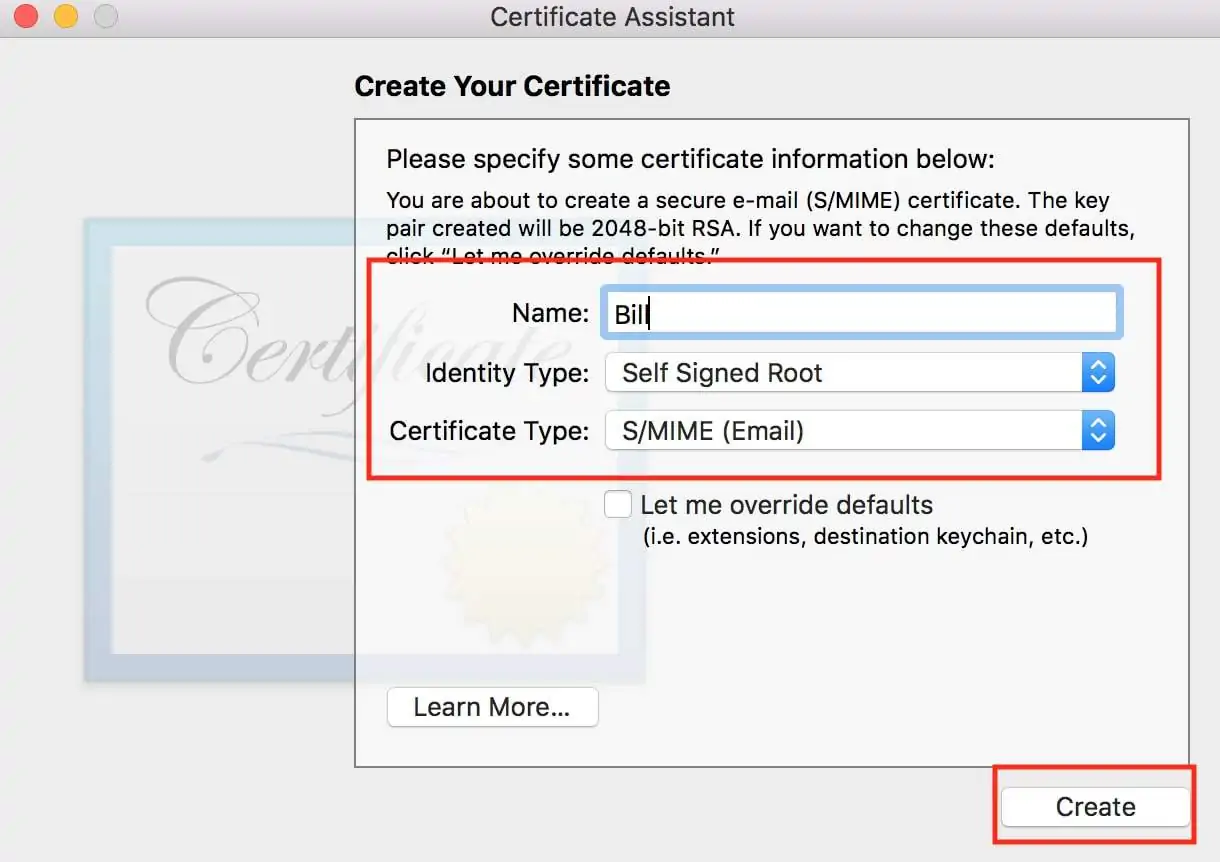
Step #3: Enter a name for your certificate, leave the other settings as is, and click “Create.”
Step #4: Click “Continue” to confirm that you are about to create a self-signed certificate.
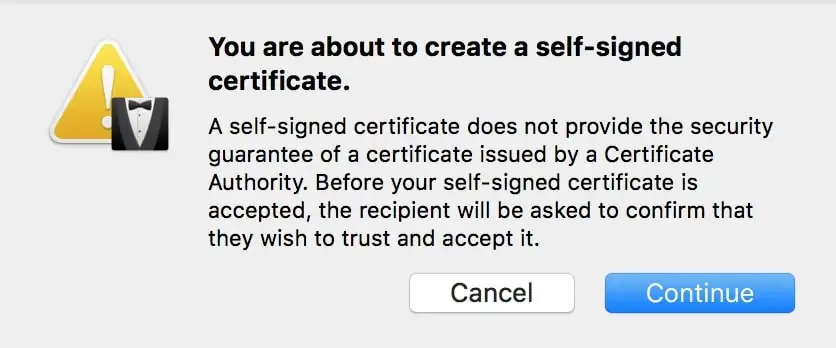
Step #5: Your certificate has been successfully created!
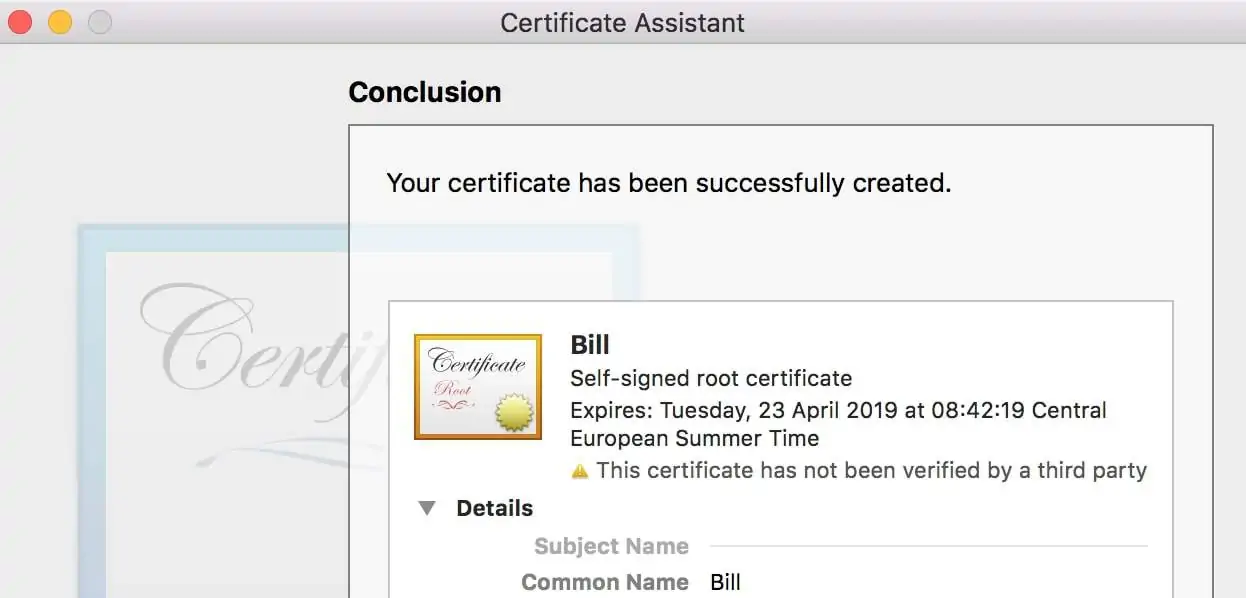
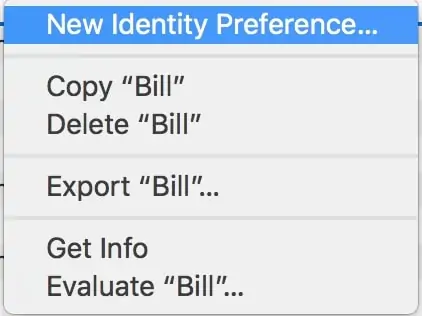
It’s important to link your email address to the certificate. The certificate you’ve just created will be shown in the “Keychain Access” list.
Step #6: Locate your newly created certificate and right-click the file. Then, click “New Identity Preference.”
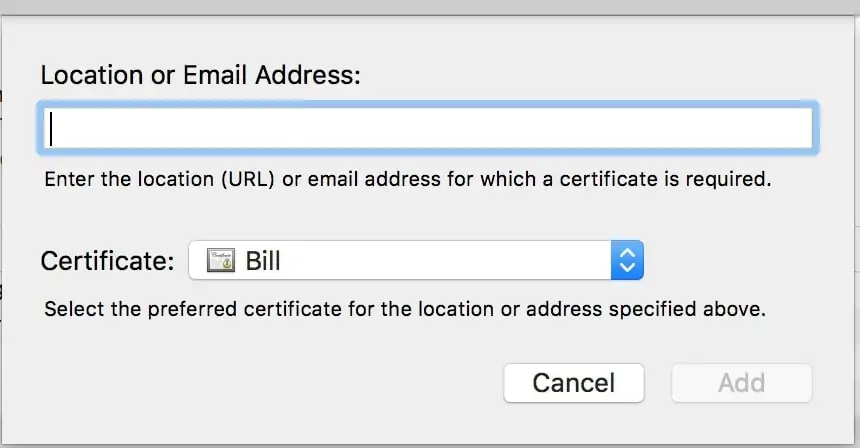
Step #7: Enter your email address in the box and press “Add.”
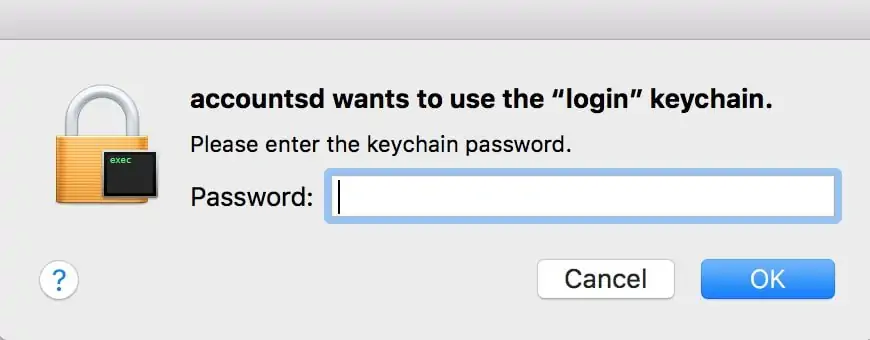
Step #8: Provide access from your Mailbox account to the Keychain Certificate. Enter your Mac password to confirm and click “OK.”
Step #9: Now that you added the certificate to your email, open a new email message and send an email to the recipient to exchange your certificate.

As you can see, the certificate icon and encryption lock icon are located on the right side. After you’ve sent an email to a recipient, shared your certificate, and received the other party’s certificate, the padlock will allow you to send encrypted email messages.
Encrypt Your Email on Your iPhone in iOS 17
By default, compatibility with the S/MIME encryption method is built into every iOS device. If you want to enable the encryption option to email messages, follow these simple steps:
To send encrypted messages, you’ll need to install an S/MIME certificate for your email account. S/MIME certificates can be obtained from a certificate authority (CA) or, if you’re using an Exchange account, from your organization. You will also need the recipient’s certificate (public key).
Enable Message Encryption
When you configure S/MIME for your account, you can choose to “Encrypt by Default” when you compose new messages by doing the following:
- Open the Settings app.
- Tap “Mail” -> “Accounts.”
- Tap the account that has messages you want to encrypt by default.
- Tap “Account” -> “Advanced” -> “Encrypt by Default,” then turn on Encrypt by Default.

Now, when you reply to or forward an email, the encryption state of your email will match the state of the incoming email rather than your system’s default setting. You can also tap the blue Lock button in the address field to change the encryption state of any outgoing emails.
Encrypt Your Email on Your Android Device
In order to send encrypted email messages with your Android device, you have a few different options. One of them is to install an application called “CipherMail.”
Cipher is another term for “scrambled text,” hence the name of the mail application! CipherMail allows you to send emails using the S/MIME method.
It works similarly to the previously-explained S/MIME methods, and the certificate is enabled by sharing it with the recipient the first time.
You can either download the application on CipherMail’s website or download it in the Google Play Store.
An alternative option, with arguably better privacy security, is to encrypt your email messages with PGP/MIME. This method works differently because you need two applications to enable the encryption process: an email application and a keychain store.
Typically, the PGP/MIME method requires a bit more time to set up but also provides better protection. The biggest advantage is, you don’t need to share/exchange your certificate with the recipient in order to send encrypted email messages.
To enable PGP/MIME encryption, you need the K-9 Mail app and OpenKeychain, both available in the Google Play Store.
Follow the steps below:
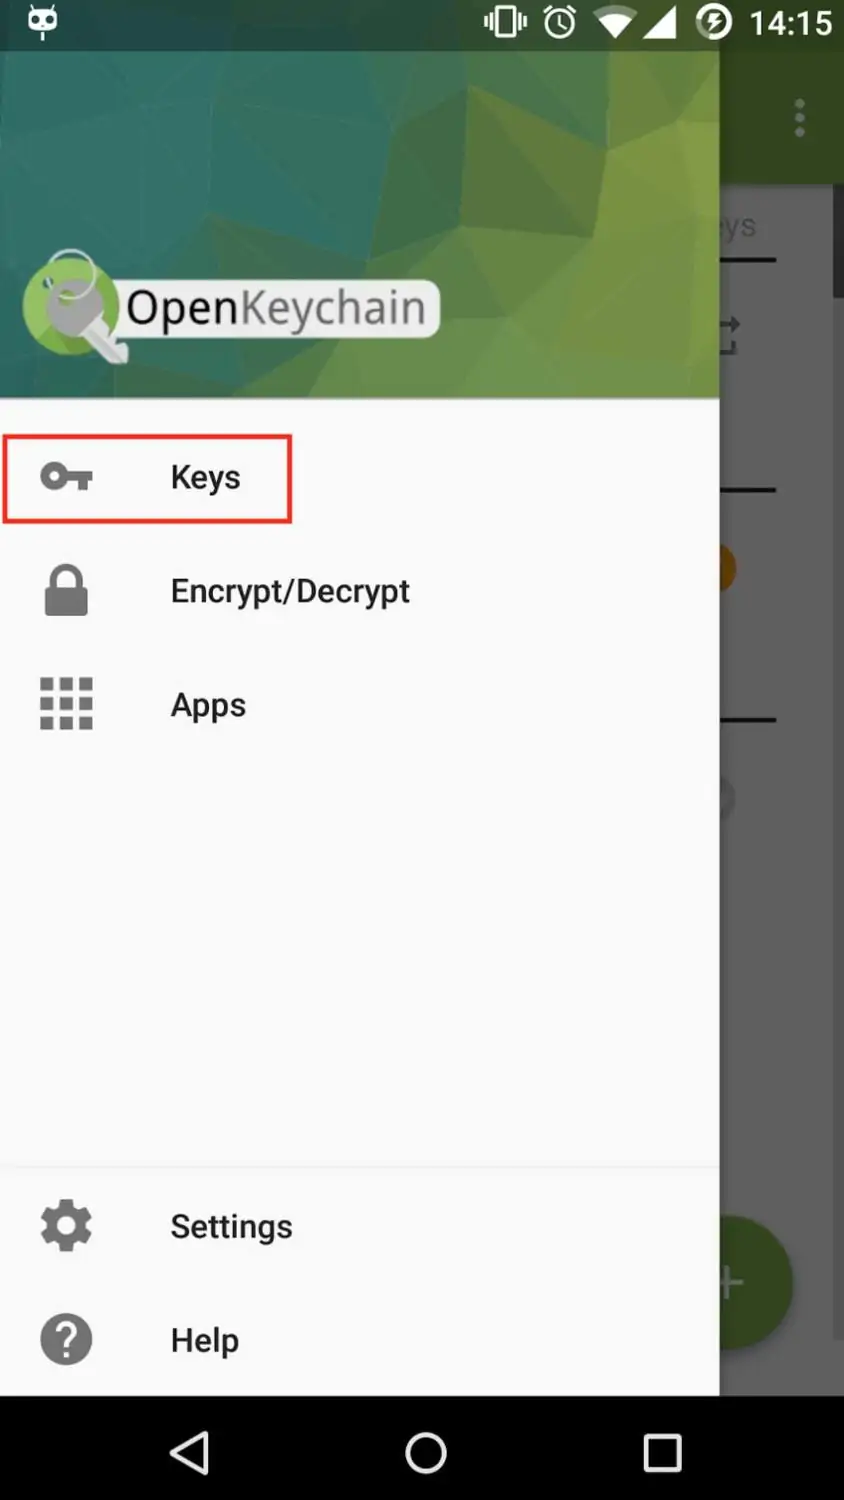
Step #1: Install the OpenKeychain app.
Step #2: Select “Keys” and then select “Create My Key” to generate your PGP key.
Step #3: Next, install the K-9 Mail application. Walk through the simple installation steps of the app and set up an email account.
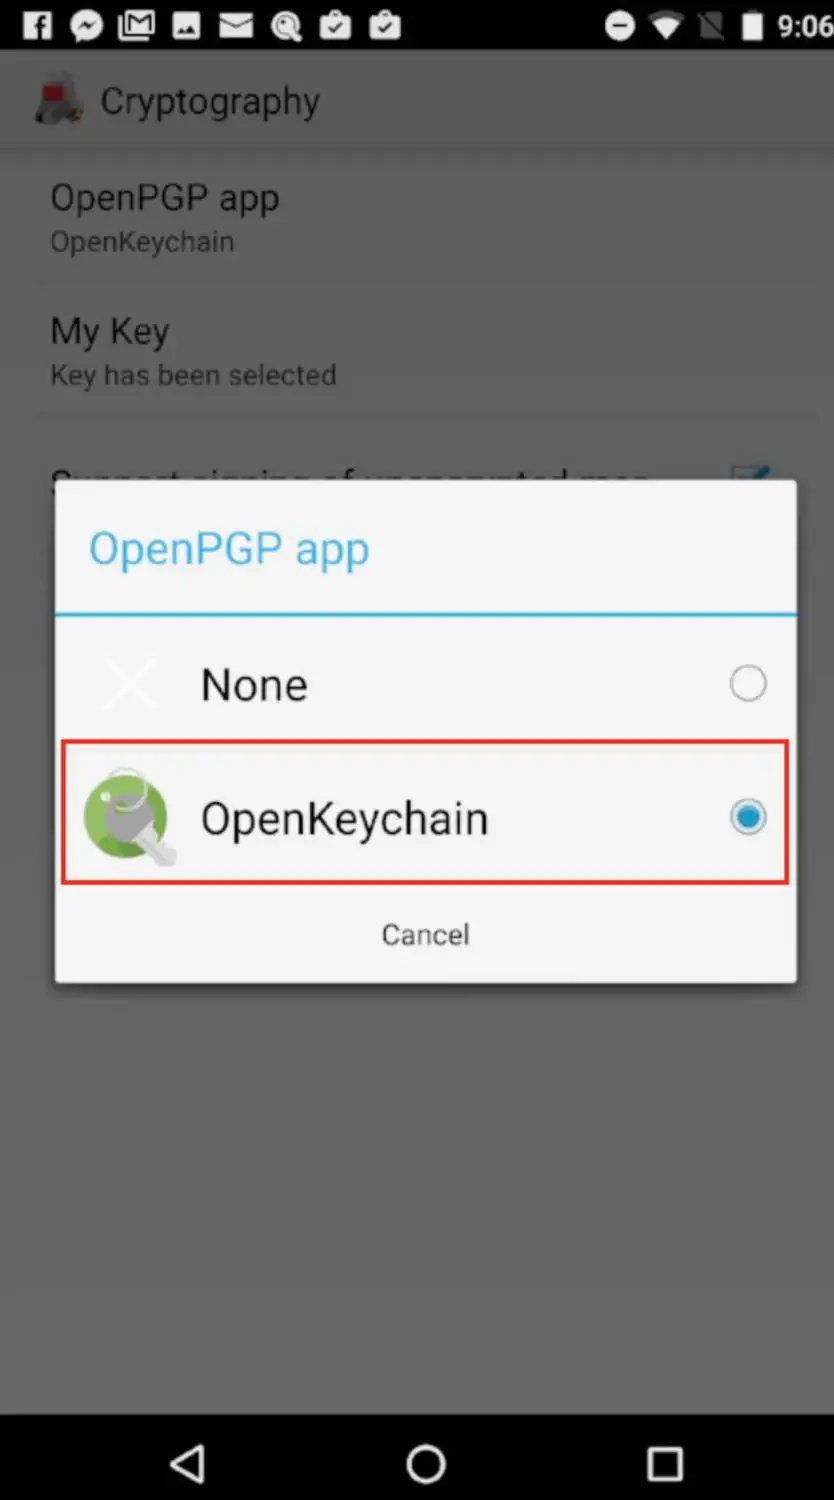
Step #4: Once the app is installed on your Android device, go to Menu -> Settings -> Account Settings.
Step #5: Locate and click on the “Cryptography” button, then click “OpenPGP.”
Step #6: Then, select “OpenKeychain,” which you’ve just installed.
Now you’re ready to send and receive encrypted email messages in K-9 Mail.
Note: remember that, when using PGP/MIME encryption, you’ll need the public encryption key of the recipient. So, you can encrypt the message with their public key and they can decrypt it with their private key.
This means that the other party also needs to use PGP encryption, otherwise it’s not possible.
If they want to send encrypted email messages to you, they’ll need to encrypt it using your public key, so you can decrypt it with your private key.
When you want to encrypt your Gmail, PGP/MIME encryption is the way forward. In order to implement encryption in your Gmail account, you’ll need a (Chrome) browser extension.
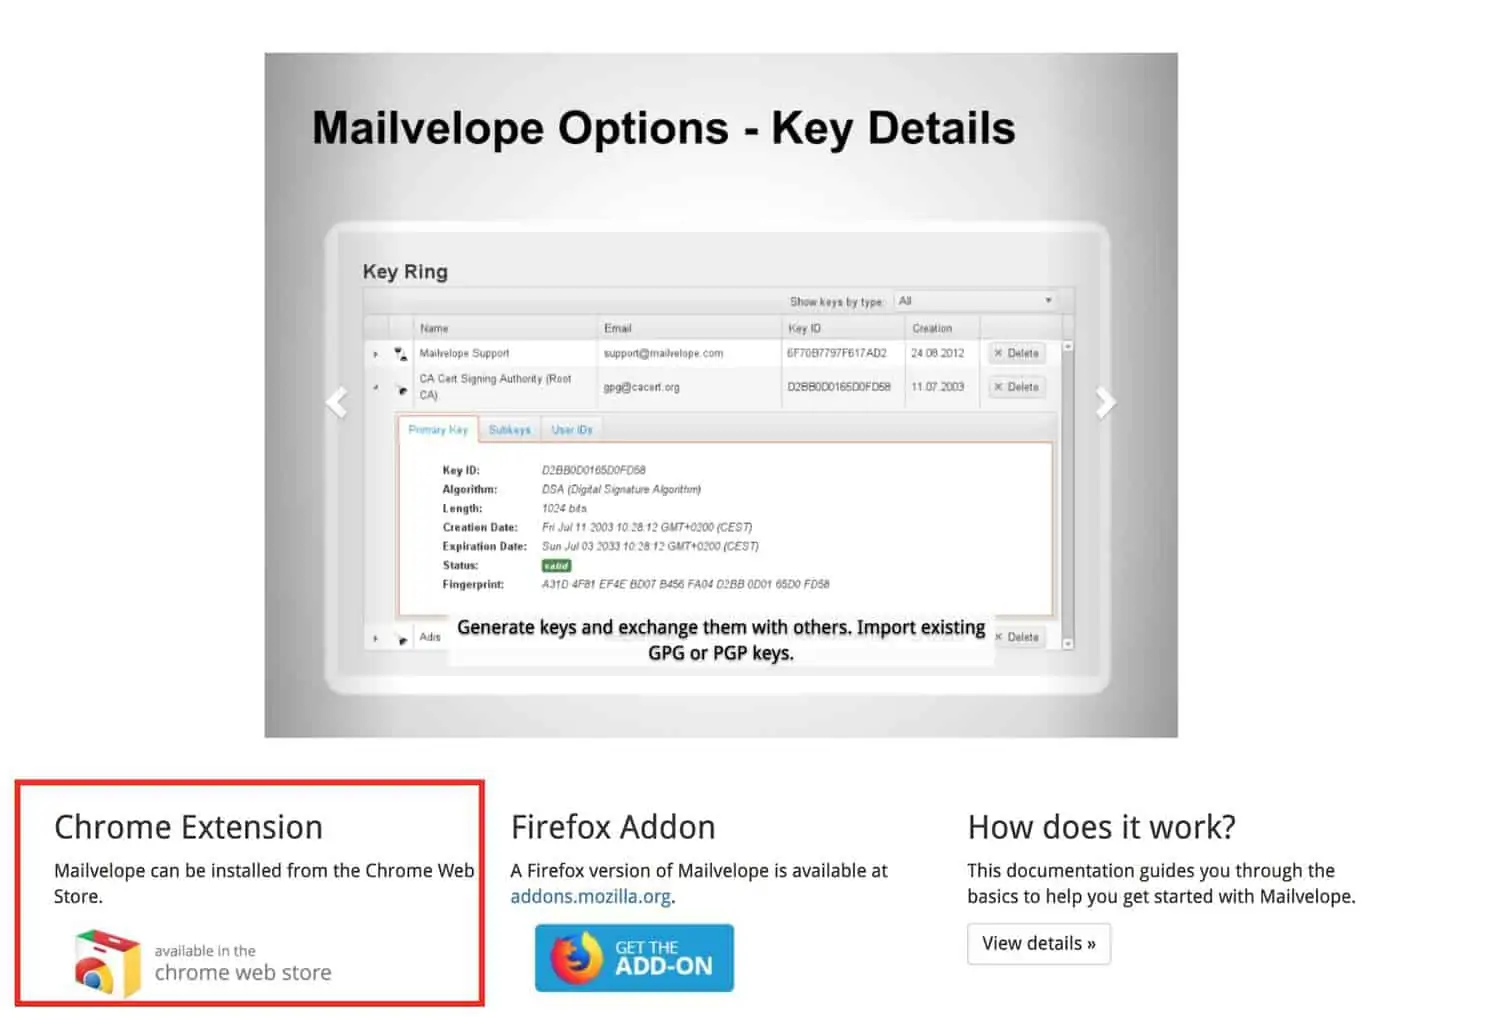
You can choose between Mailvelope or Psono. For the sake of the example, we’ll go with Mailvelope.
Step #1: Go to Mailvelope’s website and click on the “Chrome Extension.”
Step #2: Then, click “Add extension” in the popup window.
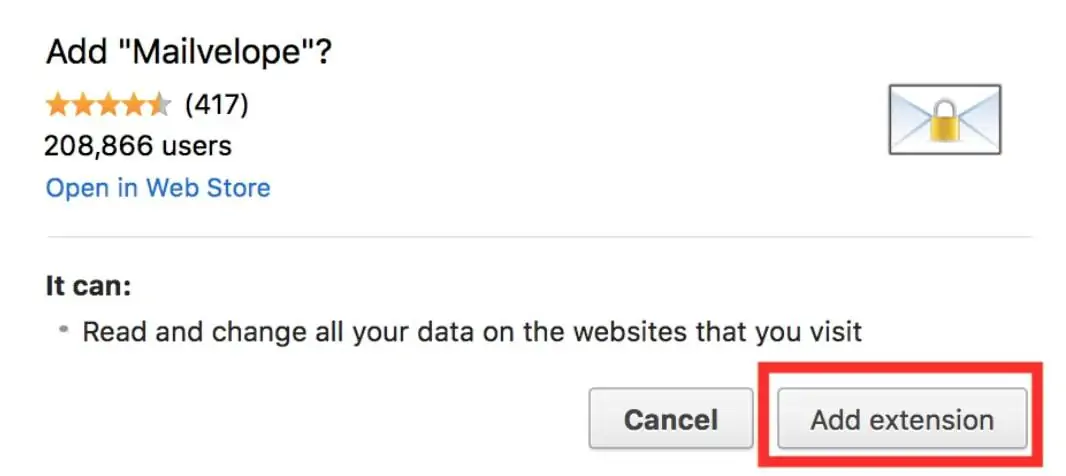
It’ll only take a few seconds. Mailvelope’s icon will show in your extension bar, located at the top-right corner of your screen.
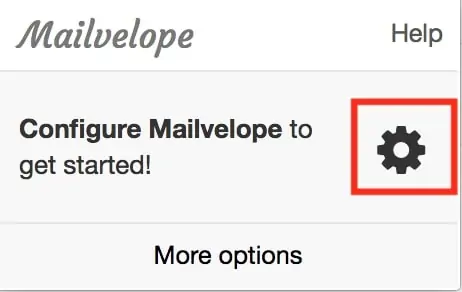
Step #3: Click on the little icon and then click the little “settings” wheel.
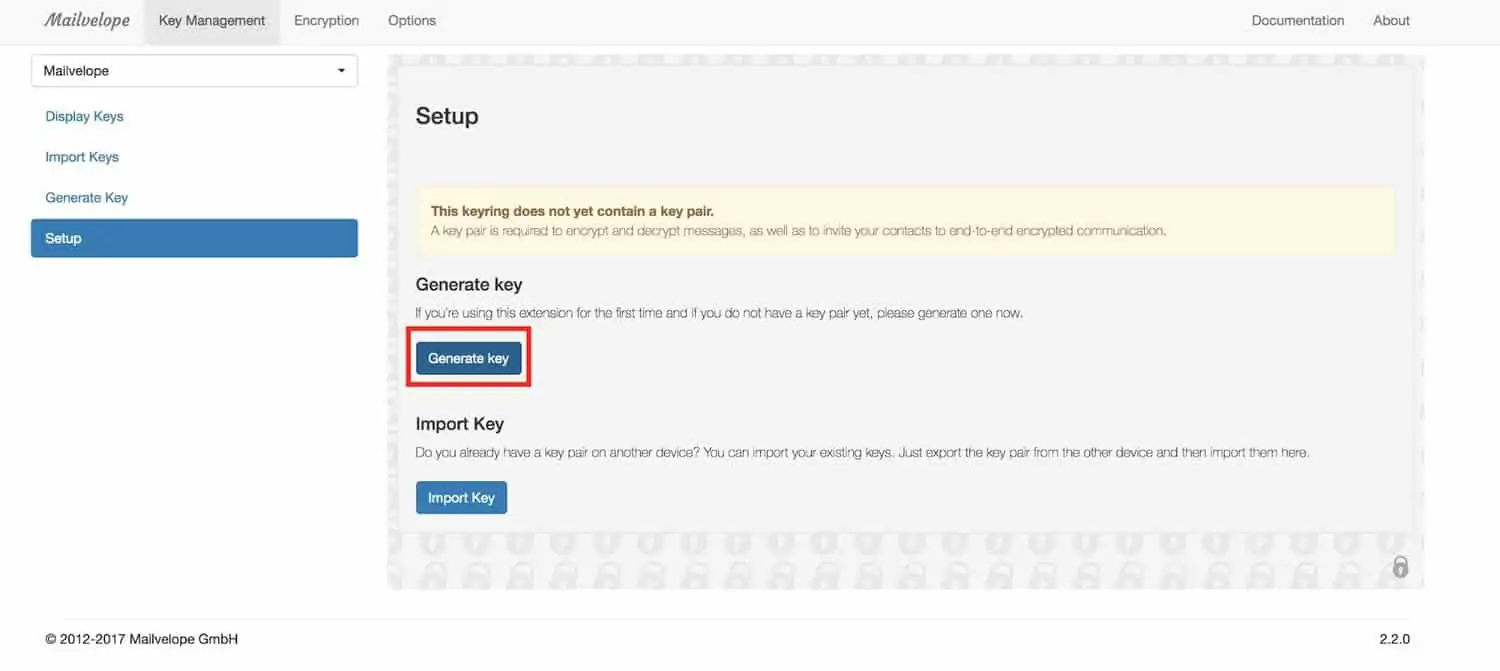
Step #4: Next, you’ll have to generate your own key.
Step #5: Enter your full name, email, and password
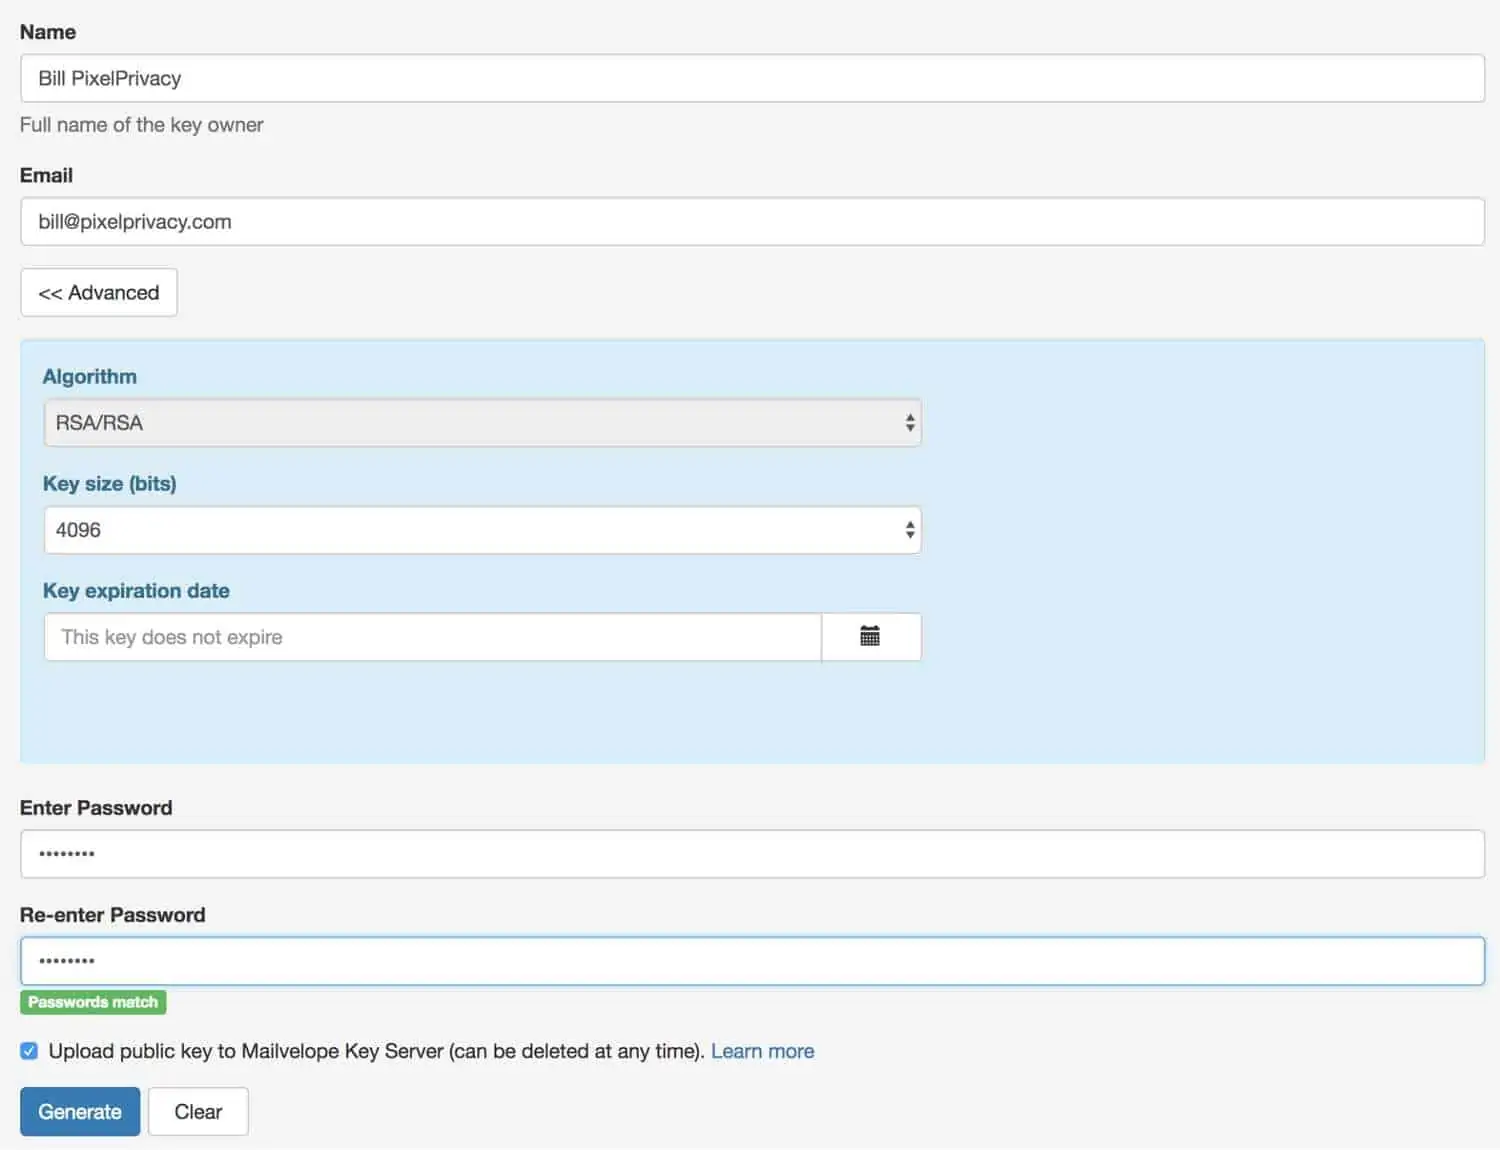
After you click “Generate,” your key will be added to Mailvelope’s keyring (database of keys).
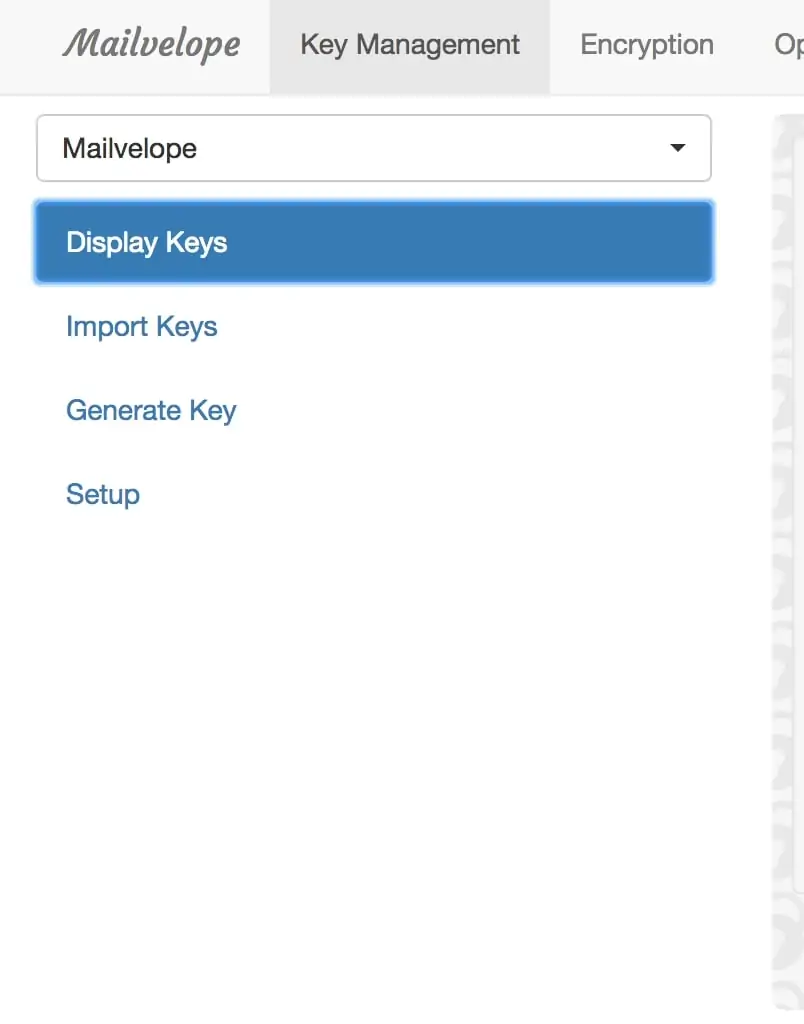
Step #6: You can view both your public and private key in the “Display Keys” section.
Step #7: Then, find the tab “Export” to copy your public key (this is the key a sender needs to send encrypted email messages to you).
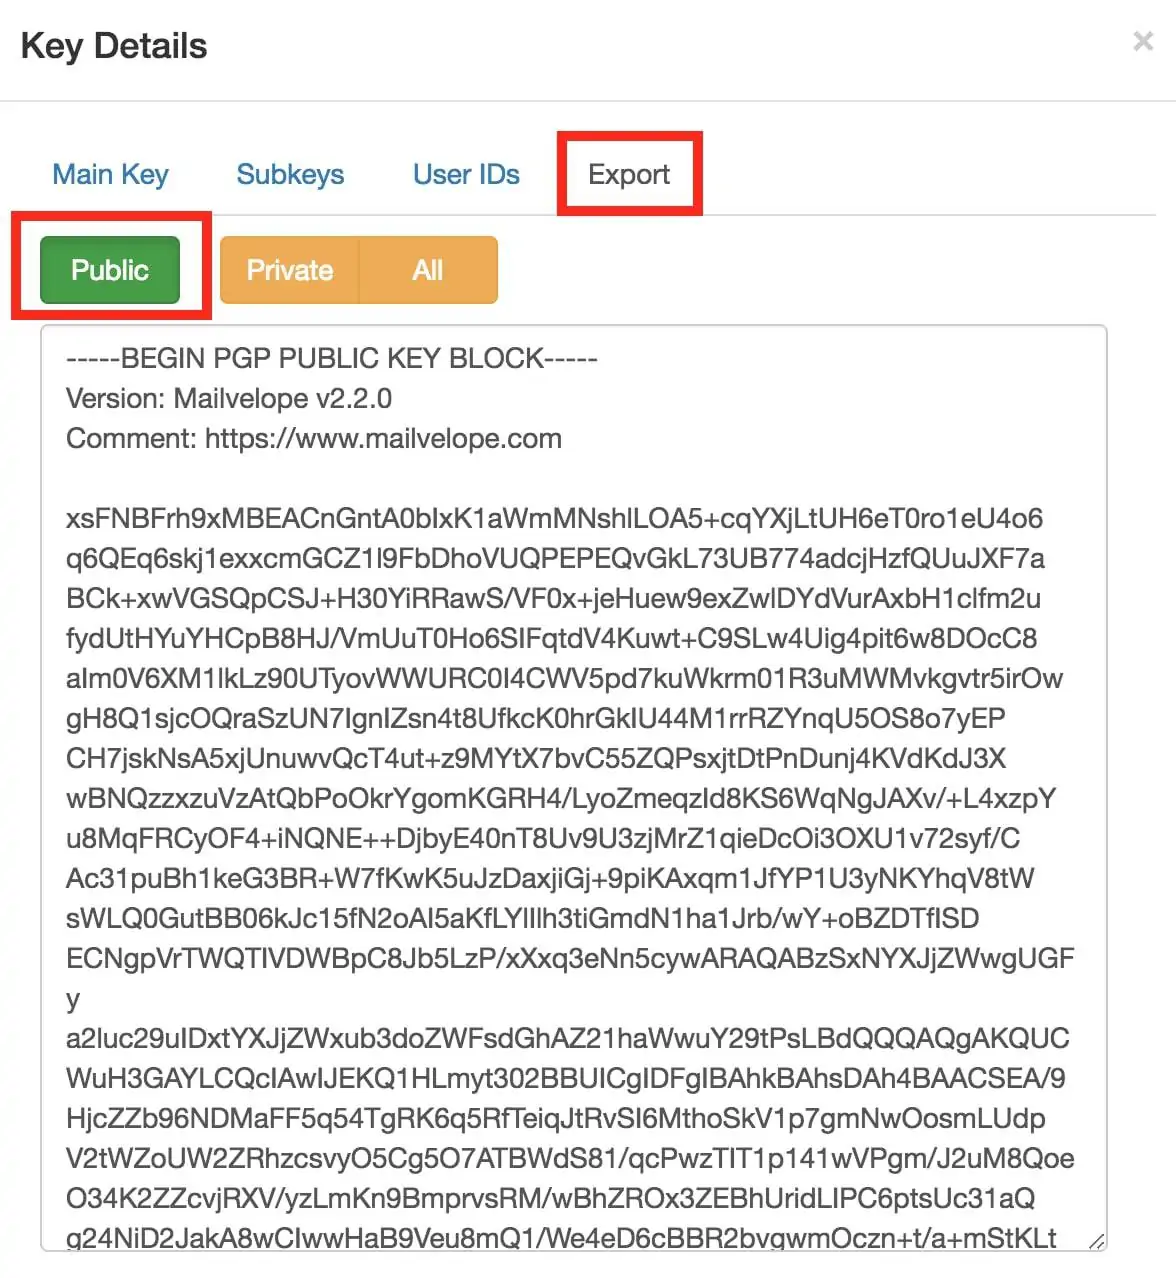
Step #8: Add your public key to a public keyserver.
After creating your public key, it’s time to publish it on a keyserver on which other people can find your public key to send encrypted email messages to you. It’s also a great platform for you to send encrypted email messages to others. There are various keyservers available, but here are my top three:
Simply choose “Submit Key” or “Publish Your Key” and add your public key to the server. You’ll probably receive a similar message, like the following:
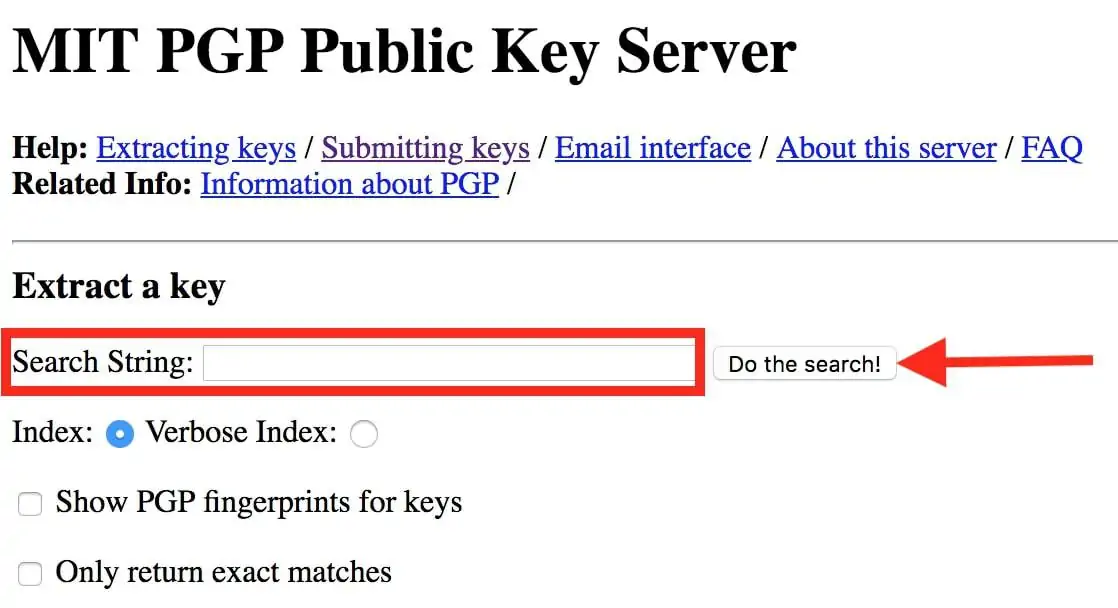
 Step #9: Check if your key has been submitted successfully by searching for your own name.
Search for your full name and click “Do the search!”
It should show up in the search results.
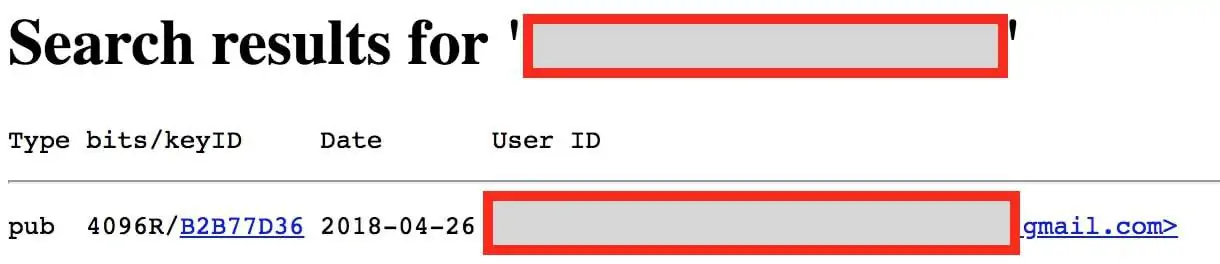 Step #10: Open the keyID of the person you’ve searched for by clicking on the blue text after “pub.”
Send Encrypted Email Messages With Mailvelope
To send encrypted email messages with your Gmail account using Mailvelope, follow the next three steps.
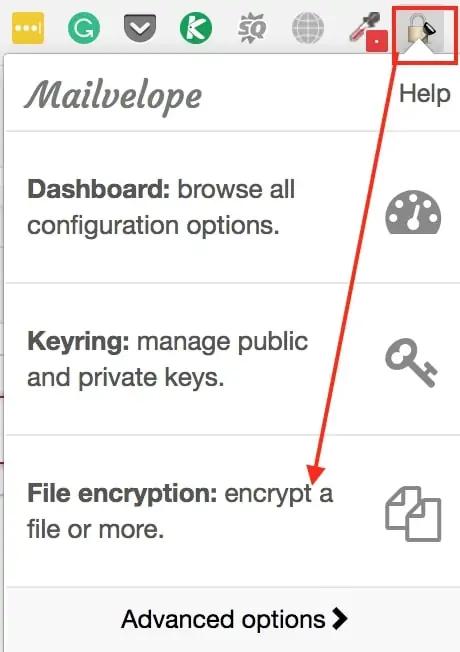
Step #1: Click on Mailvelope’s icon in your toolbar and select “File encryption.”
Step #2:
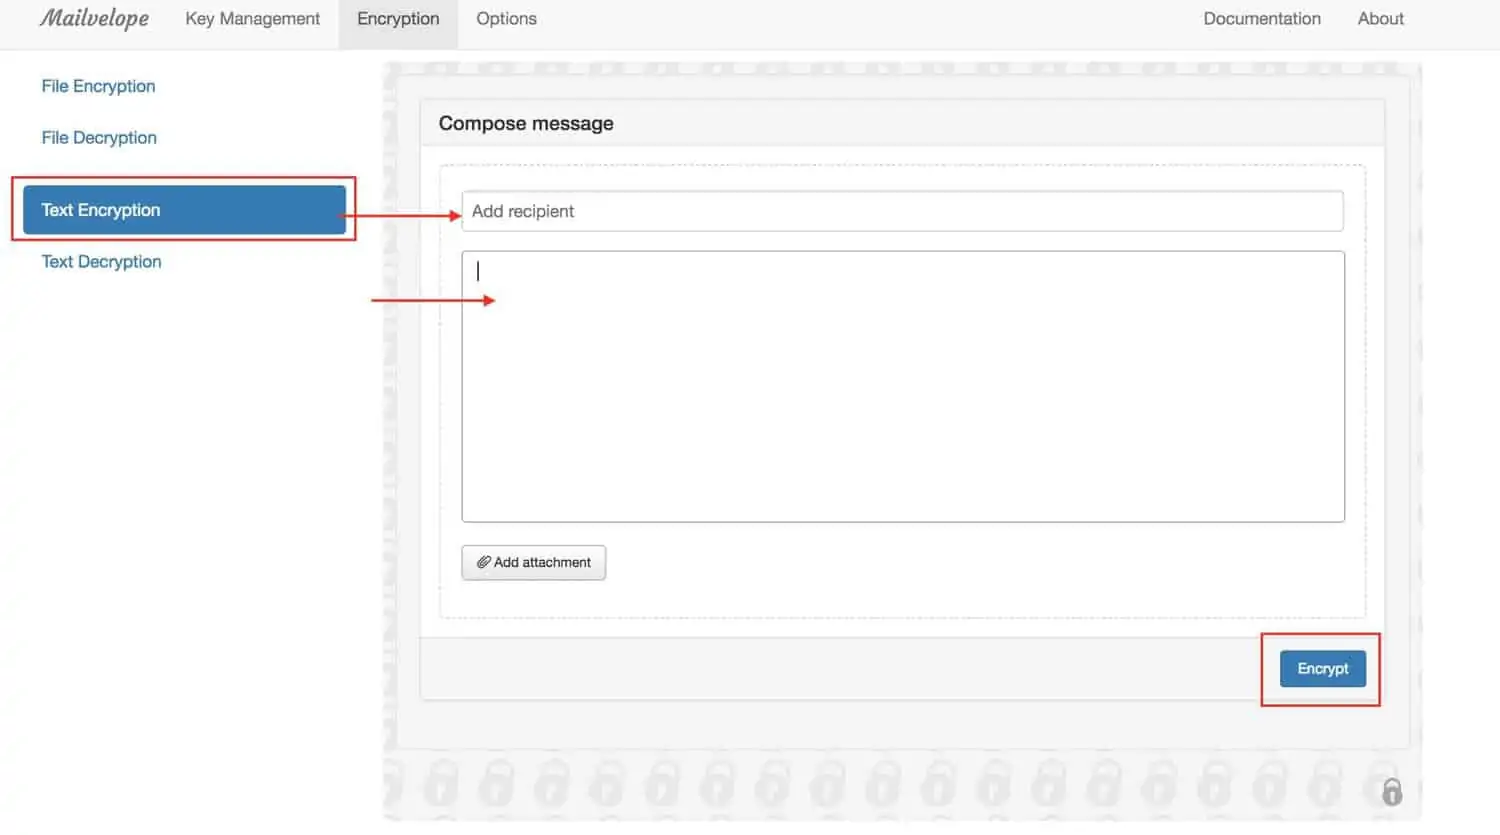
Step #3: Finally, copy the encrypted text that shows in the “Encrypted message” box and paste it into a Gmail window.

That’s it!
The recipient can use his/her private key to decrypt the message that you’ve sent!
In Closing
Now that you know how to encrypt your email messages, it’s time to take action!
As we’ve learned, it’s not necessary to encrypt every single email message. However, if you’re sending sensitive personal information, credit card details, or other content with private data, make sure to encrypt the email message accordingly.
By doing so, only the recipient will be able to view your message and prevent potential snoops from reading it.
Both S/MIME and PGP/MIME are decent protection methods, but if you want to achieve the highest level of security, it’s best to opt for PGP encryption.
It’s important to remember that when you want to send encrypted emails using the PGP encryption method, the recipient must also use the same method for them to read your emails.
A major advantage is that you won’t have to exchange the key or encryption certificate beforehand.
Simply encrypt the message with the recipient’s public key. This means you can be sure that only that person can read your message.
From now on, enjoy a safe and secure communication environment when sending and receiving emails!
Email Encryption FAQs
Why Should I Care About How to Encrypt Email?
When you encrypt your email messages, you can be sure that your messages can’t be read by hackers, government security teams, or anyone else. Only the recipient with the decryption key can read it.
Why is Encrypted Email Transit Important?
Encrypted email transit helps to protect your emails from being intercepted and read while they travel the internet between you and your intended recipients. Unencrypted emails are sent and received every day, making them an enticing target for interception.
If My Email is Encrypted in Transit, Does That Mean That No One Can Ever Read My Email?
Encryption doesn’t make snooping impossible. While your email may be encrypted in transit, it can be read by unauthorized parties after it’s delivered. Snoopy bad guys could still access your email by installing malware on the computer you use to access and read it. This is why it’s important to install antivirus and malware protection on your computer.
Contents [hide]