
Encryption is essential to anyone who wants to keep their secrets safe, whether they’re top secret military documents, student school reports, a vaccine or patient records.
It’s a mistake to think that because your files and folders are stored on a machine on your own premises that they’re safe from unwanted and prying eyes.
Even if you manage to stay off the radar of hackers who make it their business to unearth your confidential business information and extort money in return for not publishing it, there’s always the danger that files could fall into the wrong hands in a more literal sense.
A break-in could see your secrets ending up in the hands of thieves as they pore over your unpublished plans for world domination. More embarrassingly, you could accidentally leave your laptop containing classified documents on a train, or have your private life (and politically sensitive emails) exposed by a PC repairman.
Barely a week goes by without yet another report of hackers hijacking massive amounts of data from individuals and businesses, and over in the U.K., the government loses more than 2,000 cell phones and laptops every year.
Losing data is bad enough, but knowing that criminals are accessing it is even worse.
But if you encrypt your files and folders, there’s little chance that anyone other than you will ever be able to see what’s inside them.
What Is Encryption?
Encryption is the means by which a file is rendered unreadable by anyone who should not have access to it.
The individual bits and bytes which make up a file are scrambled and subjected to a series of mathematical operations that are extremely difficult to unscramble unless you have the correct key.
Check out this article for a more in-depth understanding of what encryption is and how it works.
Encrypting Your Files Makes Them Safe Against Most Adversaries
There is no such thing as truly unbreakable encryption. Cryptography is an evolving art, and new, and while new and more secure methods are being created, so are methods of breaking them. Given enough time and resources, any encryption can be cracked. It’s depressing, but it’s true.
However, unless you are up against an adversary with the resources of a state, it’s likely that your files will be safe and secure using the methods I’m about to outline.
An important thing to remember is that without the correct decryption key, you won’t be able to access your files, either. So make sure you keep it safe.
Encrypt Files and Folders Using Windows’ Built-in Tools: EFS and Bitlocker
Windows makes encrypting files and folders easy…provided you pay extra for it, that is.
While encryption using Bitlocker and EFS (more on those in a moment) is available as standard in Windows 10 Pro, Enterprise, and Education, as well as Windows 7 and Vista Enterprise and Ultimate, Windows 8 Pro and Enterprise, and Windows Server 2008 and later, it is not included with any of the cheaper and more basic Home editions.
If you’re using a Home edition of Windows, you will need to either upgrade or use a third-party solution. If you’re using any version of Windows earlier than 10, you should upgrade anyway as support and security updates have either ended already or are about to end.
For more information on third-party solutions, skip down to my “Free Third-Party Apps to Encrypt Your Files and Folders” section.
Encrypting with EFS on Windows Is Simple
You can use Encrypting File System (EFS for short) to encrypt individual files and folders on drives formatted with the NTFS file system.
NTFS is the default drive formatting for most editions of Windows, with other formats being phased out due to their limitations.
As EFS only works with NTFS, moving or copying an EFS encrypted file to a drive with an alternative file system will result in an unencrypted copy.
For instance, USB sticks are still usually formatted as FAT32. An encrypted file copied to such a device will lose its encryption.
Encrypting files using EFS is simple and means that the files can only be opened or read if the person who encrypted them is the current user on the machine.
This makes EFS super useful for Windows machines that regularly have multiple users, but if someone has your Windows login password (if it’s on a post-it attached to the side of your monitor, for instance), your encrypted files are instantly accessible. Not ideal – keep your password hidden away and don’t tell it to anyone.
Encrypt Files Using EFS on Any Currently Supported Windows Version (Except Home Editions)
This is how you encrypt your files using EFS on Windows:
1.Open the folder containing the file or folders you want to encrypt, then right click to open a context menu.
2.Select “Properties.”
3.Click on the “Advanced” button.

4.In the “Advanced Attributes” popup, check the bottom-most checkbox labeled “Encrypt contents to secure data.”

5.Click OK, then “Apply.”
6.If you are encrypting an entire folder, you will be prompted to “Apply change to this folder only” or “Apply changes to this folder, subfolders and files.” Make your choice, then click OK.
7.Congratulations! Your files are encrypted and can only be viewed if you are the logged-in user.
Keep Your Key Safe
During the process, a file encryption certificate and key are generated.
The certificate contains the public key, which allows encryption to take place, while the private key is used to unlock the files and is kept in your user profile.
Although Windows stores both of these unique files securely on the disk, it is worthwhile to back them up to safe storage on a USB stick. Disasters happen, and although unlikely, it’s possible for you to delete both files by accident.
While you can back up your certificates to any location, a USB stick is probably the most secure option.
A popup will appear, prompting you to do so. To back up your encryption key to a USB stick, do the following:
1.Insert a USB stick into an available USB port.
2.Click “Back up now.”
3.Click “Next.”
4.Click “Next” on the certificate export wizard.
5.If you want to password-protect your encrypted key, check the checkbox, then enter your chosen password twice. You can choose whatever password you want, but make sure that it is memorable.
BitLocker
Bitlocker is unlike EFS in that it encrypts your entire hard disk or removable storage, such as a USB key.
This means that it is exceptionally difficult for anyone to read the contents regardless of who is logged into the machine. If the encrypted drive is removed from your PC and accessed on another machine, the contents will appear to be gibberish.
Bitlocker uses a Trusted Platform Module (TPM) for hardware encryption, and it’s highly likely that your PC already has one, even if you’ve never used it, enabled it or have even heard of it before.
If your computer doesn’t have a TPM, skip ahead to where I talk about enabling Bitlocker without hardware support.
Bitlocker is the most secure method of encrypting your files, but can be very time-consuming, so it’s best to set it up when you first purchase your Windows PC, when there is very little on the hard drive.
To encrypt your hard drive using Bitlocker, you first need to enable TPM in the BIOS.
BIOS is an acronym for Basic Input Output System, and it provides the first instructions to your PC before it starts to load the operating system. In it, you will find configuration options for boot order, clock speed, locale and TPM.
The exact BIOS layout varies by machine and manufacturer and is accessed in different ways.
Access your machine’s BIOS by repeatedly pressing either F2, F8, F10, F12 or Del immediately after powering up the PC. You should see a screen that looks something like this:

Navigate the menus until you find an entry which contains “TPM.” Set it to “On.” If you can’t find TPM, don’t worry, I’ll discuss how to use Bitlocker without TPM further down.
Save your changes and exit.
Note that navigation in the BIOS is usually (but not always) performed using the keyboard. In many cases, mouse use is disabled.
Once back in Windows, open Settings (or Control Panel on older versions) and search for Bitlocker. Click on the first result: “Manage BitLocker.”

On the next window, you will be given a list of your fixed and removable drives and given the option to “Turn on BitLocker” for each one.
As you can see in the screenshot below, I only have one drive plugged in, and there is only one option to “Turn on BitLocker.”

Select which drive you want to encrypt and select “Turn on BitLocker.”
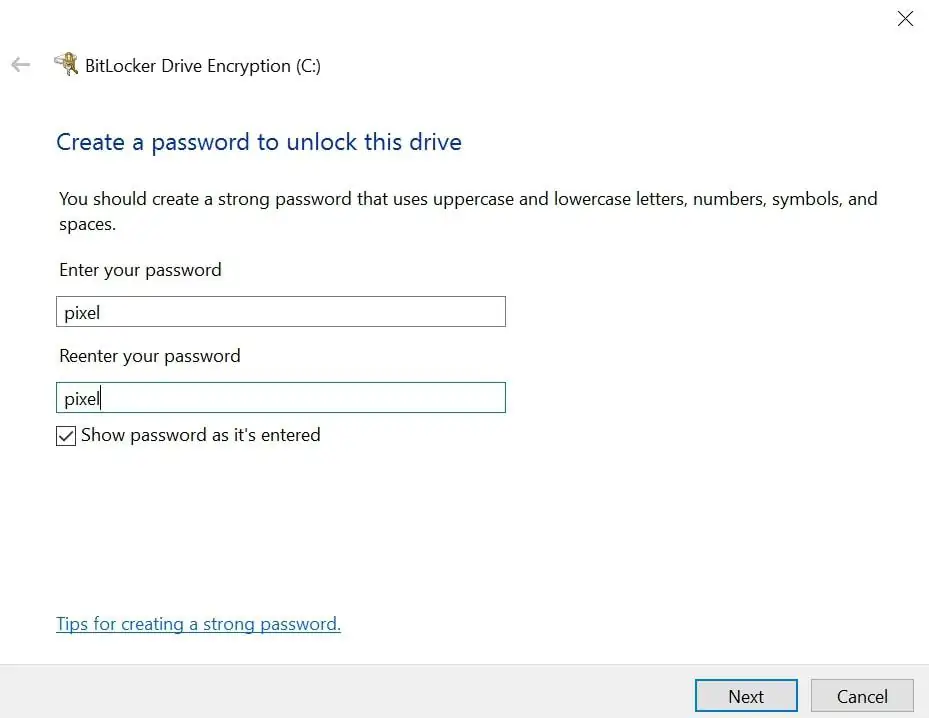
You will be prompted to “Create A Password To Unlock This Drive.” Pick something memorable, but not easy to guess. “Pixel,” for instance, is a poor choice.
When prompted, select whether to save a copy of your key to either your Microsoft account, to a file or print it out.
Make your choice according to which you think is most secure. If you feel your memory is good enough to recall it under all circumstances, feel free to delete the saved file or burn the printed paper. Note, Windows will not allow you to save the key to an encrypted drive on the encrypted drive itself.
You will be asked whether you want to encrypt the entire drive, or just the parts of it already in use. If you are encrypting a drive on a new PC, you should choose the first option. If your machine has been in use for some time, it is also best to encrypt the entire drive.
In my opinion, encrypting the entire drive is the best option in both circumstances. It does, however, take a long time.
Make your choice and hit “Next.”
At the next prompt you will need to choose whether to use “New Encryption Mode” or “Compatible Encryption Mode.”
If you are certain that the drive you’re using will only be used on devices running Windows 10 or above, you should choose “New Encryption Mode.” Otherwise, “Compatible Encryption Mode” is your best bet.
Note: This choice is only available on Windows 10.
Finally, you will be asked if you are “Ready to Encrypt this drive.” Check the “Run BitLocker System Check” checkbox and then hit “Next.”
Encryption can take up to several hours depending on the size of your drive and your processor. Go and take the dog for a walk while you wait.
Encrypt Using BitLocker Without TPM
Most new machines will have a Trusted Platform Module, but not all do. Mine doesn’t.
However, it is still possible to encrypt your drive using BitLocker.
The chances are good that you won’t even know your machine doesn’t have a TPM until you see a message such as this:

Fortunately, and as it indicates, there are steps you can take which mean you can use Bitlocker anyway. It is less secure than when using a TPM, as there is no dedicated hardware to create and store the keys. However, it is considerably better than nothing.
Open the Local group policy editor by pressing Windows + R, then typing “gpedit.msc” into the box.

Navigate the tree on the left through Local Computer Policy > Computer Configuration > Administrative Templates > Windows Components > BitLocker Drive Encryption > Operating System Drives.

At this point, you will see a number of options in the right pane. Double click on the “Require additional authentication at startup entry,” then select “enabled” on the following screen.
Confirm your choice by selecting “Apply,” then “OK.”

Free Third-Party Apps to Encrypt Your Files and Folders
There are a few reasons not to use Microsoft’s built-in encryption tools in Windows, 7, 8 or 10 – not least of which is that if you have the truly appalling Home edition, you won’t even have the option to use them.
If you don’t have a TPM (as my machine doesn’t), encrypting with BitLocker is sloooow, while EFS is useless for non-NTFS drives.
If you need or want to use a third-party app to encrypt your files, these are my top choices.
7-Zip
7-Zip is principally a compression utility and arrived on the scene back in 1999. If it was a person, 7-Zip would have finished its bachelor’s degree by now and be working towards a PhD. It’s mature is what I’m saying, and it’s smart, too.
Archives created through 7-Zip have the .7z file extension, making it easy to recognize them instantly – although it does also support the classic zip format.
7-Zip can encrypt archives using super-strong AES-256 encryption, and the software is able to create self-extracting archives.
Pros:
- Mature software
- Very strong AES-256 encryption
- Easy to use
- Can encrypt files and folders of any size
Cons:
- No disk encryption
Veracrypt

Veracrypt is a fork of the late, lamented Truecrypt utility, and supports a wide range of ciphers including AES, Serpent, Twofish, Camellia and Kuznyechik.
These ciphers all use different methods to encrypt files. Some are more secure than others, and the time it takes to encrypt and decrypt your disk will vary. Don’t worry though – all of the ciphers that Veracrypt uses are super secure.
Unlike 7-Zip, Veracrypt encrypts entire hard drives or partitions rather than individual files or folders. If you’re really intent on encrypting files or folders using Veracrypt on Windows, you can store the file in a virtual hard drive on your actual hard drive, which Veracrypt can then encrypt. Most people would say that this isn’t worth the effort.
Pros:
- Wide range of ciphers
- Long history of legal cases demonstrating its competence
- Pre-boot authentication – meaning that the machine won’t boot to Windows without the correct key
Cons:
- Not built for encrypting individual files and folders
GNU Privacy Guard

GNU Privacy Guard is a free replacement for Symantec’s PGP cryptographic software and uses a combination of symmetric-key cryptography for speed, and public-key cryptography, meaning that it is both fast and secure.
Pros:
- Free and open source software
- Supports encrypting the entire volume or individual files
- Graphical or command line (text interface) versions available
Cons:
- Not very intuitive
- Complex documentation makes it difficult for non-technical users to make informed choices
Should You Encrypt Your Files and Folders in Windows?
If you have any sensitive documents on your machine, it’s a good idea to encrypt them whether you’re a government minister or not. There’s all kinds of information you don’t want getting into the hands of strangers. Financial documents, love letters, personal photos or business plans are all things which, while not necessarily secret, you probably don’t want unauthorized eyes to see.
Encryption, using one of the methods described above, is probably a good idea.
Bear in mind that there are downsides to encrypting your files and folders – mainly that you need to encrypt your files or folders before you can use them. This takes time, both for individual operations and for disk unlocking.
There’s also the possibility that you might forget your password or lose your key – rendering your files and folders completely irretrievable forever.
The upside is that your privacy is almost completely assured.
Contents [hide]
- What Is Encryption?
- Encrypting Your Files Makes Them Safe Against Most Adversaries
- Encrypt Files and Folders Using Windows’ Built-in Tools: EFS and Bitlocker
- Encrypting with EFS on Windows Is Simple
- BitLocker
- Encrypt Using BitLocker Without TPM
- Free Third-Party Apps to Encrypt Your Files and Folders
- Should You Encrypt Your Files and Folders in Windows?