As your main point of access to the internet, your browser is an enticing target for hackers, governmental agencies, Internet Service Providers, and other nosy third parties.
If you use one of the big four browsers (Chrome, Firefox, Safari, and Microsoft Edge – please tell me you’re not still using Internet Explorer), you are likely vulnerable to tracking, hacking, and more while using the internet.
In this article, I’ll cover the ways you can adjust the settings in your browser to better protect you, tell you how to cover your tracks when it comes to your previous browsing activity, what you can do to shield your browsing activity from prying eyes, and much more.
I’ll also discuss how you can protect against malware that can get onto your computer through your browser, and how to prevent both the “good guys” and the “bad guys” from collecting information about you and your online travels.
Overview
The developers of web browsers work hard to ensure that the latest versions of their browsers have as few online security and privacy flaws as possible.
Unfortunately, while the developers are working to protect you, hackers are tearing apart that latest browser code, looking for security holes they can use to launch attacks against that browser’s users.
While browser developers usually act quickly to plug any security holes they discover, many times it’s a case of closing the barn door after the horse has bolted. Most security holes are plugged in a reactive way, not a proactive way.
Luckily, there are numerous ways for browser users to take steps to protect themselves against browser flaws, as well as help prevent themselves from being tracked around the web.
First, we’ll take a look at how to keep your browser updated to the most recent version. Then, we’ll take a look at some settings in both your browser and on your computer that can help protect you online.
We’ll also take a look at using a VPN to keep things private, using your browser’s “privacy” mode and more.
Keep Your Browser Updated
Keeping your browser updated to the latest available version is arguably one of the best ways to protect yourself while browsing the internet.
Updating your browser is usually a matter of just a few clicks of the mouse, and your browser will even let you know when an update is available.
Updating Google Chrome on Your Computer
Normally, Chrome updates take place in the background, automatically downloading the latest version of the browser to update it the next time you close and reopen your browser.
However, you can easily detect if there is an update available and force the update to take place.
To check for a pending update, do the following after opening Chrome:
- At the top right of the Chrome window, you’ll see the “More” icon. (It looks like three stacked dots.)
- If an update is pending, the icon will be one of three colors: Green, which means an update was released within the last two days; orange means an update was released approximately four days ago; red, which means an update has been available for at least a week.
![]()
A screenshot from my editor. She doesn’t update very frequently…
To perform a Google Chrome update, do the following after opening Chrome:
- At the top right of the Chrome window, click the “More” icon. (It looks like three stacked dots.)
- If you see a menu item called “Update Google Chrome,” click it. (If you don’t see it, then an update isn’t available and you’re running the latest version.)
- Click “Relaunch.” (if you’d prefer not to relaunch your browser immediately, click “Not now.” The next time you restart your Google Chrome browser, the update will be installed.)
An alternate method for checking for an update and installing it is to click the More icon, then click “Help” -> “ About Google Chrome.” Or, you can enter “chrome://settings/help” in the address bar (without the quotations). A new window will open and will tell you if a new update is available.
Updating Google Chrome on Your iOS or iPadOS Device
To manually update the Chrome Browser (or any other app) on your iOS or iPadOS device, do the following:
- Tap the “App Store” icon. It’s a blue icon with a stylized “A” on it. You’ll usually find it on your first Home Screen, unless you’ve moved it to a folder or to another screen.
- In the App Store, look for your account icon (it’s in the upper right-hand corner). Tap it.
- On the Account screen, near the bottom of the screen, you’ll see “UPCOMING AUTOMATIC UPDATES.” In this section are all of the apps that have pending updates.
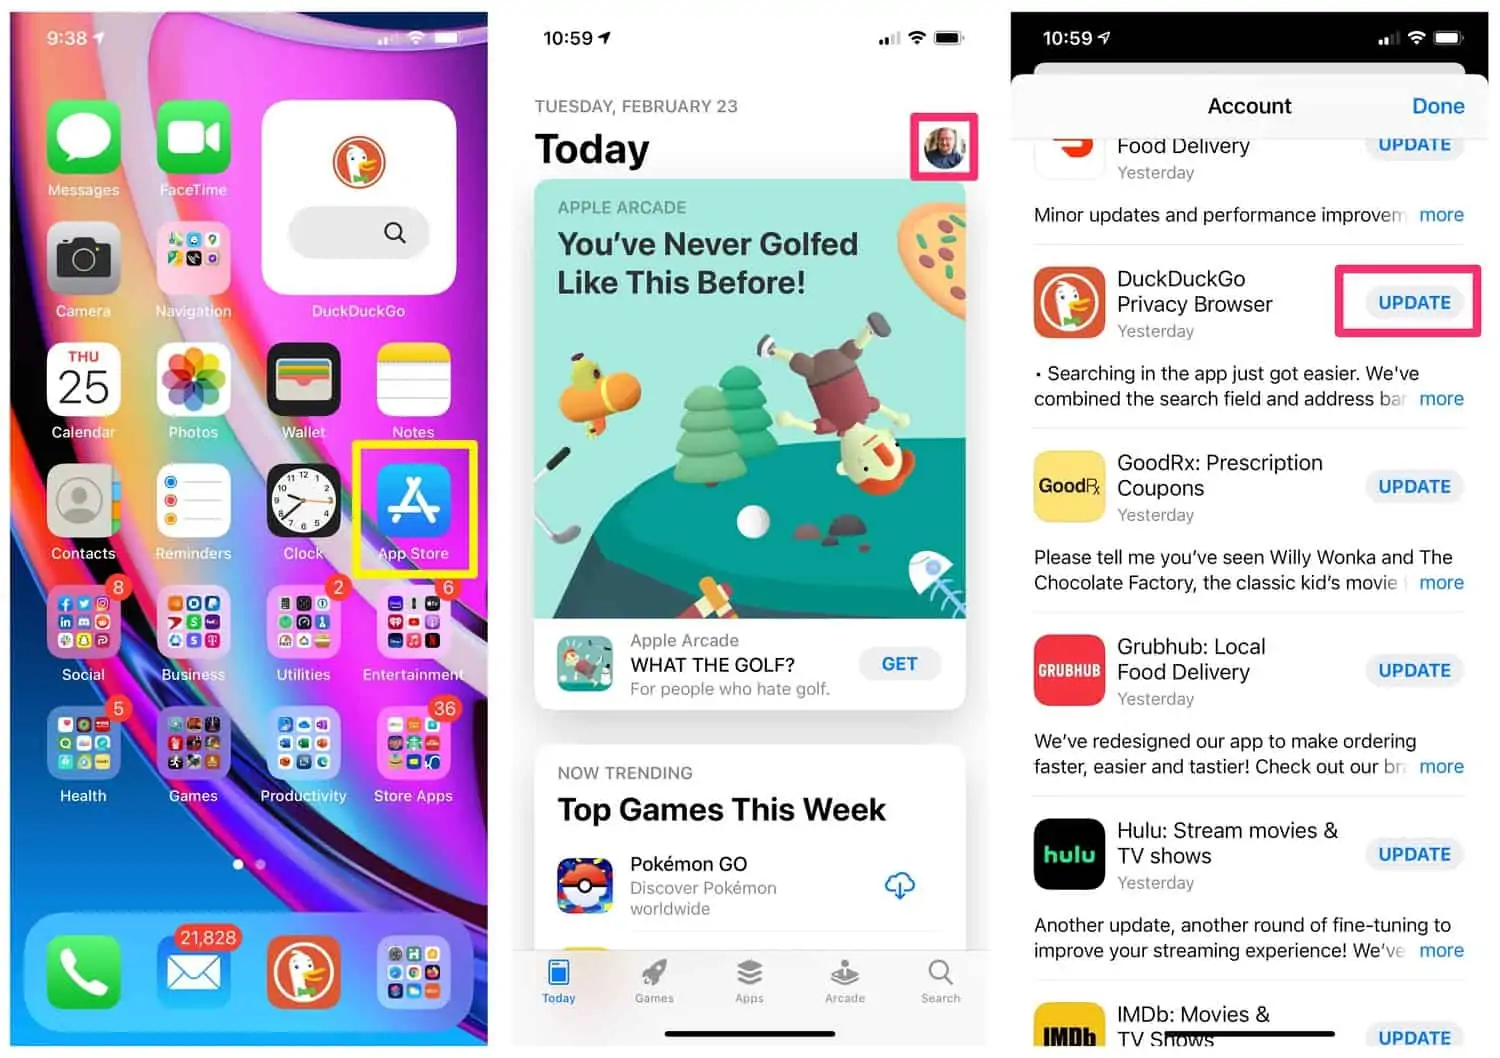
While these apps will eventually update automatically, you can manually update any of the apps by tapping the “UPDATE” button for the desired app. You can also tap “Update All” at the top of this section to update all of the apps on the list. (I used DuckDuckGo in the screenshots, as my iPhone had already automatically updated Chrome. Read more about automatic updates immediately below.)
To enable automatic updates of Chrome (and other apps) on your iOS or iPadOS device, do the following:
- Tap the “Settings” icon. The Settings app’s icon has a gear on it. The icon will likely be on your first Home Screen, unless you’ve moved it to another screen or into a folder, like I have.
- In the Settings app, look for the “App Store” menu item. Tap it when you find it.
- On the App Store screen, you’ll see a section titled “AUTOMATIC DOWNLOADS.” Look for the “App Updates” toggle switch.
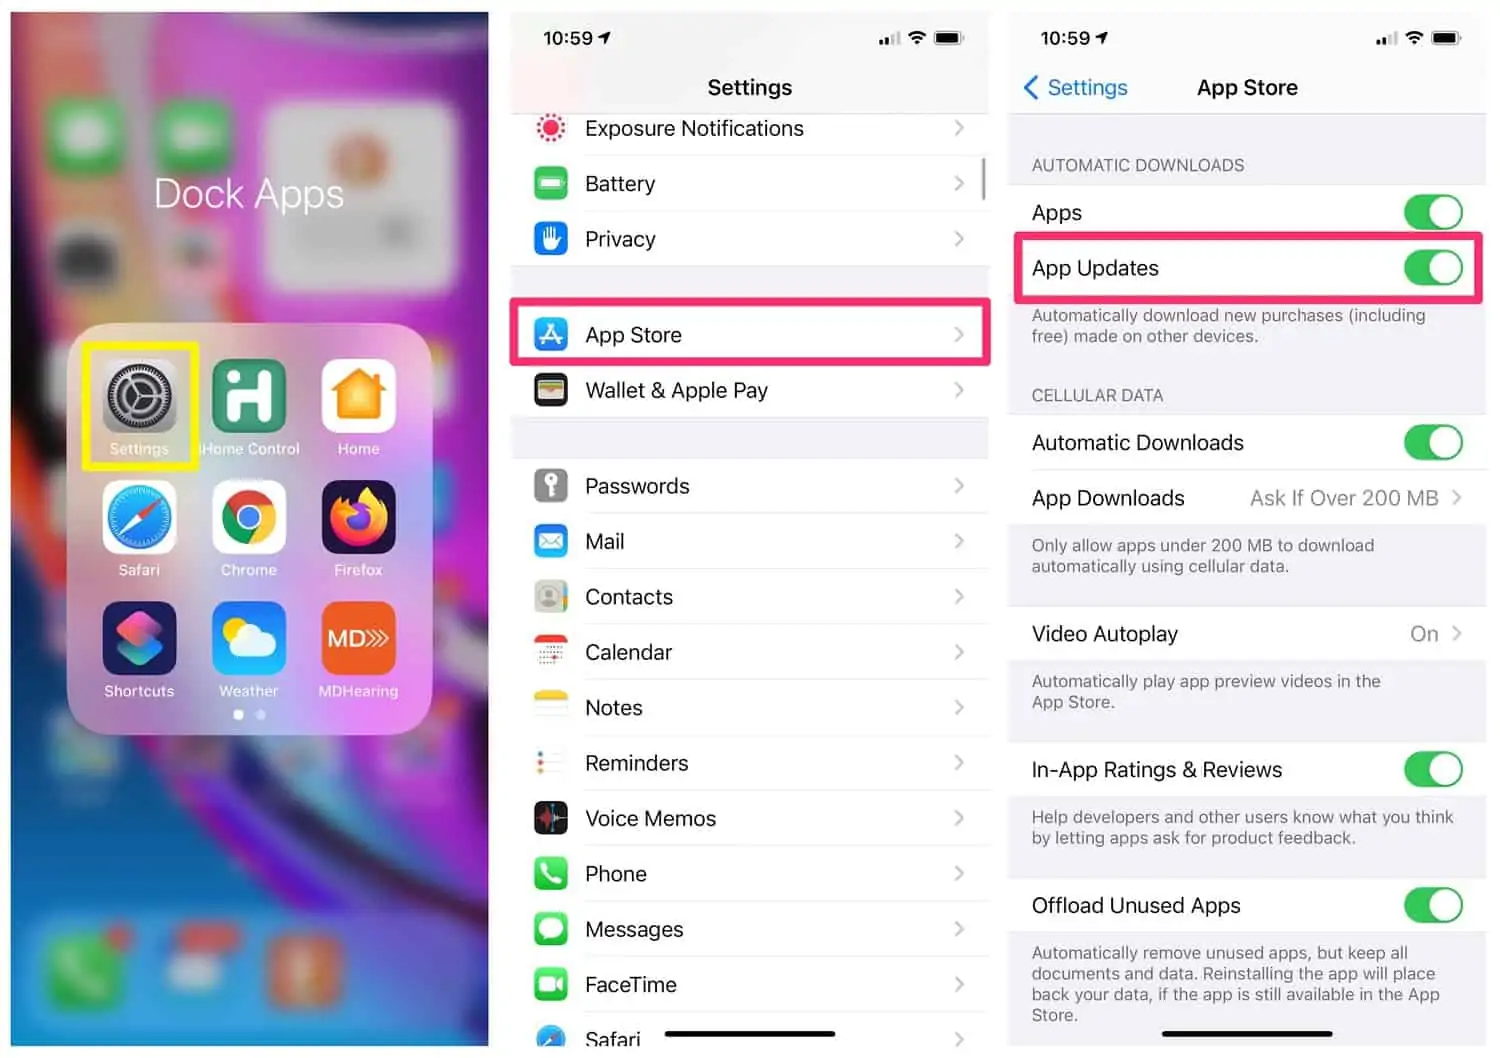
- If the App Updates toggle is already green, our work here is done, and Google Chrome and all of your other apps will update automatically. If the toggle switch isn’t green, tap it a single time. It’ll turn green, and automatic app updates are now enabled.
Updating Google Chrome on Your Android Device
To manually update Google Chrome on your Android device, do the following:
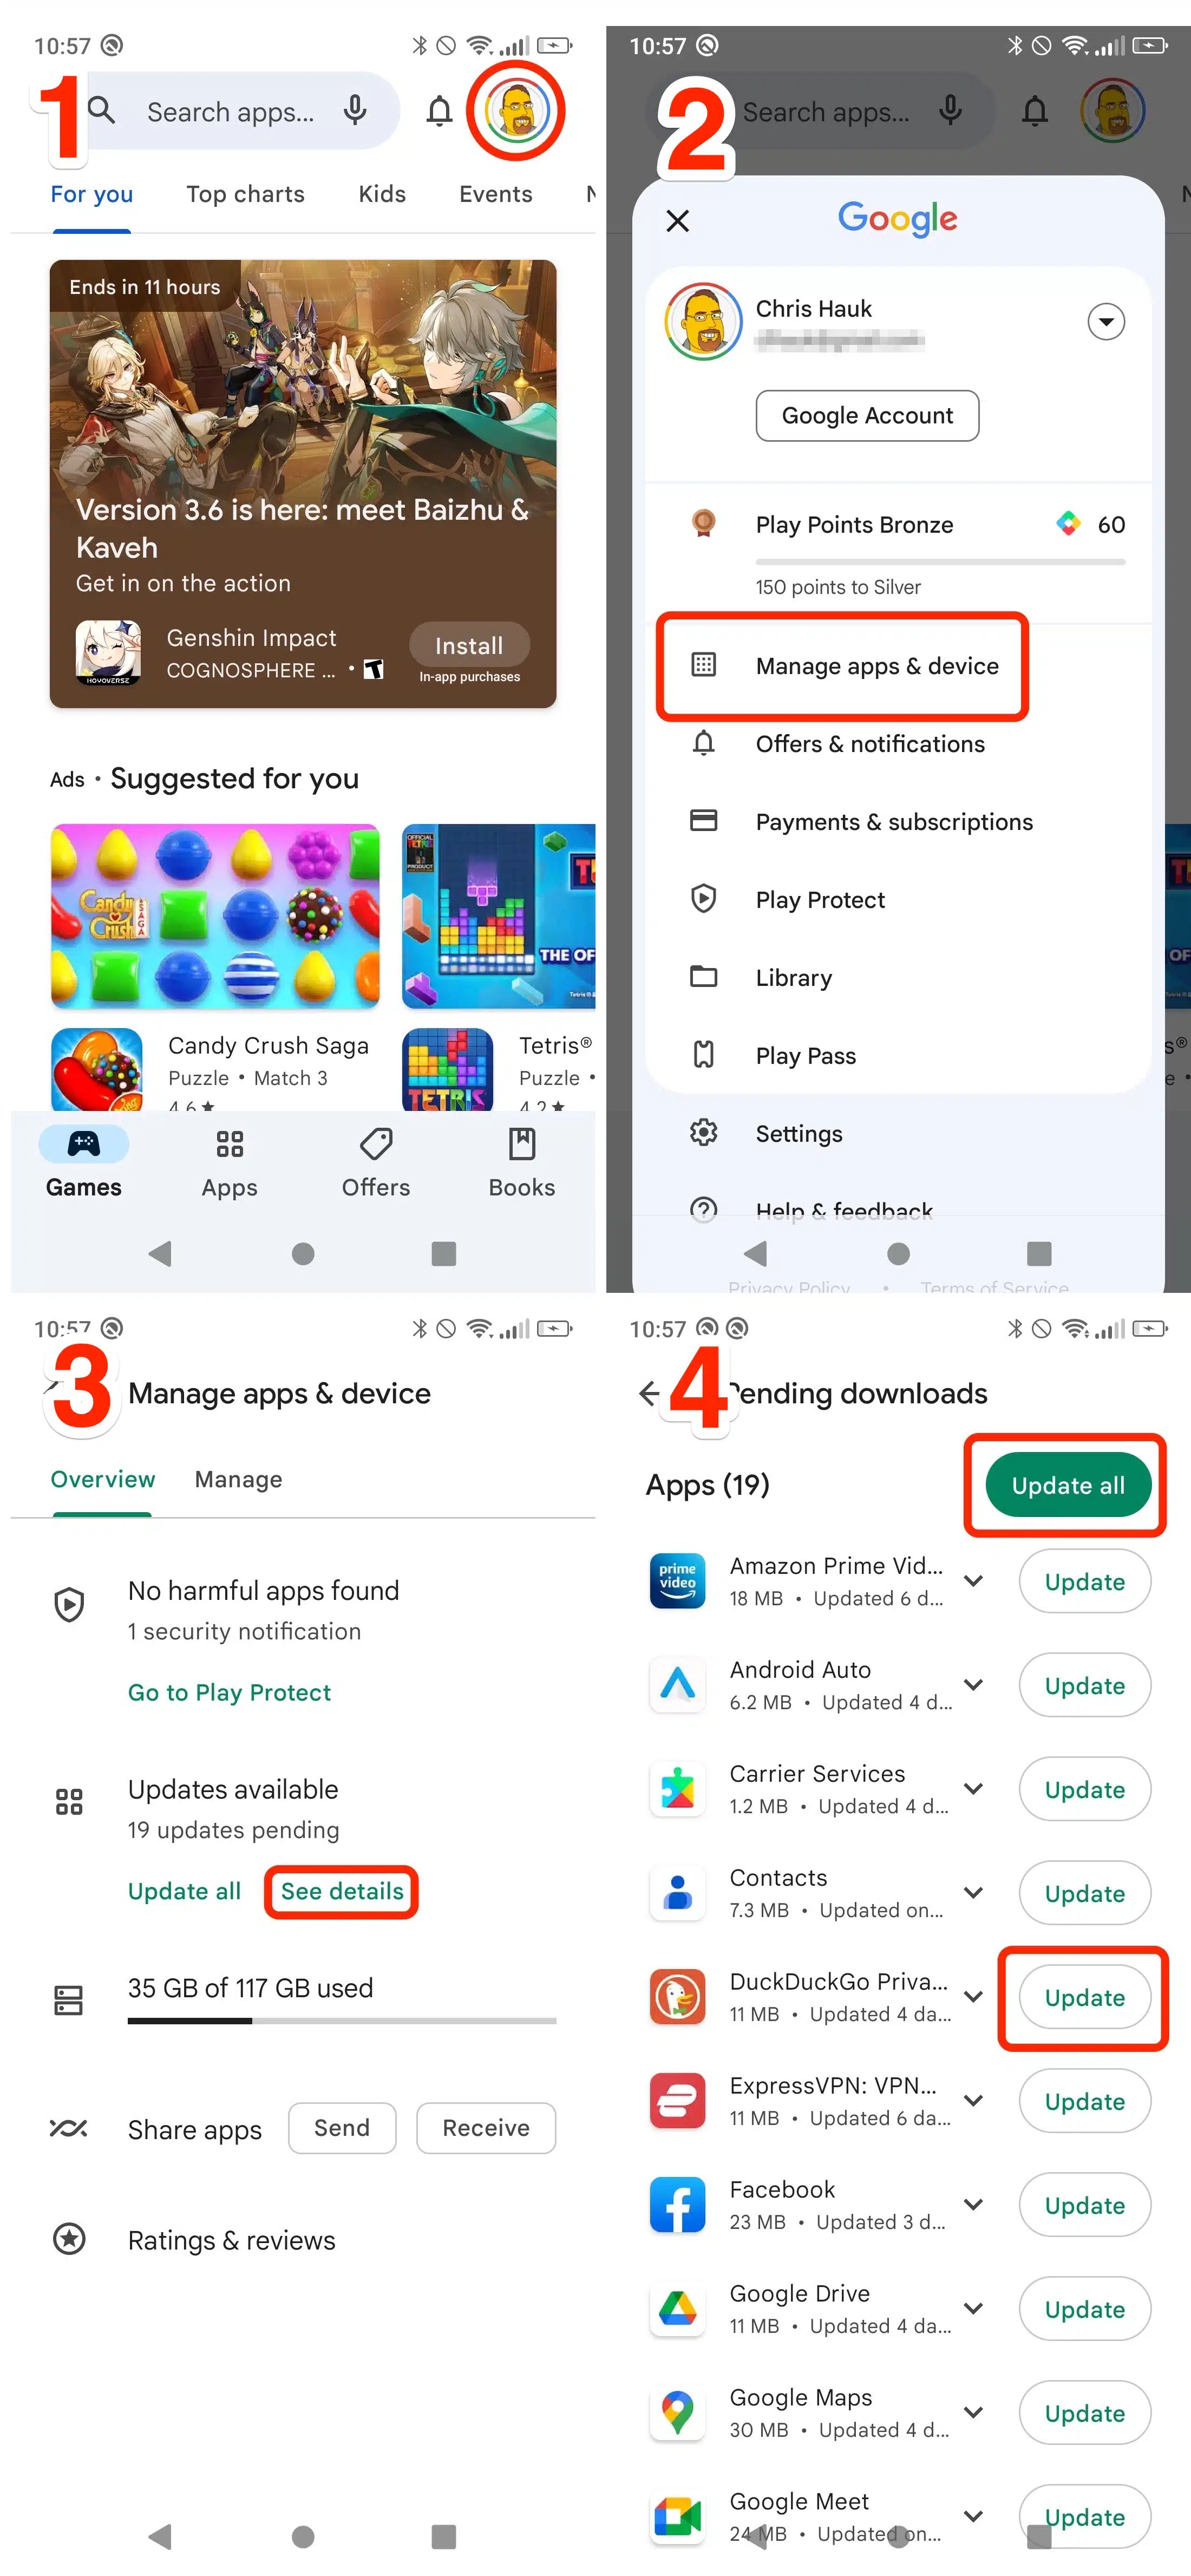
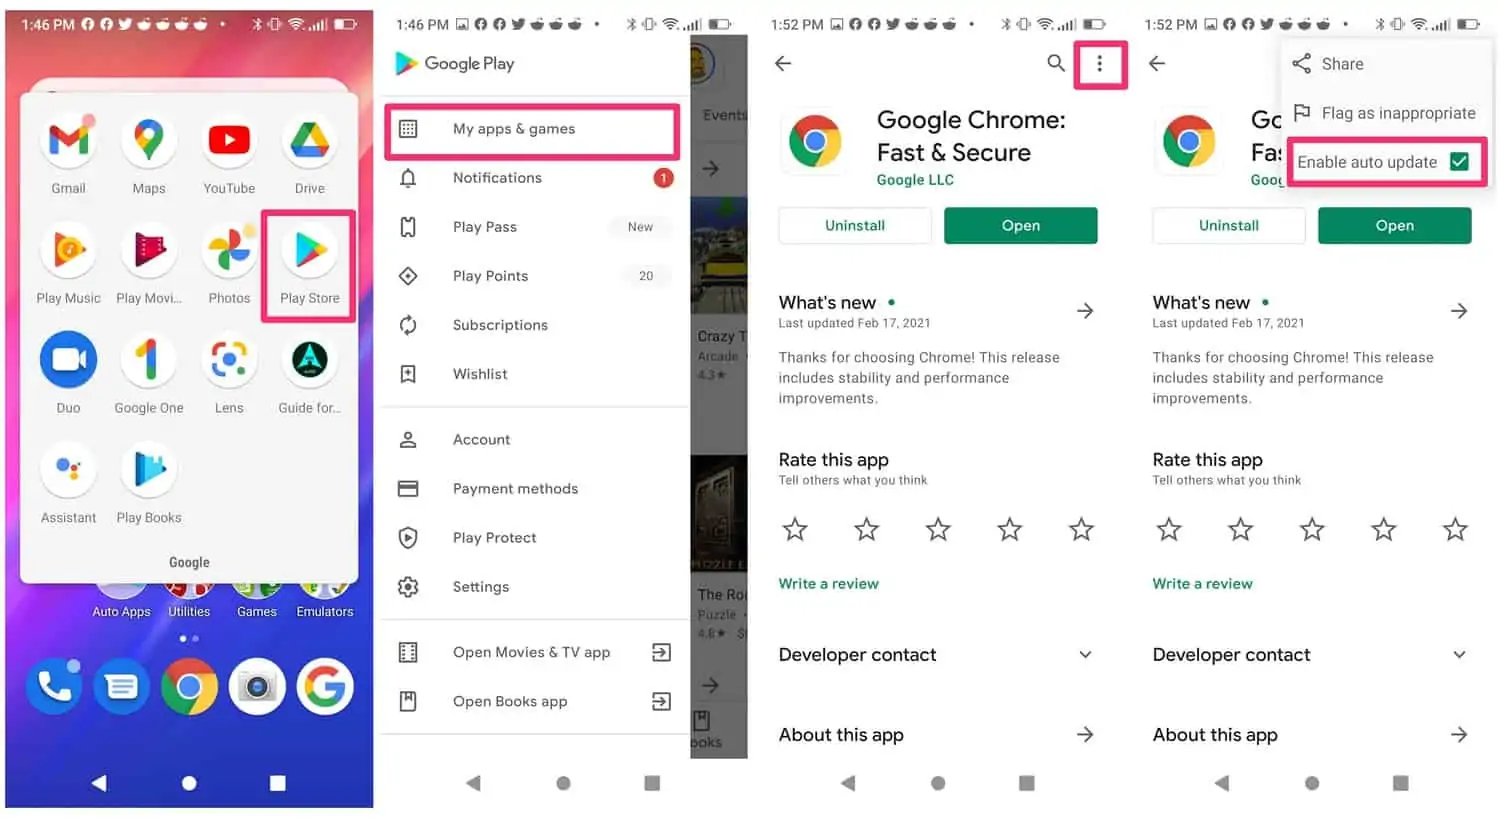
- Tap the “Google Play Store” icon to open the Google Play Store. It should be on your home screen, unless you’ve moved it to a folder like I have. (The icon is a white circle with a stylized “play” symbol on it.)
- Tap on the user profile button in the upper-right-hand corner of the screen to open the menu. It will look like whatever you decided you wanted your Google profile to be. In my case, it was a Simpsonized version of my headshot.
- Tap on “Manage apps & device.”
- Under “Updates Available” tap “see details.” You’ll then see a screen listing all of your installed apps under “Updates available.”
- Find Google Chrome in the list of apps, look for the Chrome entry. In my screenshots, Chrome has already been updated, so I’m using DuckDuckGo as an example.
- Next to Chrome, tap “Update” to immediately update the app. (You can also tap “Update All” to simultaneously update all of the apps on the list.)
To automatically update Google Chrome on your Android phone or tablet, do the following:
- Tap the “Google Play Store” icon to open the Google Play Store. It should be on your home screen, unless you’ve moved it to a folder like I have. (The icon is a white circle with a stylized “play” symbol on it.)
- Tap on the user profile button in the upper-right-hand corner of the screen to open the menu. It will look like whatever you decided you wanted your Google profile to be. In my case, it was a Simpsonized version of my headshot.
- Tap on “Manage apps & device.”
- Under “Updates Available” tap “see details.” You’ll then see a screen listing all of your installed apps under “Updates available.”
- Find Google Chrome in the list of apps, look for the Chrome entry. In my screenshots, Chrome has already been updated, so I’m using DuckDuckGo as an example.
- Tap on Chrome.
- Tap on the three-dot icon found in the upper-right-hand corner of the screen.
- A small checkbox labeled “Auto-update” will appear. Tap on the checkbox to enable it. (A checkmark will appear.) Google Chrome will now automatically update itself whenever you’re connected to the internet and an update is available.
Practice Safe Password Usage
In addition to keeping your browser updated, one of the most important ways to stay secure on the web is to practice safe password usage.
The best way to do this is to avoid reusing your passwords. Also, if at all possible, you should never use your email address as a username.
You should never use the same password on multiple websites. Each website or online service login should be protected by a secure and unique password. If you reuse passwords, you run the risk of having multiple accounts exposed if and when your personal data is involved in a data breach.
While it may sound daunting to have to remember a unique password for hundreds of websites, the task can easily be handled with one short download of a password manager.
Password Managers
There are numerous password managers available for most popular device platforms. 1Password, Dashlane and many other password managers store all of your logins and passwords in an encrypted database.
The managers also securely sync your password additions and updates among all of your desktop & mobile devices, so you have them at your fingertips on any device, accessible with a single master password.
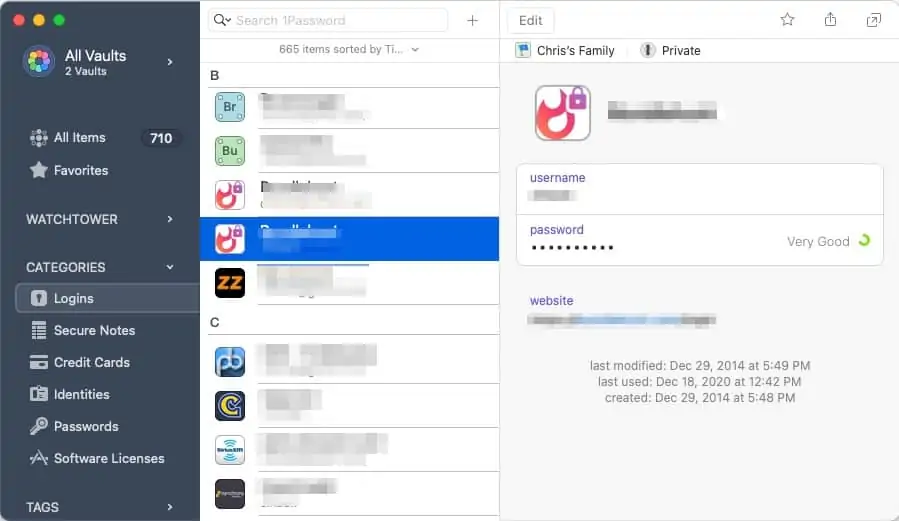
Password managers not only securely store and recall all of your passwords, but most of them can also generate secure and unique passwords on the fly. This ensures that you will not be using the same password on any website or online service.
Most password managers also include a browser extension, allowing you to use the manager’s feature directly from your browser. More about that later.
Learn more about the best password managers.
Turn Off Your Browser’s Password Manager
While we’re at it, I am not a big fan of saving passwords in the browser.
Yes, browsers do save passwords in an encrypted format, but their password generation capabilities are not as flexible as most password managers (length of the password, characters to use, ability to use special characters, and more).
That said, if you don’t want to use a third-party password manager, the browser’s password features are better than nothing.
Keep in mind one thing: Many password managers will offer to import your browsers’ saved logins into the manager. If the password manager app can do that, it’s almost certain that malicious software may be able to do the same.
Plus, if you use more than one browser (I can think of at least five different browsers I use on a daily basis), you’ll end up with multiple sets of passwords, which do not sync with each other, meaning you won’t have all of your password info in one spot.
If you decide to use a password manager app, you can then opt to turn off your browser’s built-in manager, and that way it won’t conflict with the password manager app.
Safari
To turn off Safari’s built-in password manager, do the following:
- Click the “Safari” menu and then click “Settings…”
- Click the “Autofill” tab in the Preferences screen.
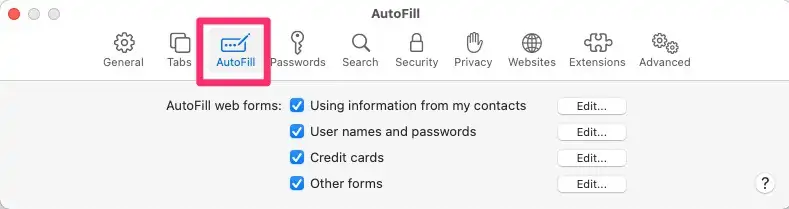
3. Clear the checkmarks from the following AutoFill web forms settings: “Using information from my contacts”, “User names and passwords”, “Credit cards” and “Other forms”.
Google Chrome
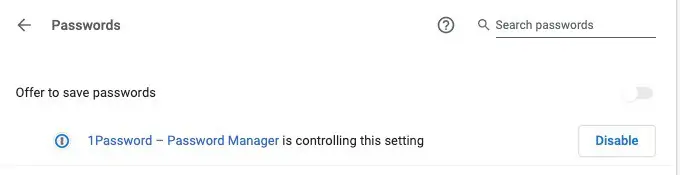
To turn off Chrome’s password-saving feature:
- Click the Chrome menu (the three stacked dots in the upper-right hand corner) in the toolbar and click “Settings.”
- Click “Autofill.”
- Click “Password Manager.”
- Turn off the “Offer to save passwords” toggle.
Firefox
To turn off Firefox’s password features:
- Click the Firefox menu (the three stacked lines) in the toolbar and click “Settings.”
- Click “Privacy & Security.”

3. Turn off (clear the checkbox) for “Ask to save logins and passwords for websites”.
Microsoft Edge
To prevent Edge from trying to save and supply passwords:
- Click the Edge menu (the three dots in the upper-right-hand corner) in the toolbar and click “Settings.”
- Click “Passwords” on the “Your Profile” page.
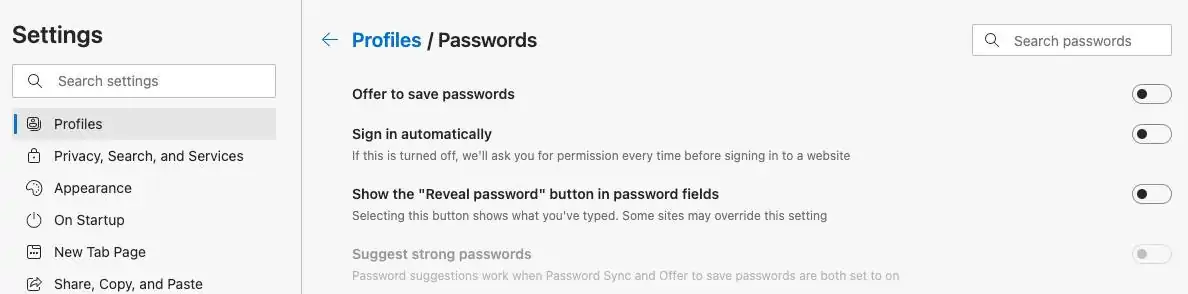
3. Turn off the “Offer to save passwords” toggle.
Internet Explorer
Seriously, don’t use this browser. There is absolutely no reason to still be using IE. Just stop it. Don’t make me come over there.
Install Antivirus Software and Anti-Malware Protection
Your browser is a gateway to the net.
This means it is also an open door for viruses and malware, meaning you should always run antivirus software and anti-malware apps to keep your device as virus- and malware-free as possible.

Modern antivirus and malware apps run in the background, keeping an eye out for suspicious activity. They can also be used to scan all of the files on your device’s storage to ensure that you haven’t downloaded any malicious files, apps, scripts and other nasties to your device.
Read more about antivirus and ant-malware apps.
Use Two-Factor Authentication
Two-Factor Authentication (2FA) is also known as Multi-Factor Authentication (MFA).
2FA is a method of authorizing a login attempt by using two pieces of authentication. The two pieces are usually defined as something the user has and something the user knows.
In most cases, if 2FA is enabled on an account when a user attempts to log into their account using the usual username/password authentication method, the website or service will then ask for a second piece of authentication.
This can include a code sent via email or text message, or a number or other series of characters that are generated by using an app or by using a key fob-like device.
This prevents anyone from logging into your accounts unless they have access to the second form of authentication. This also alerts you to any sign-in attempts, as it alerts you by sending the authentication code to your email or text messaging accounts.
Read more information about two-factor authentication.
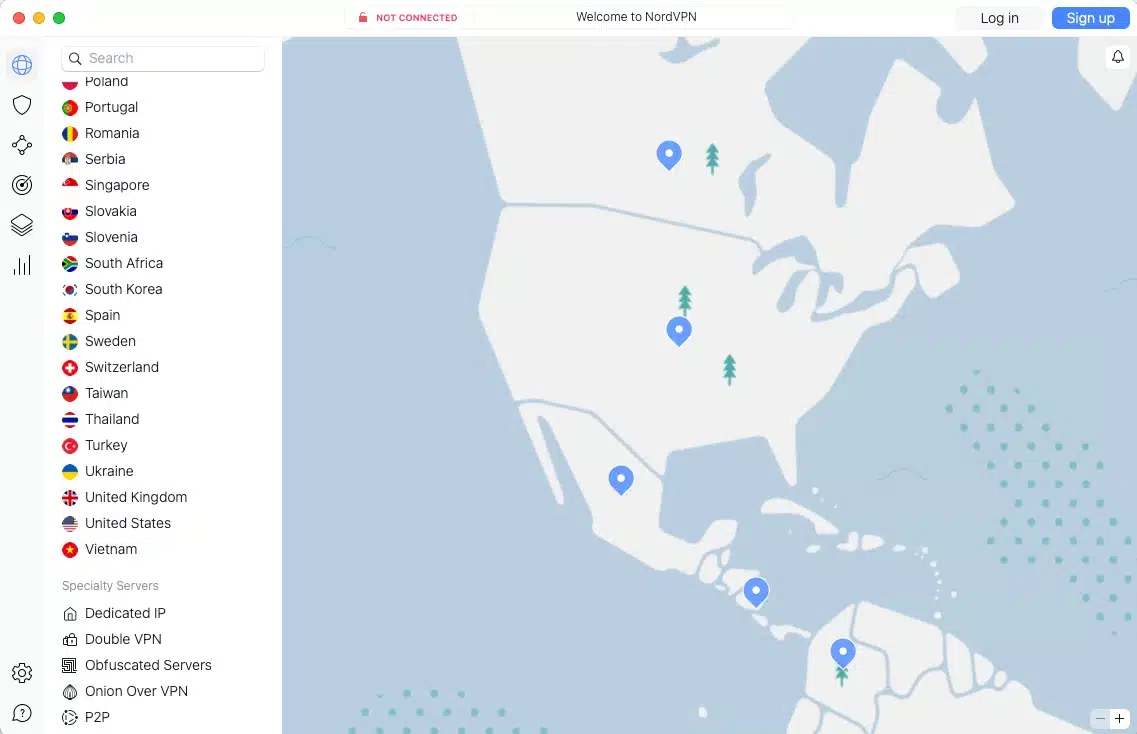
Use a VPN
If you’re concerned about your privacy while cruising the web (and you should be concerned), you’ll want to investigate the benefits that a Virtual Private Network (VPN) provides. A VPN encrypts your internet traffic & connection.
This virtual tunnel of encryption hides your online travels from being monitored by hackers, the government, your Internet Service Provider (ISP) or any other nosy types. These observers will be able to tell you’re connected to the internet, but they won’t be able to monitor you.
The use of a VPN is especially important if you’re a regular user of public WiFi hotspots, which are usually not encrypted, meaning other users could monitor your online activities, if they were so inclined and knew how to use readily available tools. I strongly recommend against ever using a public WiFi hotspot without a VPN.
As an added benefit, a VPN can temporarily assign a new IP address to your device, making it appear as if you are connecting from another location around the globe. This allows you to securely access geo-blocked online content nearly anywhere in the world.
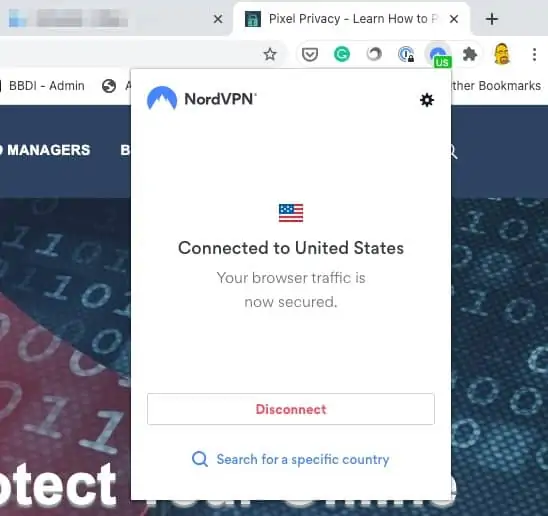
Many VPNs offer browser extensions, so you can use the VPN specifically for your browser activities. However, the most secure way to use a VPN is by using an app, so that it encrypts all of your internet communications, not just your browser.
Read more information on the benefits of using a VPN.
Use a Private Browser
If you are truly serious about your online privacy and security, you may want to consider using a private browser.
Alternative browsers, such as the Epic browser, Brave browser, TOR browser, and others provide much improved online privacy and security over Chrome, Firefox, Edge, Safari, and other mainstream browsers.
If you’re a mobile user, I strongly suggest you take a look at the DuckDuckGo Privacy Browser. Available for both Android and iOS mobile devices, the DuckDuckGo Privacy Browser blocks third-party trackers, offers private search results, and much more.
DuckDuckGo is also beta testing its private browser for the macOS platform. A Windows version of the browser is on the way.
Use a Private Search Engine
Mainstream search engines, such as Google and Bing, collect information about your searches and then share that information with advertisers and other nosy third parties.
By using privacy-respecting search engines such as DuckDuckGo, StartPage, and Ecosia, you can get search results similar to what you’d see while using Google, and you protect your search-related privacy. Plus, Ecosia plants trees with some of its proceeds, so that’s a plus.
Be Careful of What You Click On
One of the best ways to make your browsing sessions safer is to be smart about what you click on.
Phishing links aren’t only used in emails and text messages. They are also posted all around the web, especially on social networks like Facebook.
Plus, just visiting some websites can cause your browser to download and infect your computer or other device. This is a good reason to stay out of the dark corners of the web – the hinkier the website, the better chance of getting your device infected with viruses, malware, or at the very least, adware.
Browse Privately or “Incognito”
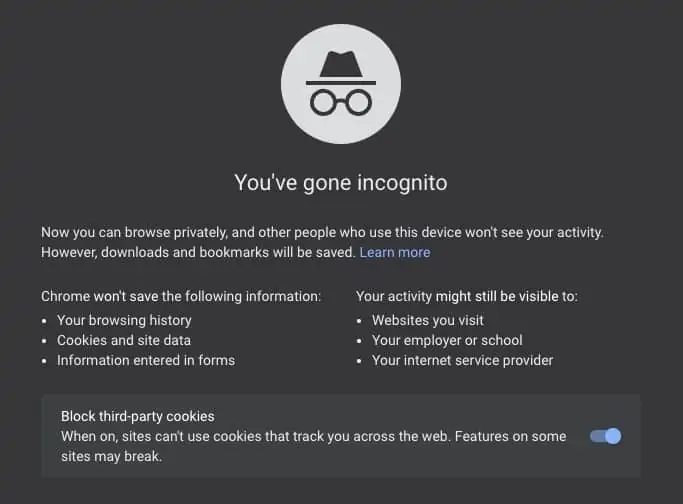
When you browse the web in “incognito” mode in the Chrome browser (known as “InPrivate” mode in Microsoft Edge and “Private” mode in Firefox and Safari), you browse in a new window that doesn’t save any record of where or what you browse.
This means it doesn’t save your browsing history, cookies and site data, or keep any record of what you enter in forms.
While this keeps your browsing history safe from prying eyes, your online activities are not hidden from the websites you visit, your ISP, school, employer, or anyone else who may be monitoring your online travels.
Browsing in Incognito Mode in Chrome on Your Computer
To open an Incognito session in Chrome, click on the Chrome file menu and then click the “New Incognito Window” menu option.
A new Chrome browser window will open. The window will be displayed using a darker motif than usual and will inform you that “You’ve gone incognito.” You’ll also see an Incognito indicator up near the address bar.
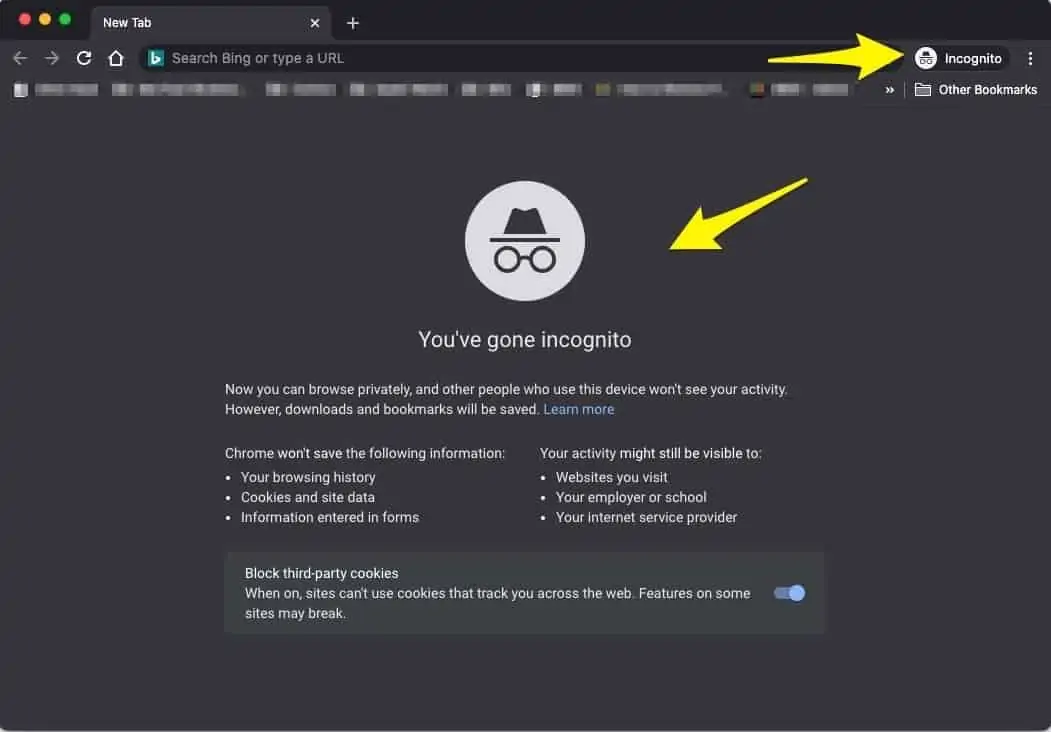
You will continue to browse incognito while that window is open. However, be advised that any other windows you have open in Chrome will still be recording your usage history, will keep cookies, and will do all of the other happy tracking-like voodoo that Google does so well.
Browsing in Incognito Mode in Chrome on Your Mobile Device
On Android
To open an incognito tab in the Chrome browser on Android, simply tap the three-dot menu icon in the upper-right-hand corner of the screen and then tap “New incognito tab.”
A new tab will be displayed that uses a darker motif than usual, and that will inform you that “You’ve gone incognito.”
On iOS
To open an incognito tab in the Chrome browser on an iPhone or iPad, simply tap the three-dot menu icon in the lower-right-hand corner of the screen and then tap “New incognito tab.”
A new tab will be displayed that uses a darker motif than usual, and that will inform you that “You’ve gone incognito.”
Browsing in “InPrivate” Mode in Microsoft Edge
To open an “InPrivate” window in Microsoft Edge, click the “File” menu and then click “New InPrivate Window” in the File menu.
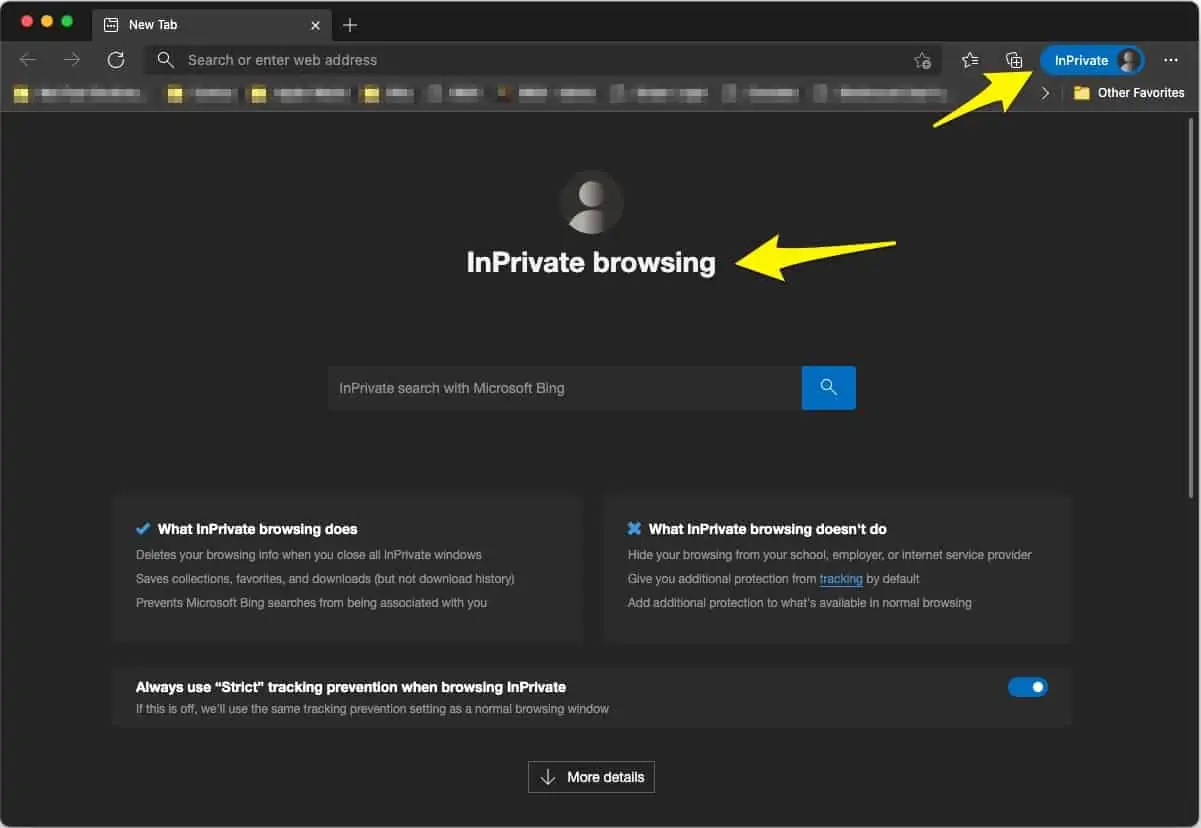
A new window, using a darker motif than usual, will open, informing you that you are now browsing in InPrivate mode. You’ll also see an InPrivate indicator up near the address bar.
The same caveats apply to InPrivate browsing that apply to browsing in Incognito Mode in the Chrome browser.
Browsing in a Private Window in Firefox
To browse in a private window in the Firefox browser, click the “File” menu, and then click “New Private Window” in the File menu.
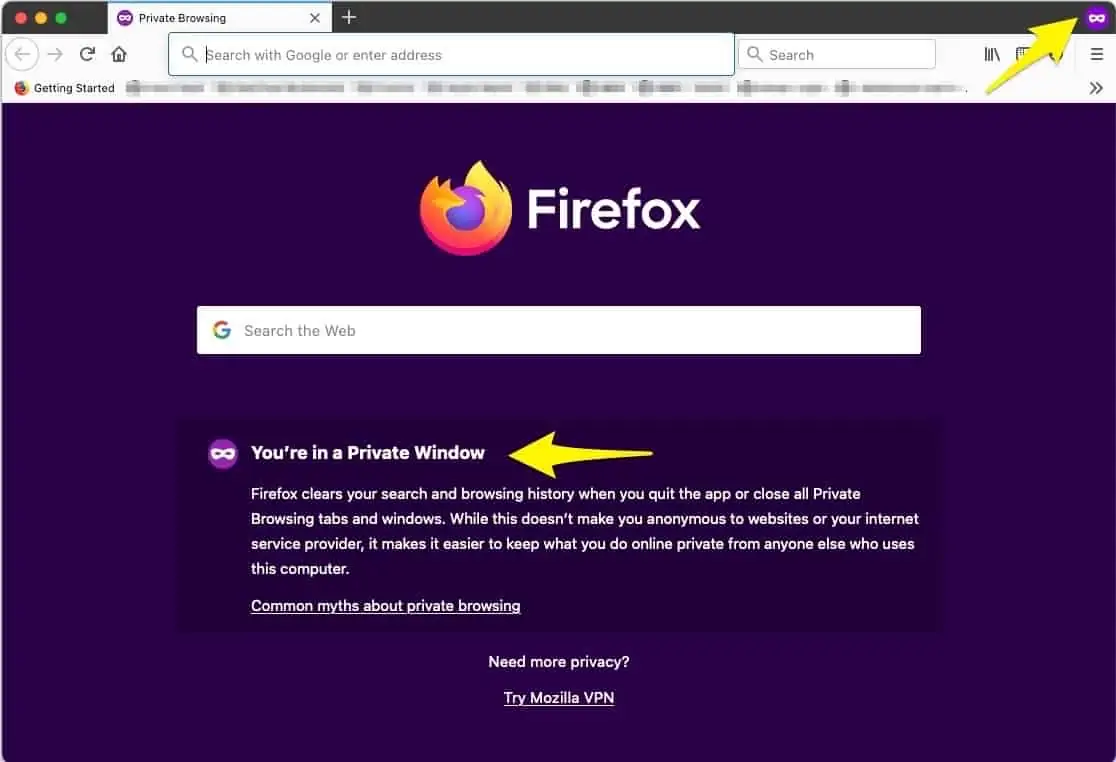
A new, darker motif window will open, informing you that you’re browsing in a private window. You’ll also see a Private Window indicator in the upper-right-hand corner of the new browser window.
The same caveats apply to private window browsing that applies to browsing in Incognito Mode in the Chrome browser.
Browsing in a Private Window in Safari
On Mac
To browse in a private window in the Safari browser, click the “File” menu, and then click “New Private Window” in the File menu.
A new browsing window will open, which notifies you, “Private Browsing Enabled.” Other than the “Private Browsing Enabled” notice, the Safari private browsing window looks the same as a regular browsing window.
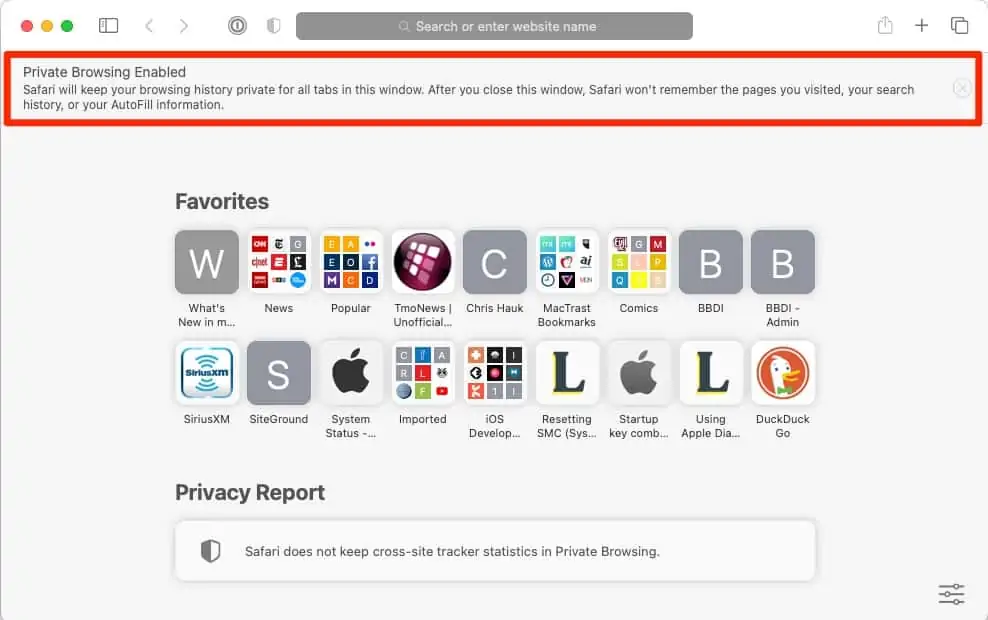
The same caveats apply to private window browsing that applies to browsing in Incognito Mode in the Chrome browser.
On iOS
In Safari on your iPhone or iPad, tap and hold on the tab view icon (It looks like two stacked boxes). In the menu that appears, Tap the “Private” menu option.
You will now be in Private Browsing Mode, and Safari will not remember anything about your browsing session. New pages will be opened in Private Browsing Mode until you once again tap the “Private” icon.
The same caveats apply to private window browsing that applies to browsing in Incognito Mode in the Chrome browser.
Clear Your Browser History, Cookies, and Cache
Your browser history, as well as the cached files your browser downloads during your online activities, can act as a history of your online travels.
While the standard “bad guys” in this situation would be the government or hackers, it is equally important to keep other users away from your browser history and cached files.
This is particularly important in the case of shared computers and mobile devices such as those both at work and home. We’ve all seen romantic comedies where a spouse, significant other or even a total stranger somehow sees another user’s browsing history, and comedy ensues.
In real life, the repercussions can be much more serious, ranging from a spoiled surprise for a birthday to getting fired.
If you don’t use private browsing session mode on a regular basis, I strongly suggest clearing your browser history and cache on a regular basis.
Browser cookies can also be hazardous to your privacy.
Cookies are small text files stored in your browser. These can be used to identify users, save a user’s site login details, create customized web experiences, and develop user profiles for customers on ecommerce sites. (That’s how they know you looked at the gourmet coffee last time you visited.)
Unfortunately, cookies can also be hijacked by the bad actors of the world, allowing them to gain access to your browser sessions, opening access to your personal data.
Please be warned: If you delete all of your cookies, you’ll likely be forced to log in at sites that formerly did it for you automatically, your preferences may be cleared on many sites you visit, and other little cookie-related things may no longer work. (There goes that high score in the browser version of Space Invaders.)
Clearing Your Browser History, Cookies, and Cache on Google Chrome
In Chrome, click on the three-dot menu in the upper-right-hand corner of the browser window. Then, click on “Settings” -> “Privacy and security” -> “Clear browsing data.” Or, you can type “chrome://settings/clearBrowserData” (without quotation marks) into the address bar.
Here, you can delete your browsing history cookies and other site data, and cached images and files for time frames ranging from the last hour to “all time.”
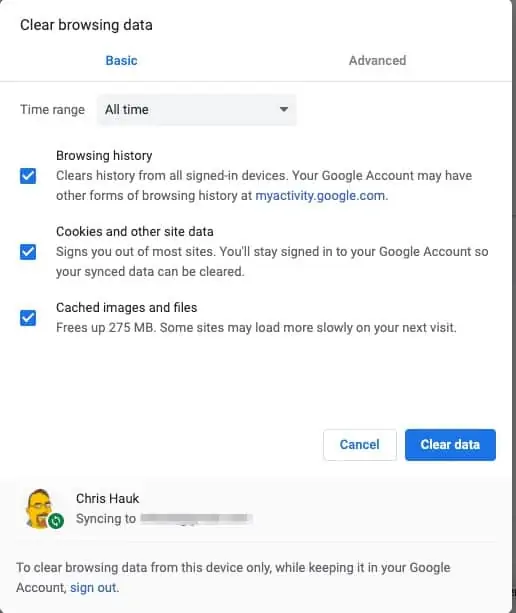
Also, when you use Google Chrome, Google keeps a record of your browsing activity on its own servers. You can go to https://myactivity.google.com/ to enable the automatic deletion of that collected info older than three months, older than 18 months or older than 36 months.
Clearing Your Browser History, Cookies, and Cache on Edge
Click the three-dot menu button in Microsoft Edge, and then click on “Settings” -> “Privacy, Search, and Services.” Look for the section marked “Clear browsing data” and click the button marked “Choose what to clear.”
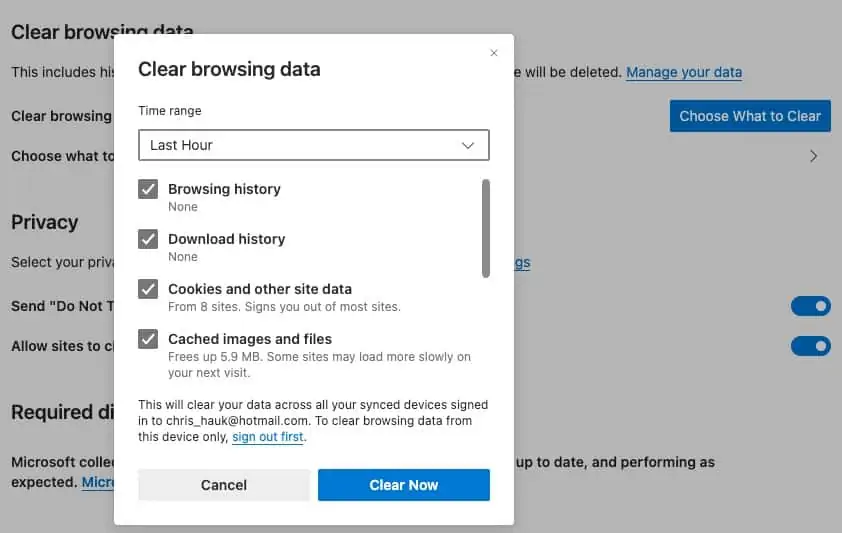
On this screen, you can clear browsing and download histories, cookies and other site data, and cached images and files from the last hour, up to all time.
Clearing Your Browser History, Cookies, and Cache on Firefox
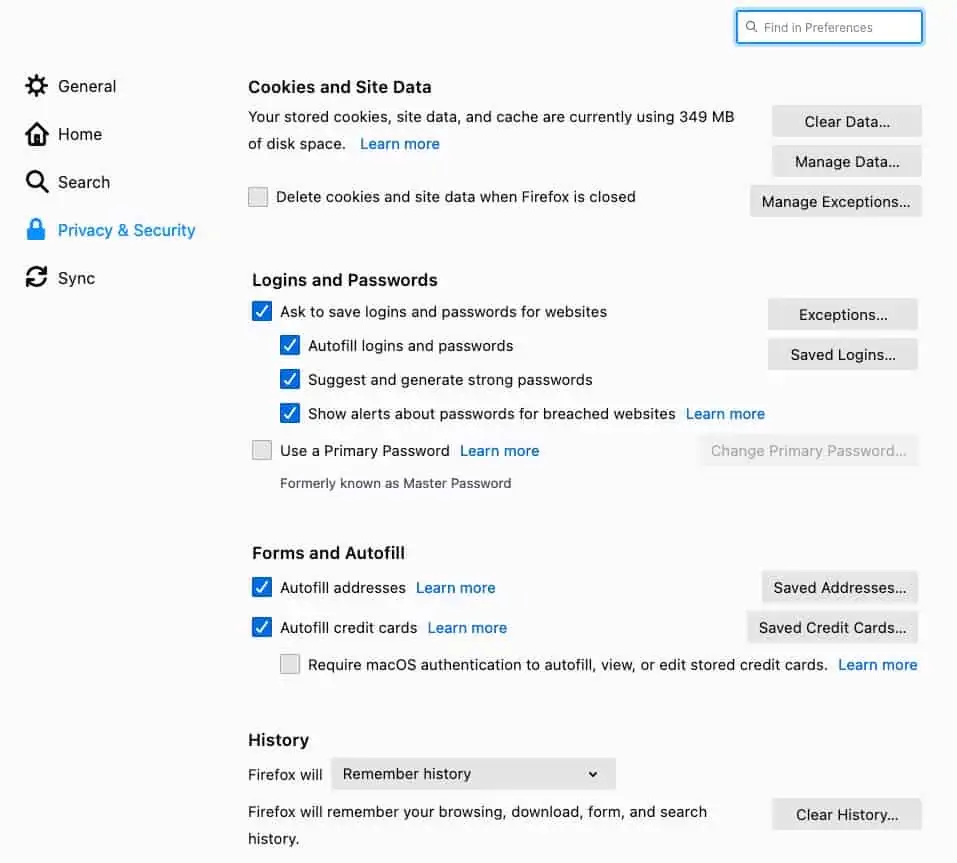
While in Firefox, click the hamburger menu (three stacked lines) in the upper-right-hand corner of the browser window. Then click “Settings” -> “Privacy & Security.” Here, you can clear your cookies and site data, your browsing history and more.
Clearing Your Browser History, Cookies, and Cache on Safari
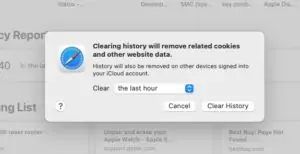
Safari makes it easy for Mac users to clear their website history, cookies, and cache. Simply click “Clear History…” in the Safari menu. You will then be presented with the option to clear all of the above data from the last hour up to all time.
Conclusion
While doing everything I’ve laid out in this article won’t make you impervious to online hazards, it will help keep you more secure and will also help protect your privacy on the web. Surf safe, my friends!
How to Browse Safely FAQs
Is it Safer to Use Online Banking on a Mobile or Desktop Computer?
As long as you’re using an encrypted WiFi connection or a cellular connection, using your bank’s mobile app on your unrooted smartphone or tablet is the safest way to access your bank accounts.
Will a VPN Help Against Identity Theft?
A VPN can help protect against identity theft, thanks to its encrypted tunnel of protection, a VPN keeps your personal data hidden and out of the clutches of the bad actors of the world. A VPN is particularly helpful in guarding against identity theft when you’re using a public WiFi hotspot. WiFi hotspots are usually unencrypted, making hotspot users an attractive target for hackers.
How Can I Hide My Search History From My ISP?
The best way to protect your search and browsing history from being monitored by your ISP is to use a VPN to encrypt your internet connection. Your ISP will be unable to see your online activities, as the VPNs encrypted tunnel prevents any outsiders from monitoring your online activities. Also, use a private search engine, like DuckDuckGo for your online searches.
Contents [hide]
- Overview
- Keep Your Browser Updated
- Practice Safe Password Usage
- Install Antivirus Software and Anti-Malware Protection
- Use Two-Factor Authentication
- Use a VPN
- Use a Private Browser
- Use a Private Search Engine
- Be Careful of What You Click On
- Browse Privately or “Incognito”
- Clear Your Browser History, Cookies, and Cache
- Conclusion
- How to Browse Safely FAQs
- Is it Safer to Use Online Banking on a Mobile or Desktop Computer?
- Will a VPN Help Against Identity Theft?
- How Can I Hide My Search History From My ISP?