
At a Glance
User privacy is crucially important in today’s always-connected world. The demand for stricter privacy protections has led Microsoft to improve the privacy settings for its Windows 11 operating system.
The new privacy settings in Windows 11 mean your privacy is protected better than any version of Windows before it. While Microsoft is still looking to gather as much information about its users as possible, it does provide ways to lock down Windows 11, protecting your privacy. In this article, I’ll take a close look at the privacy settings you can change to protect your privacy.
Why Is It Important to Protect My Data Privacy?
Operating systems, as well as websites and services, have traditionally been notorious when it comes to collecting data about their users. Luckily, there are data privacy laws that have forced companies like Microsoft, Apple, and Google to make changes to how they collect data, putting more power into the hands of users.
Keep Your Windows 11 Installation Updated
One of the best ways to keep your privacy intact while using Windows 11 and compatible apps is to keep both the operating system and application updated to the latest available version. Windows updates include patches for security and privacy flaws that have been discovered since the last update.
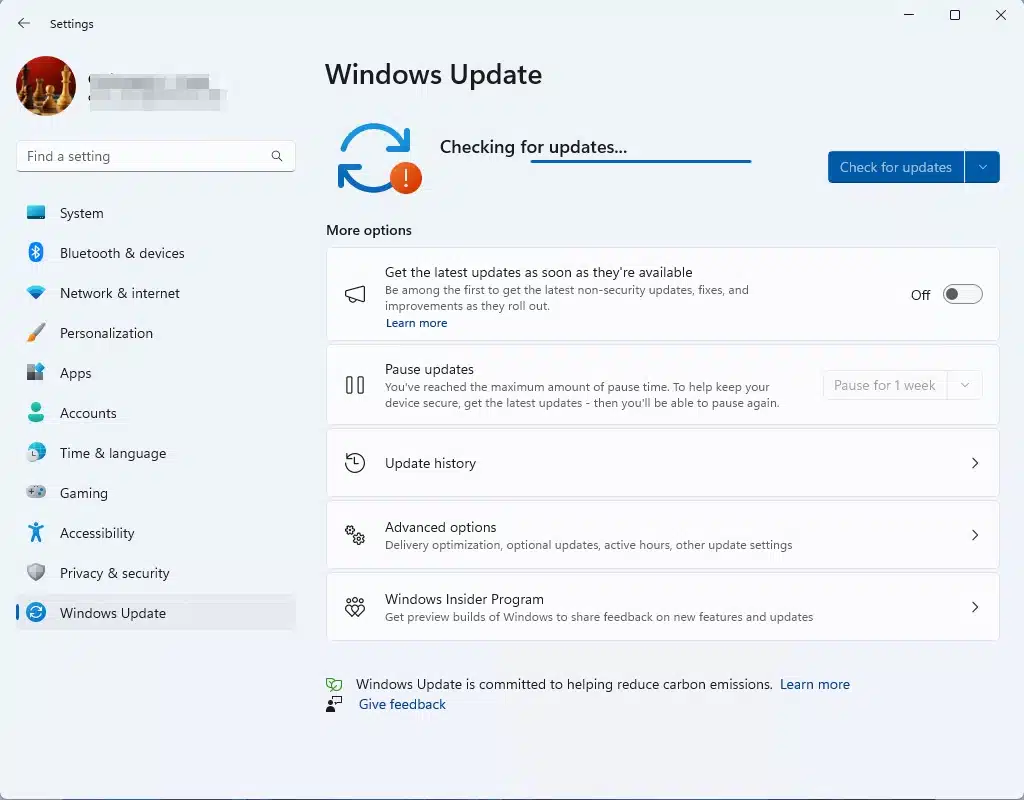
To manually check for updates and install them if they’re available, open Settings and click “Windows Update.” On the Windows Update page, click the “Check for Updates” button found at the top right corner of the window.
You can also turn on automatic updates, pause updates, view the updates history, and more.
Windows 11 Privacy Settings
In this section, we’ll take a look at Windows 11’s privacy settings and how you can customize them to reclaim your privacy.
General Privacy Settings
Every Windows user has a unique advertising ID that is linked to their computer and follows them around on the internet. If allowed, advertisers can use the advertising ID to serve up personalized and targeted advertisements while you’re online. Happily, there is a way to disable this Windows advertising ID.
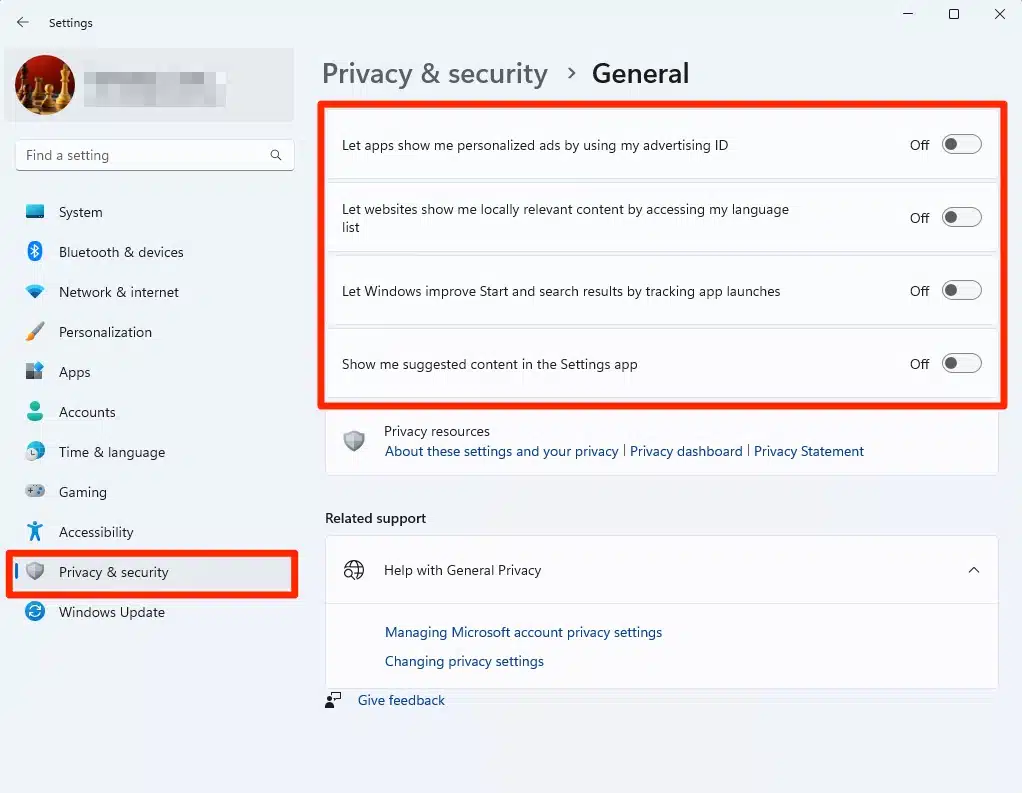
To configure the general privacy settings in Windows 11:
- Go to: “Settings” -> “Privacy & security” -> “General.
- To enable or disable the advertising ID setting, toggle the “Let apps show me personalized ads by using my advertising ID” button to “Off.”
- Similarly, you can also toggle on or off the following settings:- Let websites show me locally relevant content by accessing my language list.- Let Windows improve Start and search results by tracking app launches.- Show me suggested content in the Settings app.
Diagnostic Data
Diagnostic data is used by Microsoft developers to improve the reliability and performance of Windows. In this section, you can opt between sending only the required amount of diagnostic data or sending optional diagnostic data that includes the websites you visit, how you use apps, and more.
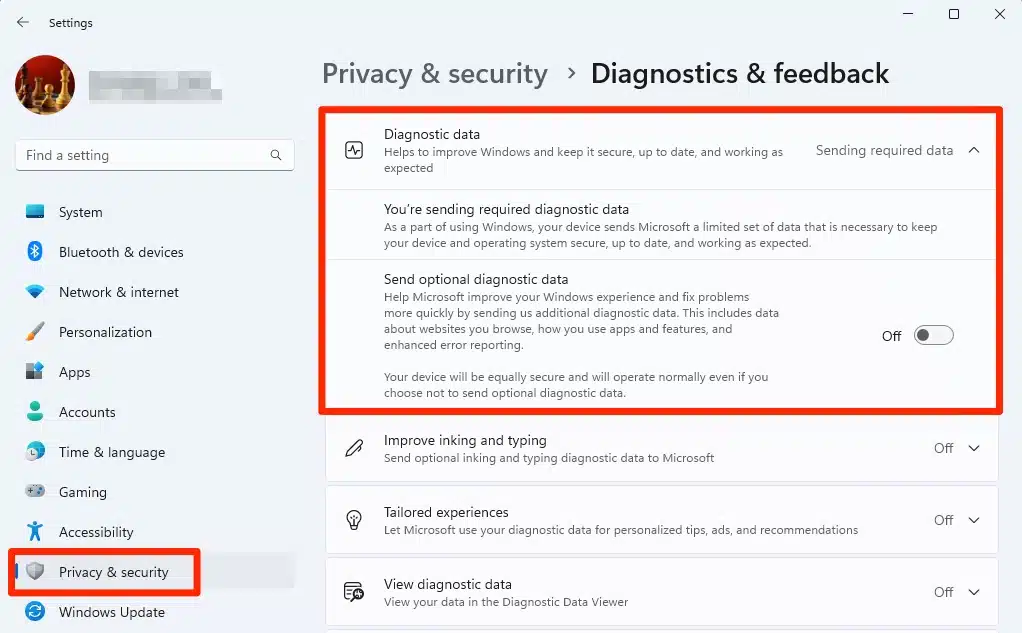
To edit your Diagnostic Data, do the following:
- Launch the Settings app.
- Click on “Privacy & security.”
- Click on “Diagnostics & feedback.”
- Click on “Diagnostic data.”
- Toggle the “Send optional diagnostic data” switch to determine whether or not you wish to send extra diagnostic data in addition to the required diagnostic data.
- If you wish to delete the diagnostic data tab, click the “Delete” button.
You can also opt to view diagnostic data by clicking on that tab, and toggle on “Turn on Diagnostic Data Viewer.” Keep in mind that when this option is enabled it can use up to 1GB of hard drive space.
Search Permissions
The Search permissions settings allow you to configure privacy options as they are connected to your search settings.
To edit your Search permissions, do the following:
- Launch the Settings app.
- Click on “Privacy & security.”
- Click on “Search Permissions.”
In the SafeSearch section, you can select the amount of adult content that will be filtered in web previews in Windows Search. “Strict” filters out adult text, videos, and images from web results, “Moderate” filters adult videos and images but will still display the text. “Off” doesn’t filter adult content from web results.
Under “Cloud content search,” you can select whether your search results will include content from apps and services that you sign in to using your Microsoft account.
Speech Recognition
If you use Windows speech recognition, I strongly recommend that you take a close look at the Speech Recognition settings.
You can set up the Speech recognition preferences on your Windows 11 machines by going to “Settings” -> “Privacy & security” -> “Speech.”
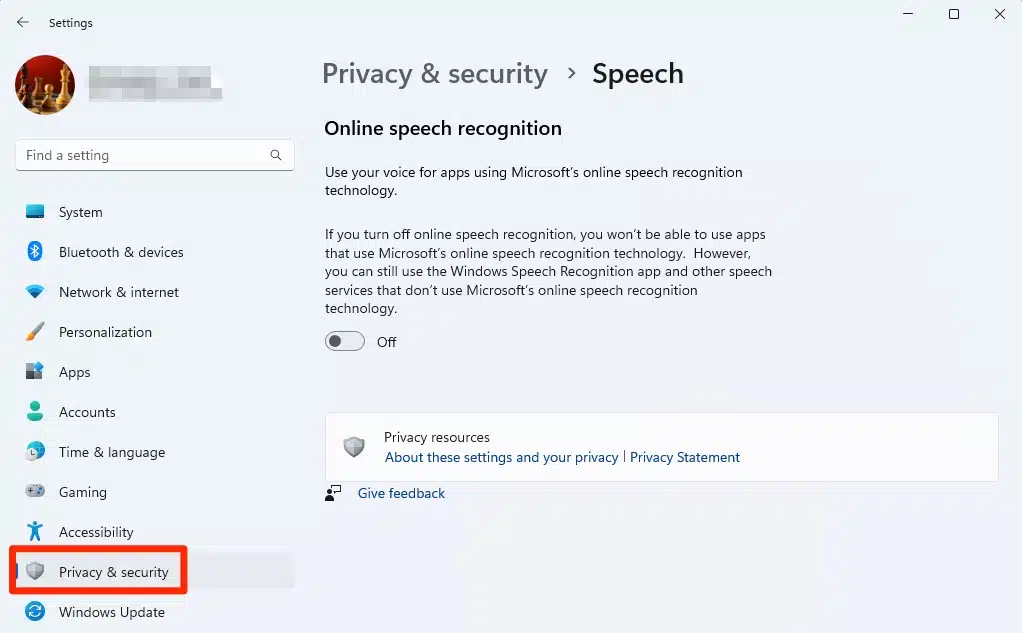
Here, you can choose to toggle off Microsoft’s online speech recognition technology. Be warned, if you turn off online speech recognition, apps and services that rely on it will not work. However, the Windows Speech Recognition app will not be affected.
If you have online speech recognition turned on, it allows Microsoft to improve its speech recognition technology. While Microsoft and its partners will have access to the voice clips, Microsoft says it protects the privacy and identity of its users.
If you decide to share your voice clips with Microsoft, go to “Settings” -> “Privacy & security” -> “Speech” and click on “Start contributing my voice clips.”
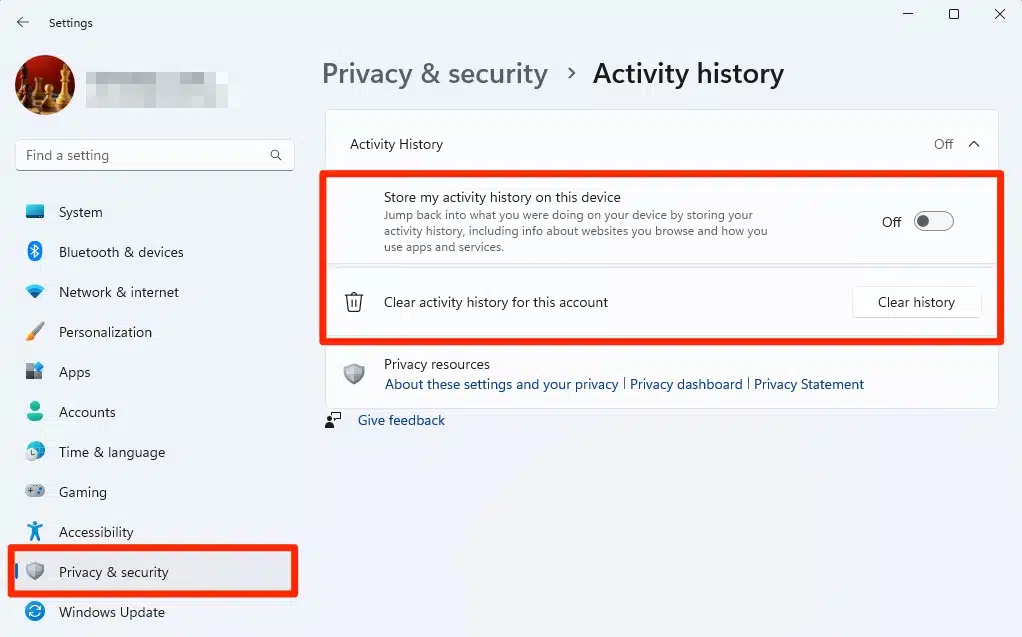
Turn Off Your Activity History
If you’re storing your activity history in Windows 11, Windows is collecting and recording various bits of data, including which files you open or which websites you visit, and much more. While all of this information is stored locally, Microsoft has access to the information if you’re signed in to a workplace or school account and have given the Redmond firm permission to view the data.
If you don’t want that data about you to be stored, go to “Settings” -> “Privacy & Security” -> “Activity History” and toggle off the “Store My Activity History on This Device” option. Be sure to delete your already collected data by clicking the “Clear History” button.
Use a Local Account
If you’re signed in to a Microsoft account on your PC, you’ll likely use an application or service that will phone home to Microsoft, sending data to the company. Instead of using a Microsoft account on your PC, consider using a local account.
Windows 11 App Permissions
Applications on your Windows 11 computer will often require access to your PC’s location data, attached cameras and microphones, and more.
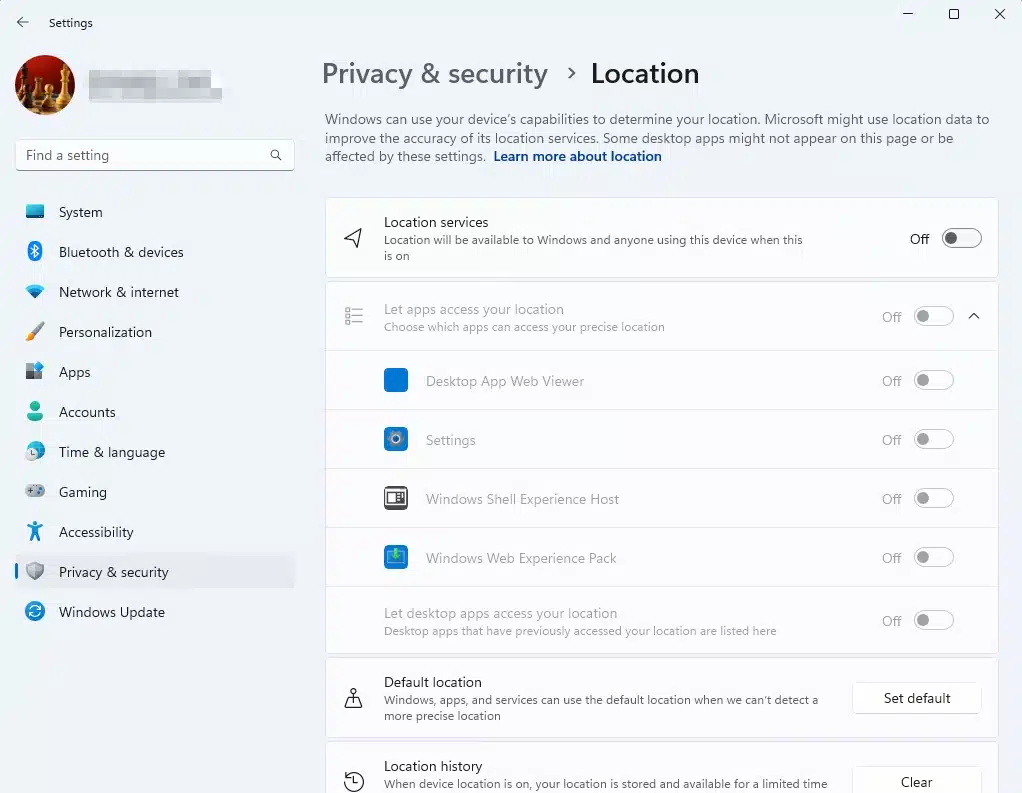
Location
Several of the apps installed on your Windows 11 PC require access to location data to properly function.
Here is how to edit Windows 11 location permissions:
- Launch the Settings app.
- Click on “Privacy & security.”
- Click on “Location.”
Here, you can enable or disable Location services for all listed apps or you can pick and choose which apps can use the location data.
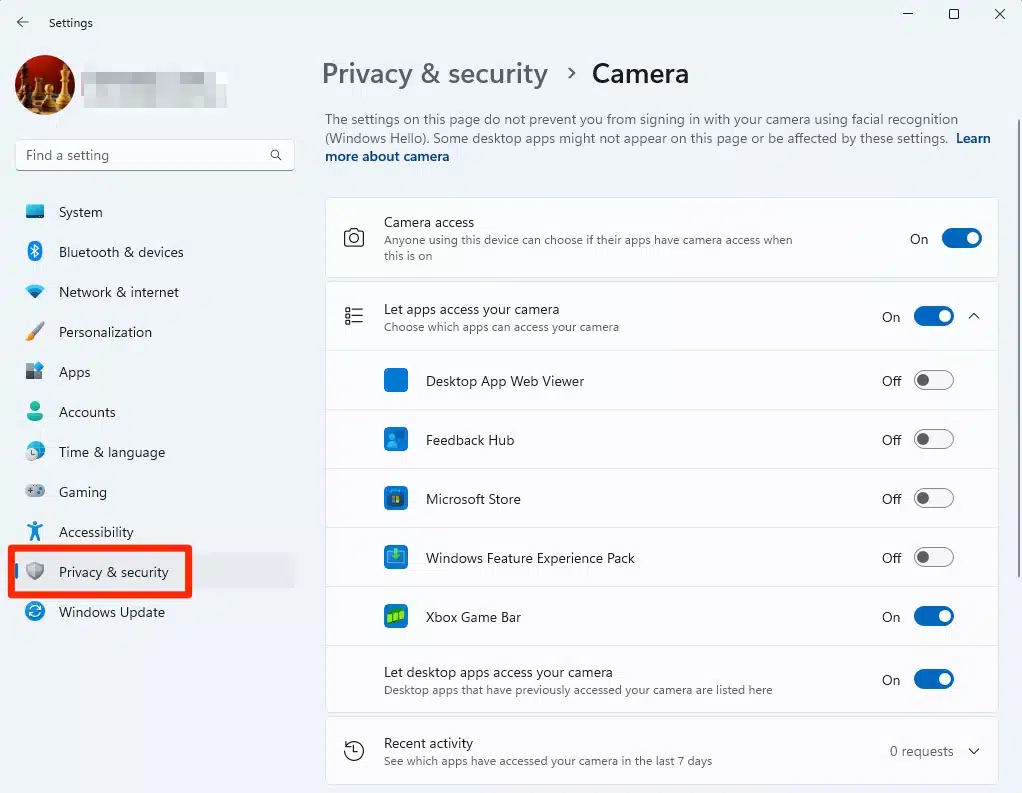
Camera & Microphone
You can also select what apps can have access to your Windows PC’s camera and microphone.
To edit Camera privacy settings do the following:
- Launch the Settings app.
- Click on “Privacy & security.”
- Click on “Camera.”
Here, you can set the access that apps have to your PC’s camera if one is connected. You can turn off access across the system or on an app-by-app basis.
To edit Microphone privacy settings do the following:
- Launch the Settings app.
- Click on “Privacy & security.”
- Click on “Microphone.”
Here, you can set the access that apps have to your PC’s microphone if one is connected. You can turn off access across the system or on an app-by-app basis.
In Closing
As you can see, Microsoft certainly does its best to collect as much information about you and how you use your Windows 11 PC. However, it also allows you to lock down your privacy by making changes to your Windows 11 privacy settings. Be sure to make the changes I’ve shown you to keep your Windows 11-related activities undercover.