
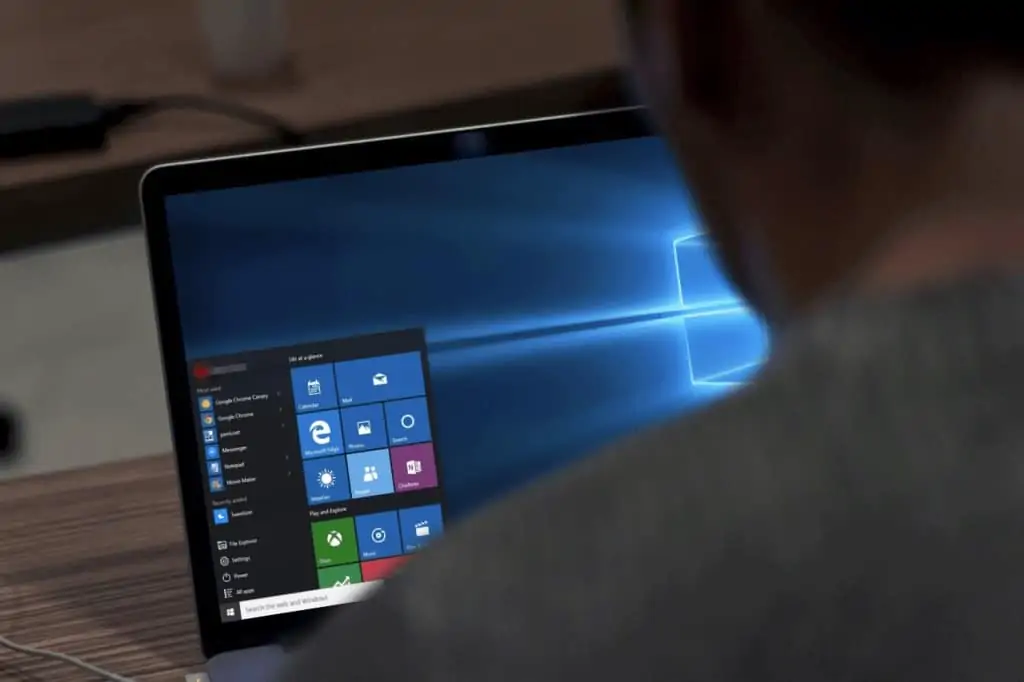
You’ve been told over and over that Windows 10 is the best thing since MS-DOS 5, and you’ve finally broken down and updated your PC from Windows 8. I have to admit that the interface and overall experience of Windows 10 are much improved over 8.
But what about privacy in Windows 10? What’s changed?
It turns out that there are plenty of “convenience” features in Microsoft’s latest Windows release that look to monitor your every move on the Windows desktop in order to “improve the Windows experience.”
I don’t know about you, but I don’t even like my boss looking over my shoulder while I’m working. I sure as heck don’t want complete strangers monitoring and saving information about my every move.
Here’s a nice bit of info from the Microsoft “Privacy” website:
Finally, we will access, transfer, disclose, and preserve personal data, including your content (such as the content of your emails in Outlook.com, or files in private folders on OneDrive), when we have a good faith belief that doing so is necessary to: protect the rights or property of Microsoft, including enforcing the terms governing the use of the services – however, if we receive information indicating that someone is using our services to traffic in stolen intellectual or physical property of Microsoft, we will not inspect a customer’s private content ourselves, but we may refer the matter to law enforcement.
The Windows 10 default privacy settings leave a lot to be desired when it comes to protecting you and your private information. Whenever I set up a new computer or update a current setup for my family or job, I always carefully go through the general privacy settings for each install, making sure to lock it down to make it as private as possible.
In this article, I’ll take you on a tour of those settings and show you which settings to change and how to do so to best protect your personal info. This information is up to date as of Windows 10 – Update Version 22H2 (Build 19045.2251). All information and screenshots will be related to this build.
In some cases, you will have to make a decision about whether to err on the side of privacy or lean toward letting Microsoft monitor some of your actions in favor of a more convenient computing experience.
Note: Before we begin going through the settings you can change to reclaim your privacy, I’d like to mention a VPN-related issue that a recent version of Windows was stricken with. Windows 10 – Update 1903 (Build 18362.207) contained a bug that could affect the operation of VPN-added services.
It should be noted that the bug only affected certain enterprise installations of the operating system, “when the diagnostic data level setting is manually configured to the non-default setting of 0.”
Later updates for Windows 10 fix the issue, so make sure your enterprise machines are updated to the most recent build of Windows 10 if your machine is experiencing any VPN issues.
#1 – Don’t Use the Express Settings When Installing Windows 10
If you haven’t yet installed Windows 10, or if you’re planning on buying a PC with Windows 10 already installed, do NOT use the “Express Settings” option when you do your initial setup.
Instead, select “Custom Settings” so you can take charge of locking down your privacy from the get-go.
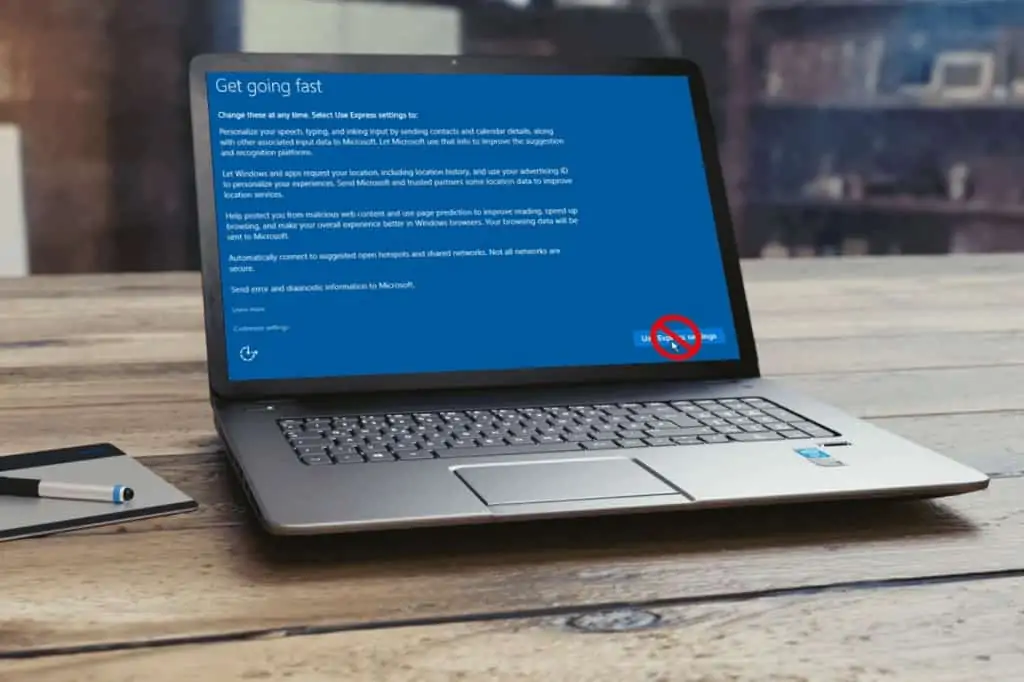
Selecting Custom Settings during setup of Windows 10 will allow you to adjust the settings that control how your private information is accessed by Microsoft.
Quick Tip: If you’re not hot on the idea of keeping a lot of your personal information and other data “in the cloud,” consider creating a local login account instead of using a connected Microsoft account.
Keep in mind that this will prevent you from accessing any files and such that you might have already stored in Microsoft’s OneDrive cloud storage.
Windows 10 users can get direct access to the full privacy statement during installation. While I don’t expect many users will actually read the entire statement, I mention it in order to point out that Microsoft has included “Learn More” links in the text.

The “Learn More” links allow users to jump to relevant parts of the statement that might interest them. The sections include such information as how Windows 10 handles speech recognitions, location services, diagnostics, and more.
#2 – Restrain Cortana
Cortana is Microsoft’s entry into the virtual-assistant sweepstakes.
Much like Apple’s Siri and Google’s imaginatively-named Google Assistant, Cortana is a voice-activated intelligent personal assistant. It recognizes natural voice commands and can answer questions by accessing Microsoft’s Bing search engine.
In addition to performing searches, Cortana can also store and access personal information such as reminders, contacts, calendar dates, and more.
A major drawback of the Cortana assistant is that it indexes and stores your information, both on the local computer and in the cloud. (This allows Cortana to synchronize information across all of your Microsoft devices.)
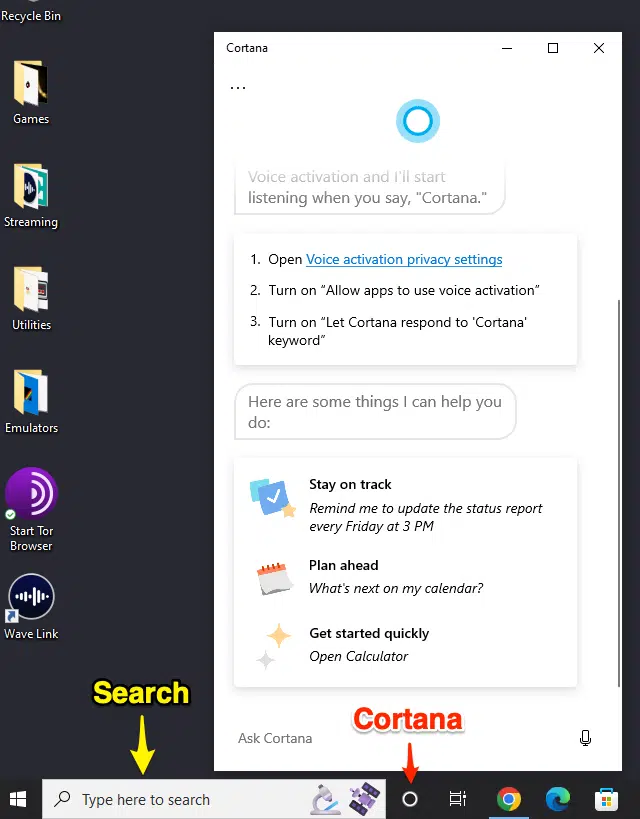
As of the release of the Windows 10 1903 Update, Microsoft split Windows Search and Cortana in the taskbar.
You’ll now find Cortana as a separate icon next to the desktop search bar, as seen below. Clicking the search box in the taskbar now offers search functionality, while clicking the Cortana icon will activate a voice-first digital assistant experience.
Privacy advocates have long been concerned about the way Cortana gathers and stores personal user information. This has led Microsoft to allow users to somewhat control what Cortana accesses and stores.
However, what Microsoft giveth, Microsoft also taketh away.
As of the latest version of Windows 10 (the Creators Update is the latest as of this writing), the company has taken away the ability to toggle Cortana on and off.
Luckily, there is still a way to turn Cortana off, but it requires editing the registry and rebooting your computer.
For those not comfortable with dallying around in the Windows Registry, there are still ways to get Cortana to back off a bit from accessing everything you say or do on your PC.
1. Controlling What Cortana Can Do
It’s easy to limit how much access Cortana has to your personal data and make it perform more like the Windows search box of old.
You can prevent it from collecting information about your speech and handwriting patterns, as well as your text entry history. In addition, you can stop the assistant from sharing your usage history across all of your Windows devices.
The Cortana settings are available in the Cortana app, as seen below. To access the Cortana settings, start the Cortana app by clicking the Cortana icon in the task bar, and then clicking the menu button in the upper left-hand corner of the Cortana window (it looks like this: “…”).
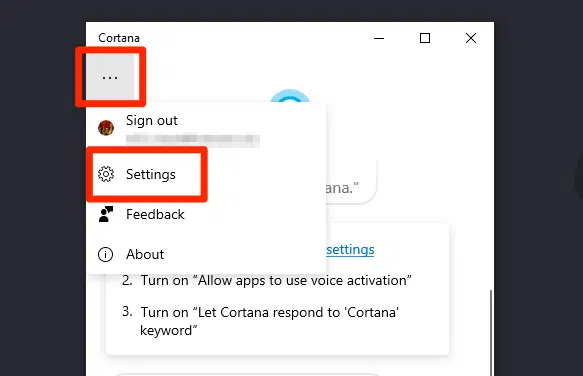
In the Settings screen, you’ll see a “Privacy” menu option in the “Account” section. Click that.
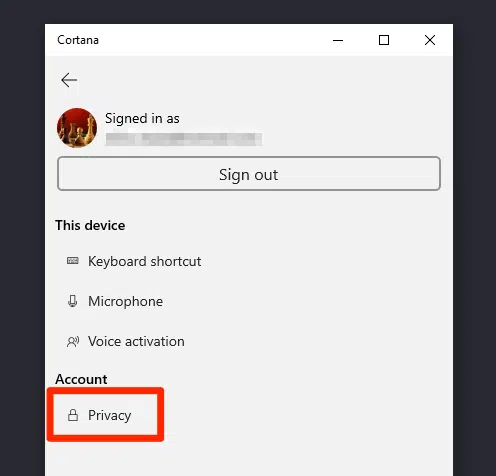
The next screen you’ll see is the Privacy settings. Here you can view what Cortana knows about you, control Cortana’s access to your Calendar and Email, clear all Cortana data, and clear your Cortana Chat History.

Talking to Cortana
Also in the Settings section of Cortana are the “Microphone” and “Voice activation” options, as seen below.
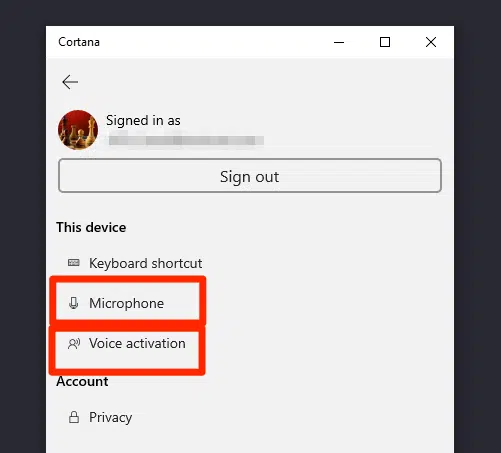
When you click this menu option, you’ll see the screen below, where you can view whether or not Cortana is using the microphone to continuously listen for its summoning phrase, “Cortana.”
If these are turned “Off,” Cortana won’t monitor your speech, possibly lowering the chance of your voice being monitored. As a nice side benefit, your Windows laptop will last a bit longer when it’s running on battery power.
Permissions & History
In the Permissions & History section of the Cortana settings, you can review the activity from all of your Cortana devices, change what the personal assistant knows about you in the cloud, manage the information Cortana has access to and manage what she can access from other services.
- Cloud Content Search

When this is turned on, Cortana will include your content saved in the cloud, such as on your OneDrive storage, when providing search results. If you want to have access to all of your files, no matter where you saved them, you’ll want to have this set to “On.” If you’re more concerned with security, toggle it to “Off.”
(Note: As of the Windows 10 1903 Update, you’ll find this toggle in the “Search” section of the Settings app. In earlier versions of Windows 10, you’ll still find it in Cortana’s settings.)
- History
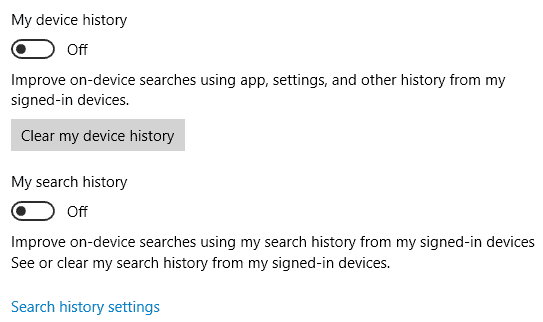
By default, Cortana saves the searches you perform in apps, settings, and other histories from any devices that you sign in with your Microsoft account. You can disable the device history in this area and clear the history on your device. You can disable “My search history” by toggling it to “Off.”
(Note: As of the Windows 10 1903 Update, you’ll find this toggle in the “Search” section of the Settings app. In earlier versions of Windows 10, you’ll still find it in Cortana’s settings.)
2. Turn Off Cortana Personalization
To disable Cortana’s personalization, stop data collection, and clear all of the data Cortana has associated with a particular device, do the following:

- Click your mouse pointer on the Cortana search icon, found in the toolbar of your Windows 10 desktop. Once the Cortana display appears, click the menu icon and then the “Sign out” icon, as shown above.
- When the Account window appears, click the “Sign out” link for your Microsoft account.
- Then, click the “Sign out” button on the next prompt.
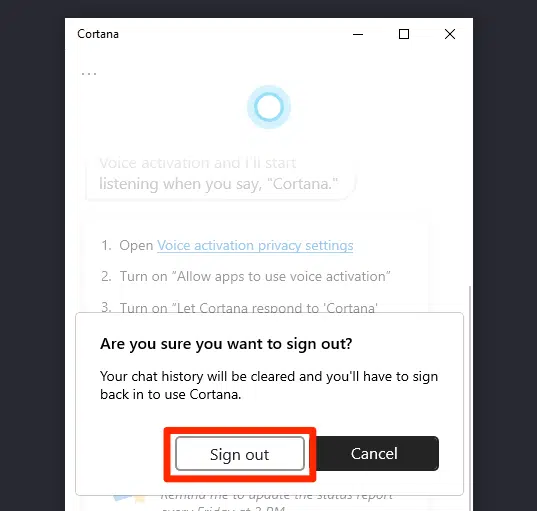
When you sign out of Cortana on your computer, the data collected by Cortana associated with that PC is automatically cleared. Data collected by Cortana on other devices remain intact until you sign out of Cortana on those devices.
3. Hide Cortana
If you’d like to keep Cortana completely out of your way, short of digging into the Windows registry, do the following:
- Right-click anywhere on the taskbar.
- Click the “Show Cortana button” option to toggle showing the Cortana button in the taskbar.

#3 – Turn Off Ad Tracking
If you decided to go with “Express Settings” when you installed Windows 10, you can be sure the operating system is tracking your every move and mining your personal data for everything it is worth.
This includes supplying information to its advertising partners, who then use that info to show ads targeted at you, online and within Windows itself.
When ad tracking is enabled, Windows generates a unique advertising ID for each user, which is intended for use by app developers and advertising networks to “provide more relevant advertising in apps.” Apps can access the ID and use it in much the same way websites access and use a unique identifier included in a cookie.
I should note that such tracking is nothing new, as Google and other search providers have been doing the same thing with cookies and information they collect from your web searches. (Which is why those foot fungus ointment ads are following you around wherever you go on the internet. You really should consult with your doctor about that.)
To turn off ad tracking, do the following:
- Click or tap the Windows Start button in the lower left-hand corner of your Windows desktop.
- Click or tap the “Settings” icon. (It’s that little gear just above the “power” button icon.)
- Click or tap the “Privacy” icon in the Settings menu.
- In the Privacy menu, click or tap the “General” menu option if it isn’t already selected.
- Turn off “Let apps use my advertising ID for experiences across apps,” as shown below.
![]()
If you’re interested in protecting your privacy while using Windows 10, this is a great place to start. I would toggle all four settings shown in the screenshot above to the “Off” position.
These four options are:
- “Let apps use advertising ID to make ads more interesting to you based on your app activity.” (If you turn this off, it resets your ID – which is a good thing.)
A note from Microsoft about this option: Turning the advertising ID off will not reduce the number of ads you see, but it may mean that ads are less interesting and relevant to you. Turning it back on will reset the advertising ID.
- “Let websites provide locally-relevant content by accessing my language list.”
- “Let Windows track app launches to improve Start and search results.”
- “Show me suggested content in the Settings app.”
#4 – Disable Location Tracking
When Location Tracking is turned on, Windows and its apps are allowed to detect the current location of your computer or device. This can be used to pinpoint your exact location.
This is especially handy for mobile devices, such as Windows tablets or Surface devices, due to location-based apps such as restaurant finders and navigation apps.
While it is a handy feature, it’s also a privacy-leaking feature that should likely be turned off if you truly desire to protect your identity on the web.
Shutting off this feature on your laptop is likely to have less impact than turning it off on a mobile device, due to the latter’s mobile nature and heavier use of location services.
I generally keep Location Tracking turned off on my desktop and even laptop devices. I use an iPhone for my daily calling and texting needs, and I leave location tracking turned on for my handset (but only for things like “Find My iPhone” and “Find My Friends.”)
By leaving both turned on for my iPhone, my wife knows where I am at all times in case of an emergency. And I, of course, know her whereabouts for the same reasons.

Location for a device can be either set for a device or just a particular user.
To turn off Location Services for a device, go to the “Privacy” section of the Settings app and click “Location.” Once there, toggle the “Location for this device” switch to “Off” to disable Location Services for all users of the device.
If the “Location for this device” switch is left to the “On” position, it will be left up to you whether or not Location Services are enabled for your login on the device, as shown below.
When the Location Service is turned on, as seen above, any app that is making use of the device’s location will display a unique icon, which looks like a dot with a circle around it.
Default Location
If location is turned off completely, skip to the next relevant section.
If desired, you can also set a default location for those times when Windows can’t detect a more precise location. If you are leaving location settings enabled, and you’re on a desktop computer, this could be helpful.
Location History
If Location is on, Windows will store your location history “for a limited time” on the device, and any apps that use the Windows location information can access the history.
If you’re sensitive about sharing where you’ve gone in the past, press the “Clear” button as seen below to erase the location history stored on the device.
Note: Pressing the “Clear” button gets rid of the location history stored locally, but not in the cloud.
To clear the location info that may have been stored in the cloud, you’ll need to click or tap the “Manage my location info that’s stored in the cloud” link, as seen below. Windows will open a browser window where you can then erase your cloud location info.

Users can also specify which apps can access and make use of their location information. Any installed app that can take advantage of that information will be displayed in a list. Users can then toggle the app’s location access off or on, as they desire.
Geofencing
Geofencing uses GPS information, or local radio frequency information such as WiFi networks or Bluetooth beacons, to create a virtual boundary around a location.
This enables devices and apps to offer you information, such as a special at a nearby restaurant, or a reminder to pick up your dry cleaning when you’re near the cleaners.

While geofencing can be a valuable tool in day-to-day activities, it also uses your device’s location, which means it knows where you are and where you’ve been.
An app can use geofencing if Location Services are turned on for that app. So, adjust permissions accordingly.
#5 – Control Camera Access
Have you ever felt like someone was watching you? (And you had no privacy? Woh-oh-oh.)
My mother-in-law actually puts tape over the built-in camera on both her laptop and her tablet. (I guess I shouldn’t mock her – the word is that Mark Zuckerberg, the founder of Facebook, also puts tape over his webcams.)
Camera access in Windows 10 can be easily controlled. Using the “Camera” menu in the “Privacy” section of the Settings app, you can completely turn off access to your computer or tablet’s built-in or connected camera. You can also set camera access on an app-by-app basis.

General access by the system is controlled by the now-familiar toggle switch located just under the “Let apps use my camera hardware” label, as seen above.
For those of you who may have only skimmed the article, toggling a switch like this to “On” allows Windows apps access to that particular feature. Toggling it to “Off” disallows any access.
While camera access is a genuine privacy concern, I usually leave mine on for my account and turn it off under my kids’ accounts. While I prefer to set camera access on an app-by-app basis for my account, I feel safer with apps under my children’s accounts not having access to it.
If the toggle switch is set to “On,” you can control each individual app’s access to the camera by using each app’s associated toggle switch.
When turning camera access off for an app, it should be noted that this only prevents the app from directly accessing the camera hardware. It can still request to open the built-in Windows Camera app, which can only capture images or video when you explicitly allow it to do so.
Heck, maybe Zuckerberg has it right – just put a sticker or a piece of tape over the camera. If Edward Snowden is correct, the NSA has at least a couple of ways to spy on you via your computer’s camera. That same Wired report provides some links to a good number of fashionable ways to cover the camera. Yes, Hello Kitty stickers too.
#6 – Control Microphone Access
While allowing Windows access to your computer’s microphone – whether it be built-in, or the connected type – might not seem as much of a privacy risk as allowing access to the device’s camera, it can still be a touchy subject.

Just as with my Camera settings, I leave the “Let apps use my microphone” toggle switch to “On” and then decide which individual apps to allow to have access to the mic. It just makes sense to allow Skype access to the mic, while Photos and the Windows Store don’t really need it to function properly.
For this setting, I would say allow or block on an app-level basis. It will become clear to you after a while which apps actually require access to your device’s microphone.
Mark Zuckerberg also puts a piece of tape over his laptop’s built-in microphone – so maybe you should get that roll of black tape out of the drawer, too.
#7 – Speech, Inking, & Typing
These sections of the Privacy dashboard settings control how you can use your voice to talk to Cortana, or certain applications you download from the Windows Store. It also uses your voice input to improve Microsoft’s cloud-based speech services. (So, yep. It sends your voice samples to the cloud.)

It also controls if Windows uses your typing history (and handwriting patterns on Surface devices and other tablets) to create a local user dictionary, which is supposed to make better text-entry suggestions for you.

When this is toggled off, you can no longer speak to Cortana, and your typing and inking user dictionary will be cleared of data. Some speech services, those that do not rely on the cloud, will still work. Typing suggestions and handwriting recognition using the local system’s dictionary will also still work.
Toggling this setting to the “Off” position will aid you in your effort to improve your privacy, but it will also lead to the loss of some features you have become used to.
As seems to be the way of the online world these days, you’ll need to walk the tightrope between convenience and privacy.
A Quick Note About App Access
Before we examine the settings that control what kind of access Windows apps have to your personal data – such as Contacts, Calendar, Account Info, and more – let’s take a look at a statement from Microsoft about such controls.
Exceptions to the privacy settings
Desktop apps won’t appear in your Choose apps that can use/access/control/read my [Capability] lists and are not affected by the Let apps use/access/read my [Capability] setting. To allow or block desktop apps, use the settings in those applications.
How can you tell if an app is a desktop app? Desktop apps are usually downloaded from the internet or installed with some type of media (such as a CD, DVD, or USB storage device). They’re launched using an .EXE or .DLL file, and they typically run on your device unlike web-based apps (which run in the cloud). You can also find desktop apps in the Windows Store.
Basically, what this means is that any app you install yourself, be it downloaded from the internet or installed from a CD – or yes, even a floppy – is not beholden to respect your Windows data access settings. As always, be damned careful about installing apps from unknown sources.
With the release of Windows 10 Fall Creators Update, users have greater control over which apps can access their information, camera, microphones, and other privacy-sensitive objects.
Previously, users were only prompted to grant an app access if the app required access to a user’s location data; all other permissions were granted automatically. Apps installed via the Windows Store will now require explicit permission to an app before it can have access.
The new rules only apply to apps installed from the Windows Store after the installation of the Fall Creators update. However, users can manage permissions for existing apps by going to “Start” -> “Settings” -> “Privacy” and selecting an individual app before then turning app permissions on or off.
#8 – Control App Access to Your Account Info
This setting controls whether or not to allow apps to access your user information. Such information includes your name, photo, and “other account info.” (Thanks for the details, Microsoft!)

Toggling this setting to “Off” blocks access by any apps. Toggling it to “On” allows controlling access to such information on an app-by-app basis. Microsoft claims turning off Account Info access for an app may not allow it to work as intended.
When the option is set to “On,” you’ll see a listing of apps that might need Account Info access. You can turn that access on or off on an individual basis. I suggest contacting the developer of any app you might have questions about and querying them as to what type of Account Info the app uses.
#9 – Control App Access to Your Contacts
Guess what the Contacts toggle switch does?
No, it doesn’t have anything to do with that sticky paper your Mom used to line her kitchen shelves with. This switch decides whether Windows apps will have access to your Address Book.

If you toggle this one to “Off,” it blocks all apps from accessing your Contacts. Toggling it to “On” allows you to designate which apps get the golden ticket to access your Uncle Al’s phone number. (It’s a landline. Uncle Al rolls old-school.)
As with the Account Info toggle, if you turn this off completely, or on an app-by-app basis, it may cause some apps not to operate as intended. This is another subject you should contact the developer on for any app you might have questions about.
#10 – Control App Access to Your Calendars
This should be getting somewhat familiar by now. This switch controls app access to your Calendars. When it’s toggled to “Off,” it turns off all app access to your Calendar info.
When it’s turned on, then you get to decide which lucky Windows app gets to look through your upcoming dates. (And I use the term “dates” loosely. “Dinner with Uncle Al” is not a date.)
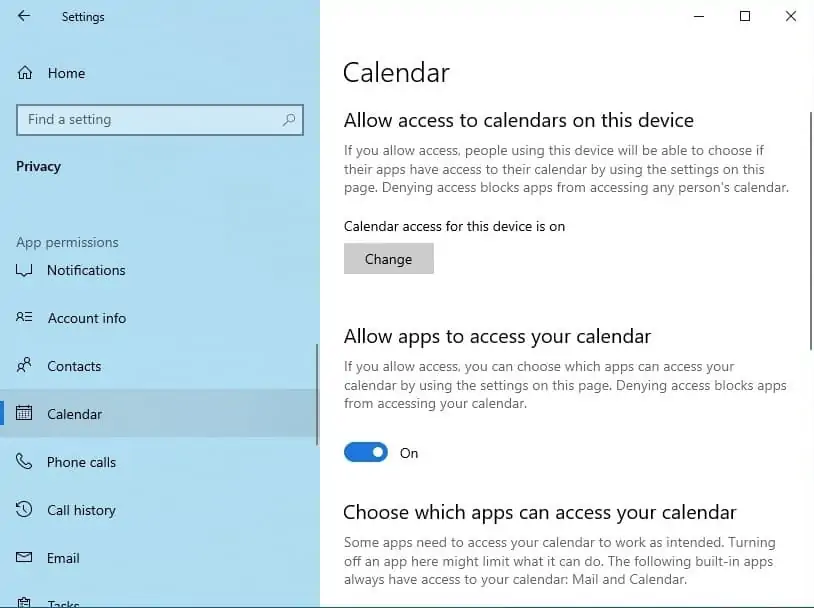
What you do in these settings depends on how you use your computer and the various apps that might need access to your Calendar information.
I myself did some experimenting with the settings until I found a level that offered a mixture of privacy and convenience that I could be comfortable with.
#11 – Control App Access to Your Call History
Windows Privacy settings also control an app’s access to your call history. If you turn this off, it disallows all apps from accessing any of your call history information. Turn this on, and you can set access to said info on an app-by-app basis.

Personally, I keep this turned off. I don’t make any calls via my Windows computer, or a Windows Phone, as I use an iPhone to make calls. However, your mileage may vary, and you may find you need to control this on a granular level.
#12 – Control App Access to Your Email
I don’t know about you, but access to my email, both personal and business-related, is a touchy subject for me. I barely trust any email provider not to monitor my inbox, let alone other apps.
My email is my lifeline to the outside world. Virtually all of my communications with business associates, as well as friends and family, usually pass through my inbox. I am very protective of the years of information that bit of storage holds. (I’m reasonably sure I still have the first email I ever received in my first Gmail account years ago.)

I turn this one completely off – but if you have a specialized app that actually needs access to your email, then you might want to do things on an app-by-app basis.
#13 – Control App Access to Your Tasks
Tasks can be another sensitive subject for me. My daily tasks list is the bible I build my day-to-day work life on, and I’m touchy about anyone gaining access to this information. (Heck, if I didn’t have to, I wouldn’t even share the info with my boss, but…)

As we’ve seen with similar groups of settings, turning this switch to “Off” shuts every app out of your tasks information. Leave it on, and it’s your responsibility to look through the app list and decide which apps really need access to the list.
It should be noted that the built-in Mail and Calendar apps will always have access to your tasks, no matter what settings you decide on, which makes sense.
#14 – Control App Access to Your Text Messages
I don’t do much messaging via Windows. Most of my messaging is performed through my Mac and iOS devices. However, I do use Skype on my Windows PC, so this setting matters a bit in my case.
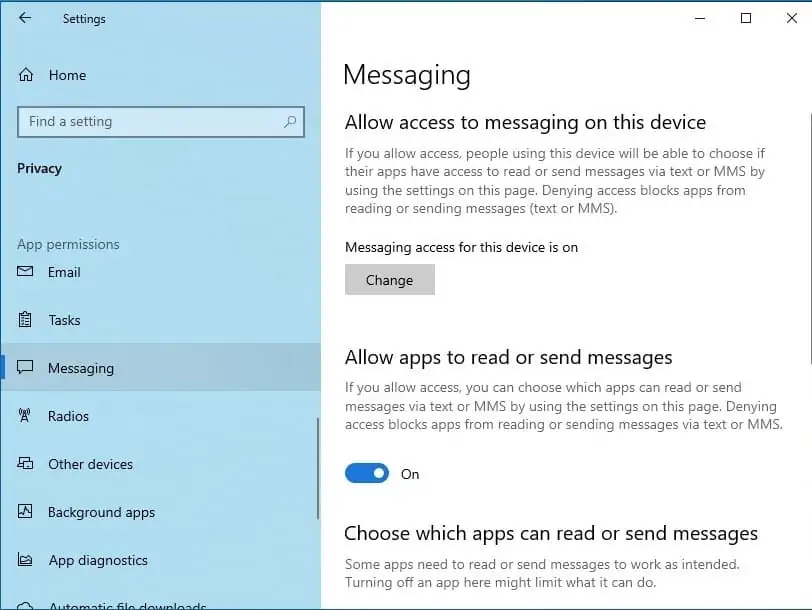
On this screen, you can either go all the way, turning off messaging access for all apps, or leave general access turned on, and decide on an app level as to which apps really need access to your text messages.
#15 – Control App Access to Your Computer’s “Radios”
When I say control access to your computer’s radios, I don’t mean the one it uses to listen to Cubs games during baseball season. The radios we’re looking at are the Bluetooth and WiFi transmitters your Windows computer uses to connect to local networks, accessories, and other devices, such as beacons.

Allowing access to your computer’s radio capabilities has some fairly significant privacy implications. By enabling access, you could leave yourself open to tracking via your WiFi and Bluetooth signals.
Access to radios is also used to share information, like files, messages, and other centrally located info, so turning off app access may be ill-advised. However, unless you’re aware of a particular app you use that requires this access, I’d be inclined to advise you to turn it off.
#16 – Control App Access to Your Computer’s “Other Devices”
This part of the Privacy dashboard allows you to pick and choose how apps share and sync information with those devices that do not already specifically pair with your computer. As usual, you can turn it off completely, or leave it on and pick and choose which apps are allowed to share info with those “other devices.”

You’ll want to be careful which apps you allow to sync with other trusted devices; this could represent a bit of a security hole if the apps are playing fast and loose with your personal data.
If you’re in doubt, contact the developer of the app. Any reputable developer should be more than happy to explain what the app might share.
#17 – Control Diagnostics & Feedback
This is where you control how much diagnostics and usage data Windows will phone home to Microsoft.
The Redmond firm doesn’t allow users to turn it completely off, so the best you can do here is click the “Required diagnostic data” radio button to send the minimal amount of data possible back to the mothership.

Toggle off the “Tailored experiences” switch. There’s no reason to be sending that info.
The final option in this section is how often to allow Windows to ask you for feedback. While some people are generous with their time, others just don’t want to be bothered.
You can set this for “Never” (my favorite) or allow it to ask you for feedback anywhere from once a week to “Automatically.” If you’re a sharing kind of person, go ahead and let them ask for feedback to their heart’s content. As for me, I prefer to keep it to myself.
#18 – Control Background Apps
This section allows you to decide what apps, if any, will be allowed to run in the background, quietly sending and receiving information, offering notifications and updating themselves, even when they’re not being actively used.
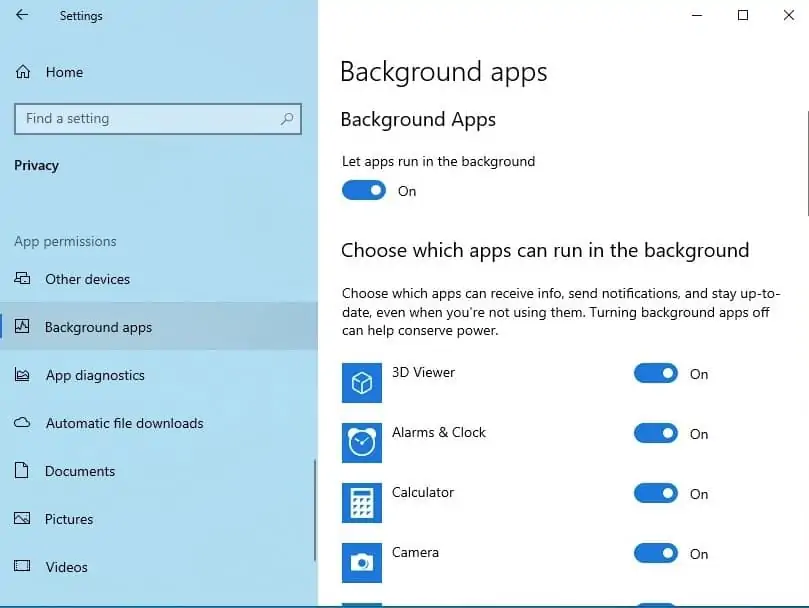
You can turn off background apps completely or select one-by-one which apps will be allowed to sit in the background, sending info and eating up precious processor cycles and battery life when you’re out and about.
I don’t know how you feel about things, but I don’t think Candy Crush needs to be running in the background. Pick and choose wisely, my friends.
#19 – Control App Diagnostics
In this final section of the Privacy dashboard, the user is required to decide whether or not to allow apps to access diagnostic data about other apps. Microsoft says some apps use diagnostic data from other apps to run as intended.

Information that could be accessed includes the user account that launched an app, as well as the app’s memory, CPU, disk and network usage (we are already “sharing” too much info…).
While I know sharing is caring, I say turn this one off. If you find an app that previously had access to this information isn’t operating as it should, then turn it back on for that single app. Otherwise, avoid this one like the plague. (I particularly don’t like the whole “who launched the app” bit of info it collects.)
#20 – Automatic File Downloads
“Automatic File Downloads” is a new addition to the general Privacy settings in the Windows 10 Fall Creators Update.
This section allows you to unblock apps from automatically downloading online-only files from OneDrive and other online cloud storage services. If you use online storage to keep your hard drive from filling up, you’ll likely want to allow apps to have access to cloud-only files on a case-by-case basis.

#21 – Manage Privacy Settings in the Edge Browser
Microsoft Edge is the default browser in Windows 10. It replaces the venerable but long-overdue-for-retirement Internet Explorer as Microsoft’s browser of choice.
Microsoft says Edge is clean, lightweight, and fast. But nowhere do they mention that it is more secure.
In this section, we’ll take a look at the Edge browser and which settings require a closer look in order to protect your privacy. I’ll guide you through the settings and discuss what they control, and how they should be adjusted to offer complete privacy.
To access Edge’s privacy section, run the browser and then click the three dots (“…”) found in the upper right-hand corner of the browser. In the menu that opens, scroll down until you find the “Settings” option. Click that.

Clear Browsing Data
While you’re in the Settings menu, in the left-hand pane, scroll down until you see “Privacy, search, and services.” Click it. In the right-hand pane, you’ll see “Clear browsing data.” On the “Clear browsing data now” line, click the “Choose what to clear” button.

In the “Choose what to clear” menu, you’ll see advanced options for what you can delete from the Edge browsing data. Default things to clear include: browsing history, cookies and other site data, cached images and files, tabs that have been set aside or recently closed, download history, autofill form data, passwords, media licenses, and site permissions. Also available are location data permissions, as well as webcam and microphone permissions.

Select the browsing data you’d like to clear and then click the “Clear now” button.
You can also click the “Choose what to clear every time you close the browser” option, and then Microsoft Edge will automatically clear the selected information each time the browser is closed. This is a great idea for the privacy-inclined – yet forgetful – users among us.
What you select to clear here is mostly a choice between convenience and privacy.
I, personally, always click the following to clear it: browsing history, cookies and save website data, cached data and files, download history, form data, and passwords. This makes it a bit tougher for hackers, government agents and other bad guys to track my browsing habits via the Edge browser.
Block Pop-Ups
In the Settings menu, look for “Cookies and site permissions” on the left-hand pane. Under “All permissions,” click on “Pop-ups and redirects.” On the next menu, click “Block” to toggle the pop-up protection.
“Block pop-ups” should always be left on. Pop-ups are a security hazard – and if nothing else, they’re incredibly aggravating to the user.

Proxy Setup
I’ve discussed proxies in other articles on this website. Basically, a proxy is a second party that takes web-related requests from you and passes them onto the target website. It then returns the requested content back to your computer, without ever revealing your actual IP address.
While proxy servers can be a valuable privacy tool, I’ve always recommended using a Virtual Private Network (VPN) server if possible, as it also encrypts your data in addition to acting as a middleman. If you don’t have access to a VPN, a proxy server is a decent alternative. Be sure to make use of this feature.
Offer to Save Passwords
Under “Settings/Profiles,” click “Passwords.” On the next screen, toggle “Offer to save passwords” to off.
I keep this one turned to the “Off” position. I have never been a fan of keeping passwords stored in a browser. I prefer using a password-manager app. They are much more secure, as most password managers encrypt the stored information.

Save Form Entries
Again, I keep this turned off, as stored-form entries can consist of your personal info. This includes your name, address, phone number, or even sensitive information such as banking info.
Stored information like this is used with the autofill feature for online forms. I don’t use that feature either. Who knows what other information is being requested by hidden fields on a web form?
In settings, click on “Profiles” in the left-hand column, then click on “Personal info” in the right-hand pane.
On the next screen, make sure “Save and fill basic info” and “Save and fill custom info” are both toggled to “Off.”

Send Do Not Track Requests
I keep this one turned on. This allows your browser to tell websites you don’t want your browser activity on their sites to be monitored. Sure, websites aren’t required to honor this request, but more and more of them are complying with such requests.
In settings, click on “Privacy, search, and services”” in the left-hand column, then click on “Privacy” in the right-hand pane.
On the next screen, make sure “Send ‘Do Not Track’ requests” is toggled to “On.”

Search in the Address Bar with…
Bing is Microsoft’s default search engine, and when you enter a URL for a search term in the address bar, it is sent to the Bing servers.
If you don’t want to send your search and other info to Microsoft for tracking, use DuckDuckGo or another search engine that doesn’t store their users’ search info.
In settings, click on “Privacy, search, and services” in the left-hand column, then go all the way to the bottom of the right-hand-pane, then click on “Address bar and search.” On the next screen, click the pulldown menu next to “Search engine used in the address bar” to select the search engine to be used in the address bar
I always use DuckDuckGo, but it’s up to the individual how much privacy they want to give up for the sake of added convenience.

Show Search and Site Suggestions
If this is set to “On,” everything you enter is sent to the Microsoft servers for analyzing in order to return suggestions. More fodder for the Microsoft marketing engine. Therefore, switch it off.
In Settings, click on “Privacy, search, and services” in the left-hand pane. In the right-hand pane, scroll down to the bottom, where you’ll see “Address bar and search.” Click on that. On the next page, turn off the toggle switch for “Show me search and site suggestions using my typed characters.”

Cookies
Here, you can decide whether to block all cookies, block only third-party cookies, or not block any cookies. Cookies can be useful while browsing, as they save your login session and preferences for websites. However, they can also be used to track your travels around the web for advertising purposes and such.
It’s your call on this one. I usually set it to “Block third-party cookies,” as that allows websites to still save session cookies, but doesn’t allow advertisers to track me around the web.
You can make multiple choices about how to control cookies in your Edge browser. To do so, in Settings, click on “Cookies and site permissions” in the left-hand pane, then click on “Manage and delete cookies and site data” in the right-hand pane. On the next screen, you’ll find multiple options for controlling cookies, as seen below.

Help Protect Me From Malicious Sites and Downloads with Windows Defender SmartScreen
If this is enabled, it helps detect phishing and other malicious types of websites, helping to protect you against the bad guys getting your personal information and downloading or installing malware.
As the feature sends your browsing data back to Microsoft for analysis, this is one of those times when you have to decide whether or not to allow a bit less privacy in the favor of protecting your personal data and protecting your computer from malware.
In Settings, click on “Privacy, search, and services” in the left-hand pane. Then, in the right-hand pane, scroll down until you see the “Security” section. Look for “Microsoft Defender SmartScreen.”
I err on the side of protection, and I keep this turned on. You should too.

Action Steps
We’ve covered quite a bit in a short time, but by following a few simple rules, you can lock your Windows 10 installation down to offer excellent protection for your privacy, while still making the most of the operating system.
1. Never Use the Express Settings Option When Installing or Upgrading to Windows 10
That also goes for setting up any new computer you might purchase that runs 10. Express Settings is just another way to ask, “is it okay if we plunder your personal information for profit?”
2. Lock Down Cortana
If you’re comfortable enough making changes to the Windows Registry, I suggest turning off Cortana completely and going back to the old-school “Find” level of Windows search.
3. Control What Cortana Has Access To
The more things you let her “help” with, the more information that gets sent back to Microsoft.
4. Turn Off Ad Tracking
Never allow Microsoft or anyone else to track your activities on the web.
5. Disable Location Tracking – Especially on a Laptop
While some mobile devices require location-tracking for Maps and navigation apps, there really is no reason for Windows on a laptop to need this.
6. Control Camera and Microphone Access
This is an especially sensitive subject for computers used by kids. If you have to, put a piece of tape over the camera and mic. Sometimes the simplest solutions are the best.
7. Control What Information Windows Apps Can Access
If left to its own devices, Windows will let installed apps decide for themselves if they need access to your account, contact, emails, tasks, and other personal info. Don’t let them have it.
8. Lock Down the General Privacy Settings in the Microsoft Edge Browser
Just like Cortana, Edge will monitor your actions for all that it’s worth if it isn’t made to do otherwise.
Well, as you can see, there are a lot of settings you need to keep track of if you want to reclaim your privacy on Windows 10. Luckily, if you’re willing to invest the time, your work will pay dividends when your privacy is on the line.
Windows 10 Privacy Settings FAQs
Is Windows 10 Privacy Really That Bad?
Windows 10 continues to have privacy issues. It collects and sends information about your usage, as well as some personal information, back to Microsoft’s servers. While you can prevent some of this by following the steps I’ve outlined in this article, you’ll never be able to lock it down completely.
Does Windows 10 Have Built In Spyware?
It depends on what your definition of spyware is. Windows 10 does send information about your usage, as well as a limited bit of personal information, back to Microsoft. This can include the website addresses and search terms you enter in the Microsoft Edge address bar, information about the images on your hard drive, and more.
However, Microsoft claims this information is collected on an anonymous basis and that none of the information is connected directly to a user.
Does Microsoft Edge Spy On You?
Microsoft Edge does track your browsing and search history. However, Microsoft does not track your browsing history or search history when you use Chrome or Firefox. (Of course with Chrome, Google is tracking you, which opens another wealth of privacy issues.)
You can lock down some of this tracking in the privacy settings for Windows and the Microsoft Edge browser.
Why Is Windows 10 Reverting My Privacy Settings?
Windows 10 can revert some of your privacy settings following an update to the operating system. This can happen when a Windows 10 update from Microsoft sees a particular setting that has been changed by a third-party program, or if it needs to change a setting to allow the update. While you can manually change the privacy settings again, it is frustrating.
Is It Okay to Use Microsoft's Personal Assistant Cortana?
Only if you don't mind Microsoft keeping track of everything you ask Cortana. Cortana greatly invades your privacy. If you insist on using Cortana, make sure the assistant does not have access to your contacts, your location, your communication history, and your internet history. Also, turn off ad tracking, camera access, and microphone access. You can control all of this in Windows 10 Privacy settings.
Contents [hide]
- #1 – Don’t Use the Express Settings When Installing Windows 10
- #2 – Restrain Cortana
- #3 – Turn Off Ad Tracking
- #4 – Disable Location Tracking
- #5 – Control Camera Access
- #6 – Control Microphone Access
- #7 – Speech, Inking, & Typing
- #8 – Control App Access to Your Account Info
- #9 – Control App Access to Your Contacts
- #10 – Control App Access to Your Calendars
- #11 – Control App Access to Your Call History
- #12 – Control App Access to Your Email
- #13 – Control App Access to Your Tasks
- #14 – Control App Access to Your Text Messages
- #15 – Control App Access to Your Computer’s “Radios”
- #16 – Control App Access to Your Computer’s “Other Devices”
- #17 – Control Diagnostics & Feedback
- #18 – Control Background Apps
- #19 – Control App Diagnostics
- #20 – Automatic File Downloads
- #21 – Manage Privacy Settings in the Edge Browser
- Action Steps
- Windows 10 Privacy Settings FAQs
- Is Windows 10 Privacy Really That Bad?
- Does Windows 10 Have Built In Spyware?
- Does Microsoft Edge Spy On You?
- Why Is Windows 10 Reverting My Privacy Settings?
- Is It Okay to Use Microsoft's Personal Assistant Cortana?